Nunavik-IcE WordPress Training
Welcome!
Welcome to the Nunavik-IcE online training! This introductory course was designed for anyone who has content to share on the site, such as teachers, pedagogical consultants and curriculum developers.
At the end of this training, you will be able, in collaboration with your team of colleagues, to go through all the steps that lead to the publication of resource posts on Nunavik-IcE.
The Post Publication Process
This course is structured around the Nunavik-IcE Post Publication Process, a foundational tool that was created to allow teams to work together smoothly by following a uniform protocol. Each of the 5 module of the course corresponds to one of the steps of the process.
The Nunavik-IcE Post Publication Process document was created in a poster format. We suggest you print a copy and keep it near your workspace so that you can follow the steps that lead to the publication of your resource.
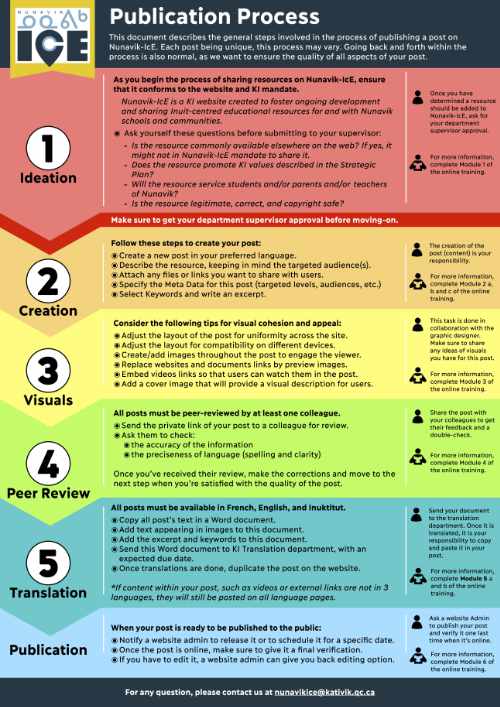
Table of Contents
This online training was designed in a linear fashion. We suggest following the modules’ order. However, if you have already completed this training, you can use the links below to access specific sections that you would like to revisit.
1: Ideation
Module 1 is all about the ideation and vetting process that leads to the sharing of your resource online, on Nunavik-IcE.
Module 1 includes:
2: Post, Files, Metadata
Module 2 is the core of this online training. You will learn how to create a post, how to share files through that post and how to add key information to this post.
Module 2 includes:
3: Visuals
Module 3 is about visual enhancement. You will learn about page layout, copyrights, the format of visual content, etc.
Module 3 includes:
4: Peer Review
Module 4 is very short. It provides guidelines for the peer review process your post has to go through before sending it to translation.
Module 4 includes:
5: Translation
Module 5 explains how to manage the translation of your post, including how to send your document to KI translation and to implement the language versions once ready.
Module 5 includes:
Course Structure
Before you go further, we would like to share some information with you about this online training.
Structure

Each module is built around the questions What, Why and How. The What section provides knowledge about the tools you are using. The Why explains the importance of the suggested procedures. The How is the technical part, where you will learn how to work on the site.
Progress
This online training was designed in a linear fashion. The first time you complete the training, we suggest following the modules’ order. If you use this page as a resource to revisit a concept, you can use the table of contents to jump directly to the module of your choice.
Interactions

To make this online training more engaging, we have added a few activities and questions throughout the modules. Some will give you feedback on your answers. However, the best way to learn is practice. We suggest you take some time to experiment with real resources.
The Nunavik-IcE website is built on one of the most popular web platforms: WordPress. We chose this tool for many reasons, including:
- it’s easy to use and does not require any web development or coding skills for the publication of new content;
- it’s well known, so many people and companies are used to working with it;
- it’s there to stay and easy to update, so we will not have to change tool in the future;
- it’s easy to find resources and tutorials to learn WordPress on YouTube and other sites.
Glossary
You don’t have to become an expert of WordPress in order to share resources on Nunavik-IcE, but a bit of background knowledge and vocabulary will greatly help you. This is why we created this glossary. From now on, every time you see an underlined word in this online training, you can find it in the glossary.
It provides explanations about technical vocabulary, gives you a bit more background on WordPress (see, it’s underlined!) and even has room for you to take notes.
Glossary under development. Draft available:
Nunavik-IcE is a Kativik Ilisarniliriniq (KI) website created to foster ongoing development and sharing of Inuit-centred educational resources for and with Nunavik schools and communities. Therefore, the resources shared on Nunavik-IcE must both be in line with this vision and meet the KI standards.
At the end of this module, you will be able to:
- assess whether or not an educational resource should be published on Nunavik-IcE.
1.1 Resource selection
We use the word resource to designate any tool that supports education in Nunavik whether it’s addressed to students directly, to their parents or to teachers. Therefore, a resource can be anything from a reading book on colours to approaches for supporting the learning of math. Although we share a broad range of resources on Nunavik-IcE, they must all represent the site’s vision, which you will learn more about in this section.
1.1.1 Why select resources carefully?
After the release of Nunavik-IcE, in December 2019, contributors quickly began sharing resources on the website. In fact, we went from 0 to 500 within three months! The question of what to share, or not, on Nunavik-IcE became critical for many reasons.
- Preserving the Inuit-centred education mandate of Nunavik-IcE
Nunavik-IcE is a site to share resources with teachers, parents and students of Nunavik. It also has the mandate to support and strengthen Inuit culture and knowledge of the past, present and future. In order to do so, we focus on resources that are either a) developed by or with Inuit b) developed for or adapted to Nunavik c) particularly relevant for Inuit education.
- Putting our efforts where it matters the most
The web is full of educational resources. It is sometimes tempting to introduce these existing resources on Nunavik-IcE, such as sharing a website or a YouTube video. However, sometimes too much is like not enough. Our goal is not to bring the whole web into Nunavik-IcE. That’s why we encourage you to choose resources sparingly, prioritizing what is the most relevant to make available to Nunavimmiut.
- Keeping high standards
Nunavik-IcE is a public platform attached to Kativik Ilisarniliriniq. That means it represents, to the public, what type of educational resources the school board provides to Nunavimmiut. Therefore, we must be careful in keeping high standards in terms of language quality (in all three languages), copyright respect, visual presentation and accuracy of information. This is also why we introduced a peer review process, discussed in module 4.
1.1.2 What to select?
Selecting resources to share on Nunavik-IcE requires case by case attention. The best way to get a sense of what is relevant to add on Nunavik-IcE is an exploration of the existing resources on the site. Each published post has been created as a result of a critical thinking process involving the three questions above. Therefore, they provide the most accurate portrait of Nunavik-IcE vision in terms of what to publish or not.
1.1.3 How to select?
To help you in the selection of resources that should be shared on Nunavik-IcE, two tools are currently available.
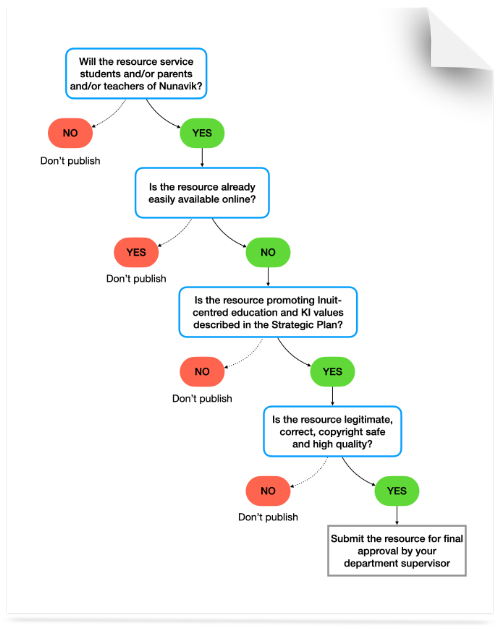
The selection process
This diagram shows a series of questions that have to be answered before selecting a resources to share on Nunavik-IcE. Each one either leads to the decision not to publish, or to the next question in line.
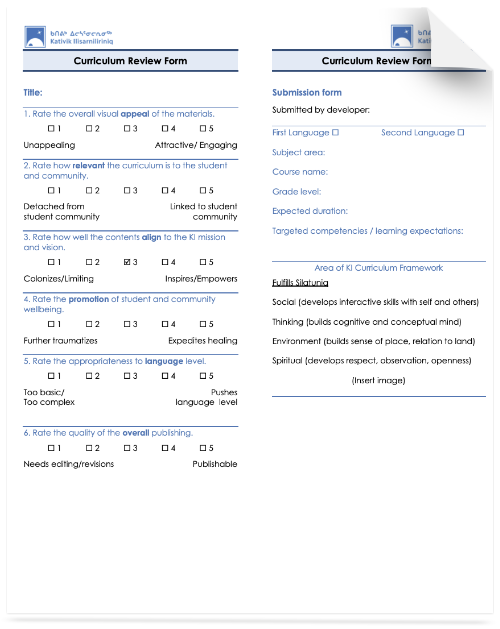
The curriculum review form
This rubric was developed by Kativik Ilisarniliriniq to review its printed curriculum materials. However, it can be a good reference when it comes to assessing online resources as well.
1.1.4 Practice
For each of these resources, select whether or not you think they should be shared on Nunavik-IcE.
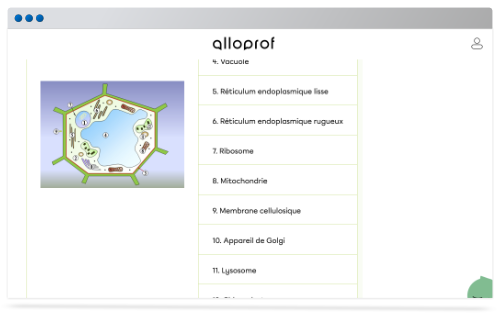
This resource is an AlloProf article on the animal cell.
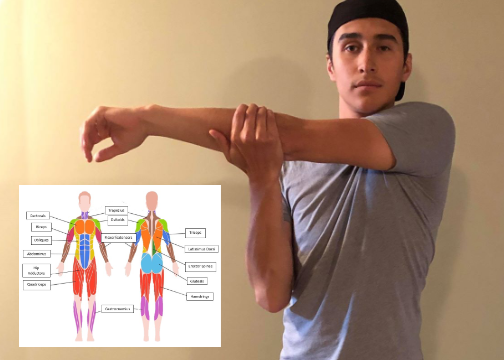
This resource is a stretching protocol to do before physical activity, shared by a teacher in Kuujjuaq.
This resource is a series of poems in Inuktitut written by Nunavik students.
This resource is the PDF of a book published by Inhabit Media.
Conclusion
Congratulations, you have completed module 1 of the Nunavik-IcE online training. You are now equipped with tools and questions that will guide the selection of resources to share on the website.
We gave this process a lot of importance and made it the first step of the Post Publication Process in order to make sure you don’t invest time in a resource that will eventually not be published.
Finally, once you have determined a resource should be published on Nunavik-IcE, make sure to get the approval of your department supervisor.
Before you go further, it’s time to login to the Nunavik-IcE backend!
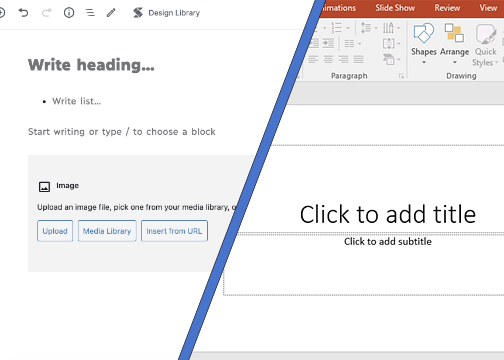
In order to create and manage content on Nunavik-IcE, you will have to login to the WordPress backend. The backend is for contributors, like you, to create and manage content. On the opposite, the frontend is for users to navigate on the website.
In a way, it is similar to working in Powerpoint. The backend is where you would create your slides with the available tools, while the frontend is the presentation mode where you can only see the result.
We have created a username and a password for you, and set your role to contributor.
If you have your username and password, click here to login to the backend! Otherwise, send an email to nunavik.ice@kativik.qc.ca.
Login Procedure
- In a web browser, go to nunavik-ice.com/wp-login.php. It might be a good idea to keep this URL in your bookmarks/favourites if you plan on working on the site often.
- Enter your username, which was sent to you by email.
- Enter your password, which is the same as your username and was sent to you by email.
- Click on Log in. Your web browser might ask if you want to save these informations. You can safely say yes.
- You are now in the WordPress backend!
Support
If you had any difficulty logging in, or if you don’t have your username or password, please ask a website administrator to help you by sending an email to nunavik.ice@kativik.qc.ca.
Orientation
This video is a short guided tour of the WordPress backend.
*Please note that the backend may look slightly different for you and other contributors.
Each resource on Nunavik-IcE is introduced in the form of a post. This term is used because WordPress was initially used to create blogs. In the case of Nunavik-IcE, we are simply creating resource posts instead of blog posts. Up to a certain point, Nunavik-IcE is only a way to show and search through posts. If you access the homepage, you will see posts that we selected for different audiences and organized by categories. If you search, you will see results which are posts that fit your search filters…
At the end of module 2a, you will be able to:
- access the post section in Nunavik-IcE backend;
- create a new post or edit an existing one;
- use the blocks editor to build your content;
- and save your work as a draft.
2a.1 Creating a Post
The process of creating posts to introduce resources on Nunavik-IcE is the core of this online training. Throughout modules 2a, b and c, you will create your first post in the backend of the site.
In order to practice the notions introduced in modules 2a, b and c, we suggest you choose an existing resource you would like to share, such as a lesson plan or an information document. You will use this resource throughout the module.
2a.1.1 What is a post?
One way to understand the concept of a post is to compare Nunavik-IcE to an online store.
When you shop online, the site shows some products, sometimes placing the newest items, or the items on sale on top, allowing you to search for the products you want with keywords and categories… this is exactly the same for Nunavik-IcE, but instead of products, we offer posts on educational resources.
2a.1.2 Why create a post for each resource?
The reason why we are creating a new post for each resource is to allow our users to find what they are looking for more precisely and to allow us more flexibility in the content we show.
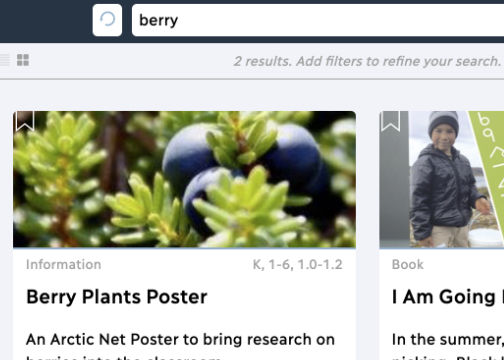
For example, if all the books available on Nunavik-IcE were in one big library post, users could not search for books by level, by theme or by the title. They could only browse through all books at all time. Simultaneously, we couldn’t feature books on berries in the fall, books on ice fishing at the end of the winter and so on.
This is why we designed Nunavik-IcE to be 1 resource = 1 post.
That means if you have 3 books on colours to share on Nunavik-IcE, you will create 3 posts, one for each book. Click here to see an example.
2a.1.3 How to create a new post?
You will now learn the procedure to create a new post. This is probably the most common operation being done on Nunavik-IcE by contributors. Take time to go through the procedure and to experiment it with your own resource identified earlier.
Creating a new post
- Login to the backend like you learned earlier.
- Select Posts in the WordPress toolbar (left hand side menu).
- On top of the list of posts, create a new one by clicking on Add New.
- You are now in a new blank post.
You must now set this post’s language. That means specifying which language you are going to use to create the original version of the post. By setting the Post language, you allow Nunavik-IcE to show your post to the right users based on their preferred language and enable all the functions related to language versions, which you will learn about in module 5.
Setting the post language
- The first thing to do is to set the language you will be working in for that specific post. That means telling Nunavik-IcE whether this post is in Inuktitut, English or French. In order to do so, scroll down in the post menu (on the right hand side) until you find the languages section.
- The language is set to English by default. If you are working in Inuktitut or French, click on the word English and select the language you want to work in instead.
- Once the page has reloaded, go back to the language section of the post menu to verify you post is now in the desired language. If it’s not, repeat step 2, as the site sometimes has a hard time understanding this command the first times!
After you tried, come back here to choose a title for your post.
2a.2 Titles
Before you create any content in your new post, you must enter a title. This will allow the site to generate a URL towards your post (nunavik-ice.com/en/your-title) and will then allow you to save your post as a draft as you work.
2a.2.1 What is the title for?
Think about the last time you chose a book to read. You probably looked at the cover image and title first. Maybe you then read the summary.
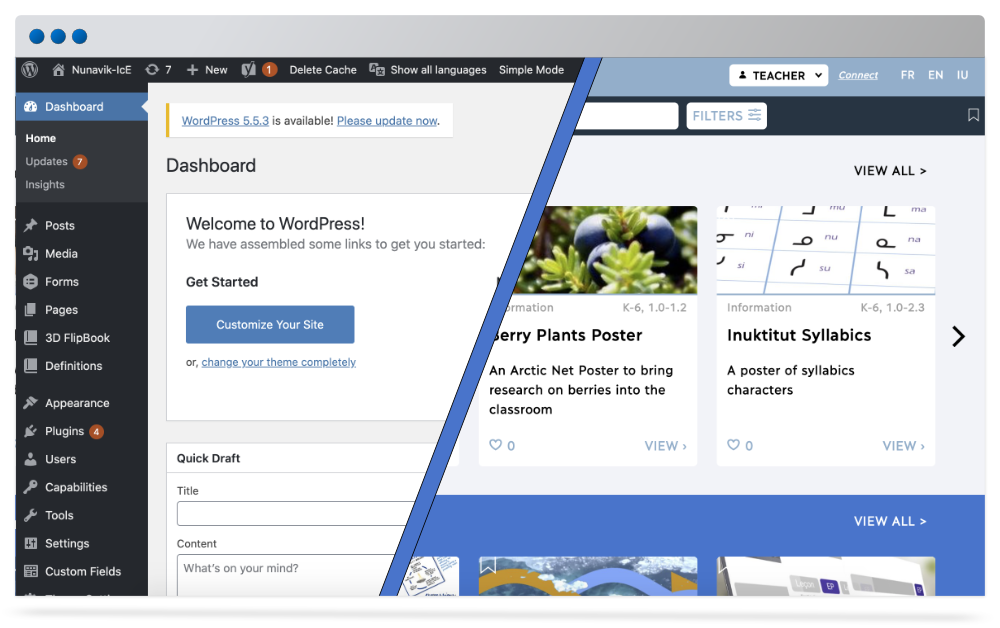
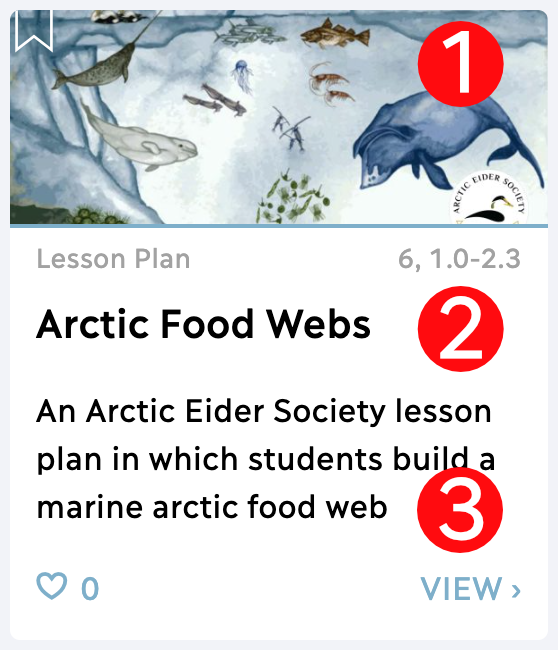
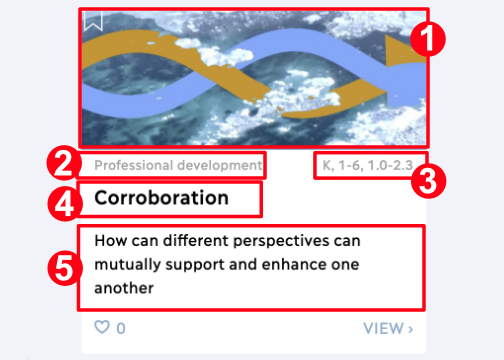
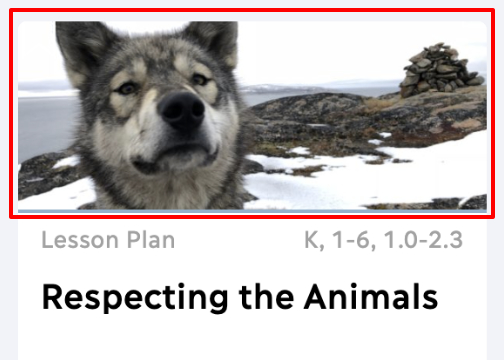
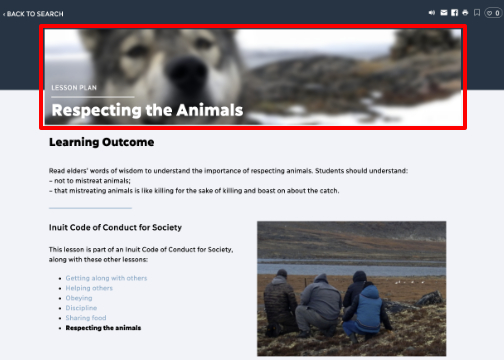
Nunavik-IcE offers users the exact same information to choose the posts they want to open. On this post on Arctic Food Webs, as a user would see it in the search results, you can see 1) a cover image, 2) a title and 3) a summary (called excerpt). Once the user clicks on VIEW, the cover image and the title form the banner on top of the post, as you can see here.
In this module, you will learn to write a good title. Cover image and excerpt will be addressed in further modules.
2a.2.2 Why is it important to write a good title?
We know that people don’t spend a lot of time reading on the Web. In fact, the average time a user spends on a site before deciding whether they stay or leave is between 7 and 18 seconds. That means we have to catch their attention during that time, so that they choose a post to explore and decide to stay for a little longer on Nunavik-IcE.
Therefore, titles should be short (3-5 words) and descriptive.
2a.2.3 How to write a good title?
First, think about the teachers, parents and students that form the audience of Nunavik-IcE. What are they likely to be looking for? This is what you should prioritize in your title.
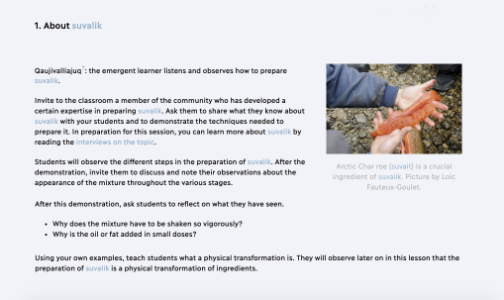
- Teachers are likely to look for curriculum related concepts. Titles like Heterogenous Mixtures and Suvalik, Caribou Anatomy or Coriolis Effect are ideal to describe simply what the posts are about.
- Parents are likely to look for activities to do with their children. Titles like Reading at Home or Printmaking with Recycled Materials might appeal to them.
- Students are more likely to look for entertaining posts. Titles like Shapes Scavenger Hunt or Mental Math Games might catch their attention.
Second, keep in mind these few good practices… and practices to avoid.
Good practices
- Use language that is adapted to your audience.
- Make sure to respect titles‘ language conventions. In English, all letters of a title except for articles take a capital letter (learn more). In French, only the first letter of a title takes a capital letter (learn more). In Inuktitut, capital letters are not used.
- Prioritize concept words that describe what the post is about.
Practices to avoid
- Avoid puns or play on words. They will unlikely come across as well in the two other languages and might not resonate with all users
- Avoid catchy but not descriptive titles. Users will not click to see what a post is about if they don’t know right from the first sight.
- Avoid using very common words, such as learning, reading, Kativik Ilisarniliriniq, lesson in your title. They take space and are not specific enough.
Third, write your title in the title block, at the top of your blank post and click on Save Draft in the upper right corner.
2a.3 Blocks Editor
You are now ready to start creating the content of your post! The good news is that WordPress has developed a tool that makes it easy to place the different components of your post‘s content: the blocks editor.
2a.3.1 What is the blocks editor?
The blocks editor works a little bit like PowerPoint in the sense that before you write text or insert an image, you have to create the corresponding zone (which are called blocks in WordPress). You can then edit and move these blocks around.
There are many different of blocks available. Some are simple, some require coding. Some have been custom designed for Nunavik-IcE and some don’t even work with this site. Before you start building your post with the blocks editor, take some time to learn about the basic blocks that constitute 95% of what we use on Nunavik-IcE. Don’t forget to refer to the glossary for more details and to take notes.
The most common blocks are:
Note: because WordPress is often updated, the symbols in this online training might be slightly different in appearance than the ones in your backend.
The paragraph block allows you to write text. The text in a paragraph is automatically formatted to fit the rest of the site, so you shouldn’t change the font, size or colour. This text you just read is in a paragraph block.
Headers are subtitles. From header level H1 (reserved for the main title of the page) to subtitle level H5, they give hierarchy to your post. It is important to keep this hierarchy logical, rather than using headers for style.
The list block allows you to create a bullet list or a numbered list.
Image blocks allow you to place an image. You can use this block as a placeholder for now, but please wait until module 3 before uploading new images, as there are guidelines to follow.
The file block allows you to upload any type of document in your post. Please complete module 2b before uploading documents, as there are guidelines to follow.
The quote block allows you to cite. It has special formatting and a reserved space for the reference.
This is a layout block. It creates 2 equal width columns in your post. Inside each column, you can then add more blocks. This is ideal to place text and image side by side.
This is a layout block. It creates 3 equal width columns in your post. Inside each column, you can then add more blocks. This is ideal to list different things, just like this description you are reading right now.
The audience block was custom developed for Nunavik-IcE. It allows you to create a section of the post that only either teachers, parents or students will see. Once you create this block and select the audience, you can add more blocks inside.
The spacer block allows you to leave empty vertical room between blocks.
The separator block allows you to place a little horizontal line in the post, ideal to separate different sections.
Buttons are a way to catch users‘ attention and to encourage them to click. They lead to a URL of your choice.
The YouTube block allows you to insert the URL of a YouTube video so that users can watch it directly in the post.
The form block allows you to insert a form in post, just like the ones in this training. Forms must previously be created with another tool of the site.
For your first few posts, we suggest only using the blocks introduced in this section. This way, you should avoid any complication with your post.
2a.3.2 Why do we work this way?
The web works fundamentally differently than apps like Word. The main reason is that a site, like Nunavik-IcE, never looks exactly the same based on the size of the screen you are using to see it. For example, in a Word document, you can say: my text is taking 3 lines in size 12. This is impossible online, because only 6-7 words fit on a line on a phone screen, while 30 can fit on a large monitor. The size also varies depending on your settings and the web browser you use.
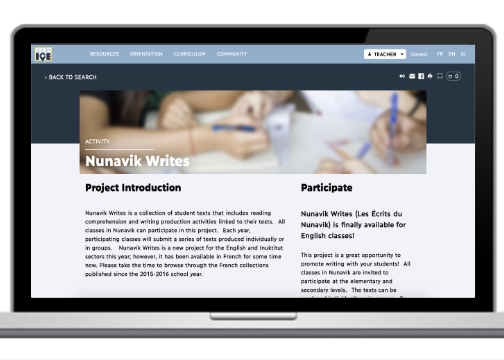
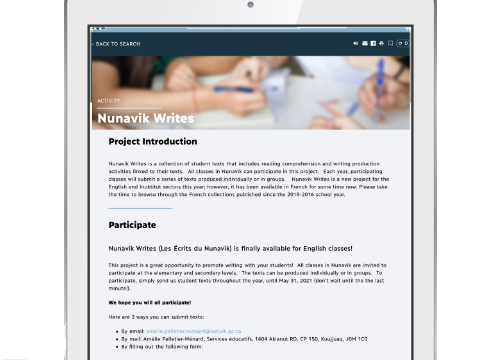
This is an example of the same post on three different devices that have different screen sizes.
Nunavik-IcE on a computer
Nunavik-IcE on iPad
Nunavik-IcE on mobile
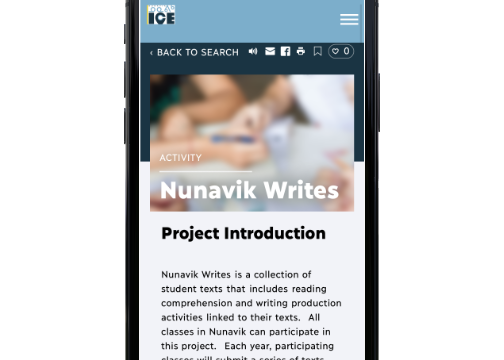
Blocks are programmed to behave differently based on users‘ screen size. In this example, you can see that the two-column layout on the computer became a one column layout on the iPad and mobile.
This happens automatically, so don’t spend too much trying to make your post look perfect, because it will dynamically change from user to user!
2a.3.3 How to work in the blocks editor?
One of the best ways to learn a new software, like the blocks editor, is to experiment with it. In this section, you will briefly learn about the main tools of the blocks editor, before we suggest two hands on activities.
Tools of the blocks editor include:
Note: because WordPress is often updated, the symbols in this online training might be slightly different in appearance than the ones in your backend.
Adding Blocks
There are a few ways to add a block to your post, all of which are identified by the + symbol. Click on the symbol and select the type of block you would like to add. It will be added under your cursor position.
Navigating Blocks
When you reach a certain number of blocks, it can become difficult to orient yourself. The block navigation allows you to see the hierarchy of blocks in the post. This is especially useful if you have blocks inside other blocks, like an image inside a column.
Moving blocks
Once blocks are created, you can easily move them around using the handles on the left. The arrows are for moving the block up and down, while the dots are for dragging the block where you want to place it.
More options
When you click in a block, a series of tools appear on top of it. By clicking on more options (the three dots), you you can access very useful tools such as duplicating the block (creating a copy) or deleting the block.
Blocks Options
When you click in a block, the full options of this block will appear in the block settings, a menu on the right hand side of the page. If you don’t see it, click on the cog symbol to make it appear.
Adding a link
You can create a link with any text or image. To do so, select the word(s) you want to convert into a link and click on the chain symbol. Paste the URL where you want this link to direct. Make sure to activate the Open in tab option.
Demonstration
This video demonstrates how to use the 6 tools of the blocks editor described above.
2a.3.4 Practice
Time to experiment with the blocks editor! Here are two activities we suggest in order for you to gain familiarity with this tool.
Activity A
The first activity we suggest is to create a post in which you will try all the common blocks introduced in this module, along with the tools.
- Login to the backend.
- Follow the steps you just learned to create a new post.
- Click on add block in the upper left corner.
- Select any common block.
- Repeat this action a few times, until you have most of the common blocks described in section 3.1 in your post.
- Write text in these blocks, to see how they format your content.
- Try to move them around using the handles, to delete one, to insert one between two existing ones, etc.
Activity B
The second exercice we suggest is to use the test resource identified earlier and to create a post to introduce it.
- Login to the backend.
- Follow the steps you just learned to create a new post.
- Write a title for your post, using this module’s guidelines.
- Click on add block in the upper left corner and select the paragraph block.
- Write a short description of what this resource is about.
- Click on add block in the upper left corner and select any block of your choice.
- Keep experimenting with the blocks editor until you are comfortable with this tool.
Once you have experimented with the blocks editor, come back here to complete the module.
Conclusion
Congratulations! You have created a post and developed content to introduce a resource you’d like to share with teachers, parents or students on Nunavik-IcE. The next two parts of this module will show you how to add files to your post and how to select information about this post (metadata).
Most of the resources that are shared on Nunavik-IcE are files such as Word documents, PDFs, videos, images, etc… There are currently thousands of files on the Nunavik-IcE website, and before you start adding yours, there are a few things you should know.
At the end of module 2b, you will be able to:
- name files appropriately to contribute to an organized media library;
- compress files to ensure faster access to Nunavimmiut;
- upload files to your post;
- link existing online files (such as websites and videos) to your post.
2b.1 Naming your Files
Naming your files might sound really basic, but its so, so, so important. Each month, over 1000 files are added to the Nunavik-IcE site by dozens of contributors. Without a proper naming system, it would be easy to loose control!
2b.1.1 What are files?
The Nunavik-IcE website has been created to share resources with teachers, parents and students. Most often, these resources take the form of files, which include:
- PDF documents
- Word, PowerPoint or Excel documents
- Videos from Youtube or other
- Books
- Audio files
- Images
- Websites
- and more
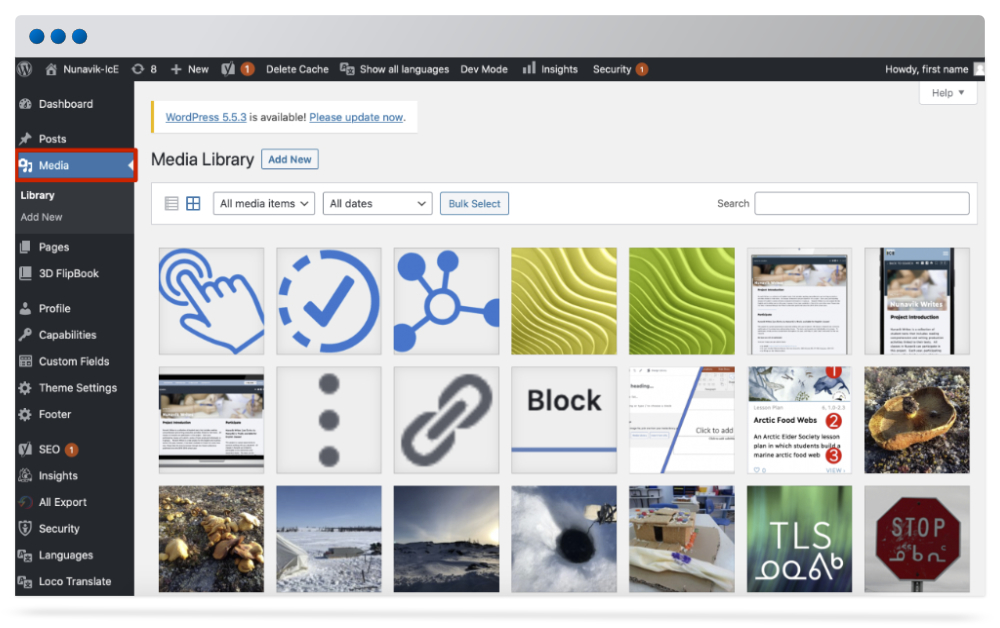
Files are stored in the WordPress media library. In the backend, this is the second tab you can see, under posts, in the WordPress toolbar on the left hand side. By default, the media library shows files from latest to oldest. You can also search through it using file names.
2b.1.2 Why is file naming important?
Do you sometimes loose control over the desktop of your computer because there are too many files? We probably all do. Now imagine that 30 or 50 different people add files to your computer desktop.
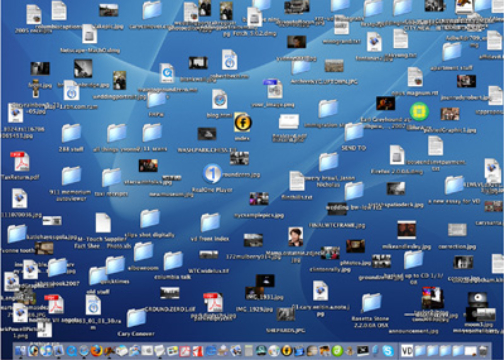
This is exactly what happens on a site like Nunavik-IcE. As this online training is being developed, there are 5234 files on the site, added by more than 30 different contributors. They were all added over the course of the last 5 months.
Now, what if you want to “replace page 9 of the book on Umiujaq because there was a typo” or “add the name of a body part on the Inuktitut diagram of the Arctic Char“? To do so, you will first have to find these files in the media library and then replace them.
This will only be possible if everyone cares for excellent file management.
2b.1.3 How to name files?
As much as possible, files on Nunavik-IcE are named according to the following structure.
PostTitle_FileName_Language.extension
PostTitle
A post often contains more than one file. Using the title allows you to identify all the files from a same post.
FileName
The file name should describe what it is. Is is a curriculum, a diagram, a procedure? What is it about?
Language
Since the website is trilingual, make sure to indicate the proper language code (FR, EN or IU*).
.extension
The extension is automatically created by your computer based on the type of file (.pdf, .docx, .jpg).
*IU is the official language code for Inuktitut. IN is actually reserved for Indonesia.
Please note:
- We use _ between words rather than spaces or other symbols ( – . [ ] / ). This is essential to avoid bugs on the site.
- We never use accents. This would cause bugs on the site.
- We use Capital letters at the beginning of each word (for ease of reading)
- The language codes are FR for French, EN for English and IU for Inuktitut. The international language code IN is for Indonesia, while IU is for Inuktitut. Switching them up confuses search engines like Google.
- We don’t use very generic words (like Kativik, or KI) because if all files include it, it’s not helpful to find the right file.
- We avoid admin words (like Final, V2, Revised) because they don’t help us finding the right files. When a new version of a file is created, it should simply replace the previous one on the site.
Here are a few more examples. Just by reading their titles, you know what these files are about, in which post they belong, in what language they are and their type.
- CaribouAnatomy_BonesDiagram_IU.jpg
- SocialStudies_PrimaryCurriculum_EN.pdf
- IglooBuilding_TypesSnow_IU.pptx
- Berries_InfoPoster_EN.jpg
- IAmGoingFishing_BookCover_IU.jpg
- EnglishLanguage_StudentExemplar1_EN.pdf
2b.1.4 Practice
Let’s give it a try. For each of the following files, use the description to rename them appropriately following the structure you just learned.
When you submit your answer, you will be shown 2 good examples, and 2 examples that don’t match the structure. Your answer might vary from these two good examples, but they will help you self-assess.
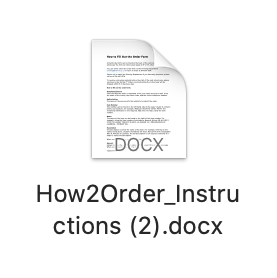
This Word document explains, in English, how to place an order with Kativik Ilisarniliriniq’s printing department.
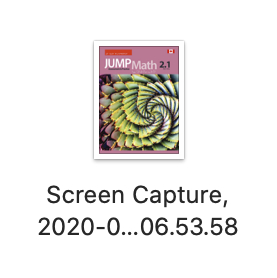
This is a jpg picture of the cover of grade 2 JUMP Math Exercice book in Inuktitut. It will be displayed in a post on JUMP Math resources.

This video is an Introduction to Kativik Ilisarniliriniq secondary second cycle math program with French narration.
This is an English version of the curriculum for the Kativik Ilisarniliriniq pre-work training course, updated for 2020.
2b.2 Compressing your Files
Each time we upload a file on Nunavik-IcE, we influence the general speed of the site, as well as the time it will take for users to see or download that file. In this module, you will learn how to monitor and reduce the size of your files.
2b.2.1 What is file size?
The size, or weight, of a file is determined by the amount of information it contains. It is generally calculated in KiloBytes (KB) or MegaBytes (MB). 1000 KB = 1 MB. These are the units of measure for the weight of a digital file.
The first step in learning how to compress your files (decrease their size) is to learn how to check their size.
On a Mac
Right click (or ctrl+click) on the file and select Get Info. The file size is located in the top right corner of the Info window.

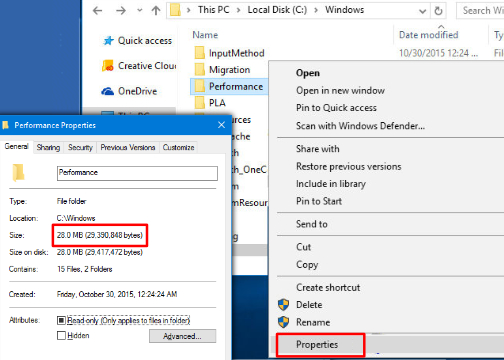
On a PC
Right click (or ctrl+click) on the file and select Properties. The size of the file is the third item on the list.
2b.2.2 Why is file size important?
File size directly determines how fast users of Nunavik-IcE can see the resources, as well as the general loading speed of the website. Therefore, it is our collective responsibility to keep our files as light as possible.
2b.2.3 How to compress files?
The way to compress files depends on the type of file, the computer and the version of the software you are using. Here are a few general guidelines for the most common files, that should work in most situations.
Word: Word documents can’t really be compressed. Unless they contain many images, they should be light. If they contain many images, one way to reduce their file size is to save them as PDF. However, users will not be able to modify them. Click here to learn how to save a Word document in PDF.
PDF: These files can easily be compressed. However, the method depends on the software you use. If you use a Mac, you can compress PDF using Preview. You can also compress PDF using the Pro version of Adobe Acrobat. Finally, some websites can compress PDF for free.
PowerPoint: Presentations are often heavy because of the images they contain. To reduce the file size of a PowerPoint, click on File > Compress images. Then, save your presentation.
Images: Images will be discussed in a further module. For now, the only thing you have to know is that the Nunavik-IcE website automatically compresses your images.
Videos: All videos must first be added to the Nunavik-IcE YouTube channel, which compresses them automatically. This topic is covered in a further module.
2b.2.4 Practice
To complete this practice activity, you will need to find any existing PDF document on your computer.
- Using the method above, check the file size of your PDF document and note how it weights in MegaBytes (MB) or KiloBytes (KB).
- Using one of the three methods suggested, compress your PDF.
- Check the size again to see if you were able to reduce it. If the final result is under 5 MB, or even shown in KB, that’s pretty good!
2b.3 Uploading Files
Your files are now ready to be uploaded on the Nunavik-IcE website.
- They have been named appropriately so that we can find them in the media library.
- They have been compressed so that users can access them quickly.
2b.3.1 What is uploading?
Uploading is the opposite of downloading. It is the action of taking a file on your computer and placing it online, on Nunavik-IcE. All the uploaded files go in the media library. When users access files on the site, they do the opposite process. They download a file from the site onto their computer.
2b.3.2 How to upload a file?
Although files are stored in the media library, this is not where we will upload them. Rather, we will keep working inside the post you created in module 2a. Files will be uploaded directly in the post, through the blocks editor and will automatically be stored in the media library.
- Login to the backend.
- In the WordPress toolbar, click on Posts.
- Find the post you are working on and click on the title to edit it.
- Identify an area of your post where you would like to add a file.
Depending on the type of file you want to add to your post, you will have to select different blocks. For resources on your computer, use one of the following blocks.
Choose this block for any file such as a Word, PDF or Powerpoint document.
Choose this block for any pictures or illustrations.*
Choose this block for any song or sound document.
*Please do not upload images now and focus on files. Module 3 is mostly dedicated to images and explains how to adapt the size of your images to Nunavik-IcE.
- Select the file block.
- In the file block, click on Upload.
- Select the file you want to upload from your computer.
- Once the name of your file appears, it has been uploaded.
Demonstration
2b.3.3 Practice
It’s time to practice! Login, access the post you were working on, add a file block and upload a file. The procedure and demonstration video, in section 3.2, can guide you step-by-step.
Before you go:
- don’t forget to name your file according to the structure you learned;
- don’t forget to compress your file;
- and don’t worry, this file will not be public for now.
2b.4 Linking Online Files
You just learned how to take a file on your computer and make it available online, on Nunavik-IcE… but what about files that are already online such as a YouTube video, a website, a link towards a document? In this section, we will see how to add these online files to your post.
2b.4.1 What are online files?
Online files are resources that have already been uploaded. A YouTube video is an online file because someone took it from their computer to make it available online. When you upload a file from your computer in a post, like you just did in section 3, you create an online file.
Online files always have a URL to access them. That makes them really easy to add to your post, without even adding weight to Nunavik-IcE.
2b.4.2 Why do we use online files?
Why do we ask you to put your videos on YouTube before adding them to a post on Nunavik-IcE? Why do we create links towards documents of the ministry of education rather than uploading them to Nunavik-IcE?
The answer is simple: if they are uploaded elsewhere, they don’t add weight to Nunavik-IcE and therefore don’t slow the site down.
However, since these online files are curated by other organizations, they are sometimes moved or removed. In these cases, the URL we used to create a link towards these resources on Nunavik-IcE gets broken and leads nowhere. This is why we only create links towards online files when it is most likely they will remain there.
2b.4.3 How to add an online file to your post?
Adding online files to your post is really simple.
- Login to the backend.
- In the WordPress toolbar, click on Posts.
- Find the post you are working on and click on the title to edit it.
- Identify an area of your post where you would like to add an online file.
- In parallel, find the URL of the online file you want to add to your post and copy it.
Depending on the type of online file you want to add to your post, you will have to select different tools. Here are the main tools used to add online files to a post.
YouTube block
The YouYube block allows you to insert the URL towards a video so that it will play directly in the post. The tutorial you watched in this online training are embedded in YouTube blocks.
Button block
As you saw in section 4.1, URLs are long and unappealing. For this reason, we replace them by buttons with descriptive labels that link to the same URL.
Links
Click here to download the post publication process.
Links are a more subtle way to add URLs to your posts without showing them. Any text or image can become a link towards a URL or your choice.
To add a YouTube video:
- In your post, click on the + symbol to add a block.
- Select the YouTube block.
- Inside the block, paste your URL.
- Click on Embed*.
*Your video will not appear in the backend, and you might even see an error message in the block. This is normal. If you click on the Preview button in the upper right corner, you will see your post in the frontend and the video will work.
To add a button:
- In your post, click on the + symbol to add a block.
- Select the buttons block.
- Inside the shape of the button, write the text that will appear on the button.
- On top of the button, in the toolbar, click on the link symbol (a chain).
- Paste your URL.
- Press Enter or click on the 90 degrees arrow symbol.
- Make sure to activate the toggle that mentions Open in new tab.
To add a link:
- In your post, identify the words or the image you want to convert into a link.
- Select the words or the image.
- On top, in the toolbar, click on the link symbol (a chain).
- Paste your URL.
- Press Enter or click on the 90 degrees arrow symbol.
- Make sure to activate the toggle that mentions Open in new tab.
2b.4.4 Practice
It’s time to practice! In this exercice, you will add a YouTube video to your post using the three methods you just learned (the YouTube block, the button and the link).
- Find a YouTube video of your choice and copy the URL.
- Login to the backend, find the post you are working on and open it.
- Add the YouTube video to your post using all three suggested methods.
- YouTube block
- Button block
- Link on text
- Save your draft.
Conclusion
You are now ready to move on to the next module, where you will learn about metadata. This will complete module 2, where you learned the A to Z of post creation.
One last thing about files! In module 2b, you uploaded a test file in your post. This file is still in the media library and is making the site a little bit heavier. Let’s take the time to delete it before going further.
We will never insist enough on the importance of rigorous file management. That involves proper naming and compression (addressed in module 2b) but also deleting files that are not used or that were accidentally uploaded more than once.
To delete a file:
- Login to the backend.
- In the WordPress toolbar, on the left hand side, click on Media.
- In the media library, locate your file. If you uploaded it recently, it should be at the top. Otherwise, you might have to search for it by typing its title in the search box.
- Click on the file to select it.
- On the right of the file, you can see all the related information such as how you named it and how it weights. At the bottom right of this section, find the red mention Delete permanently.
- Click on Delete permanently.
- A confirmation message will appear. Confirm that you want to delete the file.
Once you have deleted your test file from the media library, you can move on to Module 2c.
In module 2a and b, you worked on the visible components of your post: what users will see when they visit Nunavik-IcE. In this third and final part of module 2, we will focus on the invisible, yet essential components of your post, the metadata.
At the end of this module, you will be able to:
- select metadata for your post;
- write efficient tags;
- write an excerpt.
2c.1 Metadata
2c.1.1 What is metadata?
Metadata is a common term in technologies used to designate sets of information enabling the management of digital resources.
For example, when you take a picture with a digital camera, the date and time are stored as a metadata of the photo. This information then allows your computer to show pictures to you from most recent to oldest. Another example is music. The genre of a song, a metadata, could allow you to create a playlist of all your Jazz songs.
In this section, you will learn about the different metadata used on Nunavik-IcE. You can read about each metadata below, or watch the video presentation of the metadata section. This information is also available in your Glossary, where you can take notes.
These are the main metadata categories available on Nunavik-IcE. It is possible that you see categories that are missing from that list (in which case ignore them) or that some items of that list are not visible to you (if you don’t need them).
Status & Visibility
This metadata includes the publication time of the post and is set automatically. The site uses this metadata to automatically show posts from the latest to the oldest.
Language
This metadata allows users to select the language in which they want to navigate Nunavik-IcE. Once they set a language, the site only shows them language versions of that language.
Audience
This metadata allows the site to select which posts to show teachers, parents and students once they have selected their type of audience.
Permalink
This metadata is generated automatically when a post is published. It is the URL of your post.
Tags
This metadata allows users to search by keywords. The website also automatically uses tags to suggest related posts. For example, if a user searches for the words Snow and Weather, the site will only show posts that have both these tags. Once a post is selected by the user, related posts will be suggested at the bottom. First, each post that has both the tags Snow and Weather, than only Snow, then only Weather, in order of latest to oldest.
Category
This metadata is used to identify what type or resource is in the post, such as a video, a book, a lesson plan, a professional development article, etc. Users can search for specific categories. We can also create automatic groups, like the ones visible on the homepage.
Subject
This metadata is to identify the school subject of a post, such as Inuktitut, Sciences, of Social Studies. Users can limit their search to only one subject at the time.
Levels
This metadata is to identify the school levels targeted by the resource your post is introducing. Users can limit their search to one or many levels. The site also automatically sorts posts by level when students visit the site, only showing them what was identified for their level.
Theme
This metadata was created to allow our users to search for interdisciplinary resources on a specific theme such as animals or colours.
Collection
This metadata is only used automatically by the site to group many posts that would be part of a larger unit. The 50+ Inuktitut grammar rules, for example, are a collection. When a user searches for the word Grammar, these posts appear in a bundle.
Season
This metadata allows you to identify a post as particularly relevant for a specific season as defined in Nunavik. This allows users to search by season, and administrators to feature posts at specific times of the year.
Visibility
This metadata is used automatically by the site. Hiding a post will remove it from what a user can see by searching. However, the link can still be shared and accessed. This post you are reading now is hidden: invisible to the public, but visible to you because you received the URL. Featuring a post is a way to bypass the date metadata. Posts are always shown from the newest to the oldest, except if they are featured. In this case, they will always appear first.
Excerpt
This metadata is actually visible. Along with the title of the post, it provides a very short description of what it is about and helps users choose what they want to look at.
Cover Image
This metadata is visible in two locations. First, the cover image is shown on each post in the Search Results. Second, the cover image is shown as a banner in each post. This metadata is addressed in module 3, on visual enhancement.
Title Colour
Since the title is shown in overlay with the banner, we designed a tool to select whether you want a white or black title. If you select a bright cover image, you might want to consider a black title. This metadata is addressed in module 3, on visual enhancement.
Download PDF
This metadata determines what happens when users click on Download PDF. It is addressed in another training.
Return Link
This metadata determines what happens when users click on Back to Search. It is addressed in another training.
2c.1.2 Why do we use Metadata?
Metadata is essential for Nunavik-IcE to work properly and should receive the highest level of attention. Without them, users would basically see 900+ posts at the same time, without any possibility to search of sort… in other words, it would be chaos!
On Nunavik-IcE, metadata is mainly used for three things.
- They are used automatically by the site to show posts in the right language and for the right audience.
- They are used by the search tool to filter the posts that users see when they apply filters and keywords.
- They are used by Webmasters to create automatically generated pages, such as the homepage where posts are shown by categories and automatically updated when new content is being published.
2c.1.3 How to work with Metadata?
Good news, working with metadata is very easy from a technical point of view. It is basically just a list of options to choose from.
However, it will require you to think like a user in order to set the right metadata and allow users to find the posts they are looking for. This is especially true for tags, addressed in the next section.
Procedure to set metadata
- Login to the Nunavik-IcE Backend.
- Click on Posts in the WordPress Toolbar on the left hand side.
- Find the post you are practicing with in this module.
- Click on the title of that post to edit it.
- On the right hand side, locate the post menu. If you can’t see it, click on the cog Symbol to show/hide it.
We will now set metadata in the order they are listed, from top to bottom. However, it is possible that your backend shows slightly different metadata, in a different order than mine. Please ignore any metadata not listed in this procedure.
- The first metadata category is status & visibility. It tells you about the author, status and date of publication date of this post. Skip this category as it is automatically set.
- You should then see revisions. This is only information about how many times a post was edited. Skip this category, as it is automatically set.
- Permalink comes next and shows you what the URL of that post will be. Although you can edit it, it is automatically set. Skip this section as well.
- You then reach the categories metadata section. There, tick the box corresponding to the type of resource you are sharing (book, video, game, etc.). Please select only one category and make sure to tick the box in the language your post is set to. For example, if your post is set to English, tick Game and not
Jeu. - Tags is the next metadata category. Tags are so important that they have their own section, further in this module. Skip them for now.
- The collection metadata is reserved for sets of posts that are part of a whole. For example, if we were publishing 5 chapters of the same book as individual posts, we could create a collection and give it the title of that book. If you feel like a collection has to be created for your posts, please talk to a site administrator.
- If you post is directly related to a season (such as a post on snow types in the winter or on the colours of the tundra in the fall) select the appropriate season(s).
- The subject metadata allows you to identify the school subject your post is related to (such as Inuktitut, arts or social studies). Please only select subjects that are directly related to the post.
- Themes allow users to search for all posts on animals, on weather, on colours or on any other theme we add. If applicable, select the theme(s) that are related to your post. If you feel like a theme has to be created for your post, please talk to a site administrator.
- The featured image will appear both in the search results and as a banner to your post. It is the first contact users will have with your content. Therefore, your cover image should be representative of your post. You will learn how to prepare your cover image in module 3, so skip it for now.
- The excerpt is a short text that allows users to know more than just the title of your post before clicking on it. Writing a good excerpt is addressed in the next section of this module, so skip it for now.
- The title colour section allows you to select a white or black title for your post. Since the title appears over the cover image, select black for a pale cover image and white for a dark cover image. More details are provided in module 3.
- The niveaux metadata is for you to select which school levels the post is for. Select as many as necessary.
- The audience metadata allows you to determine which users are going to see the post in the frontend. Upon their first visit on the site, users are asked to select whether they are a teacher, a parent or a student. Thereafter, they will only see post that were identified for their audience in the metadata. You can select more than one.
- The language section informs you about the language your post is set to and on the existence (or not) of language versions. Skip this section as it is the focus of module 5.
- The visibility section allows you to hide a post or to feature it. Hiding will stills allow you to share the URL towards this post, but it will never appear in the search results for users. Featuring puts the post first in the results, disregarding more recent publication dates.
- The download PDF section is addressed in a complementary module. Skip it for now.
- The return link section is addressed in a complementary module. Skip it for now.
- Save your Draft.
2c.2 Tags & Excerpt
In the previous section, you selected most of the necessary metadata for your post. However, two metadata still require your attention: tags and excerpt.
2c.2.1 What are tags and excerpt?
Tags
The tags metadata is just another word for keywords. When Nunavik-IcE users search using keywords, only the posts that have been associated to these tags will appear.
Excerpt
The excerpt metadata is a short description of what the post is about. In the frontend, it appears under the title of the post, helping users know what it is.
2c.2.1 Why do they have their own section?
Tags
Tags are the most important metadata on Nunavik-IcE. Without limited and precise tags, users will never find your post. With too many or too generic tags, the site will become a mess and all posts will show-up everywhere.
Excerpt
Writing an excerpt is an art. In very few characters, it must convince the user that a post is the one they are looking for. Therefore, they must be very descriptive, right to the point and not redundant.
2c.2.3 How to write tags?
Writing good tags requires you to think like a user. What word is a teacher, a parent or a student likely to type in the Nunavik-IcE search tool in order to find the posts they are looking for?
Here are a few tips to help you in the writing of your tags.
Do
- Prioritize words that contain smaller words and use their plural form. For example, the tag airplanes will allow users to find the post with the words plane, planes, air, airplane & airplanes. That increases the chances a user will find your post.
- Always start your tag with a Capital letter.
- Unless it’s a title or a person’s name, write each individual word as an independent tag. For example, Igloo building would would become two tags: Igloo and Buildings
Don’t
- Tags should avoid any repetition of other metadata information such as topics, levels, audience and category of resource. Words such as math, parents, resource, book, grade 2, social studies, document… should be avoided.
- Don’t limit your tags to only one word of the same “family” of words. For example, the tag Home will not show your post if the user searches for House.
When you add tags, to your post, tags that already exist on the site because they were previously used will appear as recommendations. Please use them when possible, in order not to create doubles. This video explains how.
In this section, you have determined which tags should be sent to translation. To learn how to get them translated and what to do once they are sent back to you, refer to Module 5: translation.
2c.2.4 How to write the excerpt?
In addition to the cover image (1), the title (4), the category of resource (2) and the levels (3) the excerpt (5) is the only information available to users before they decide to read a post or to leave the site. Therefore, you should try to make the most of each of the characters at your disposal.
- Write approximately 70 characters, which represents 10-12 words.
- Start with a Capital letter, but if you don’t use an active verb, don’t put a period at the end.
- Don’t repeat informations contained in the title, nor the category of resource, the subject or the level (they are already visible on the post).
- If the resource is from a third party, mentioning their name is courtesy.
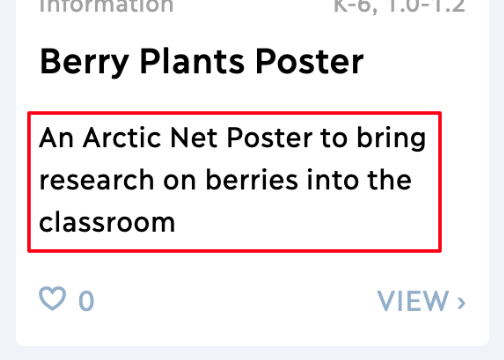
Good excerpts
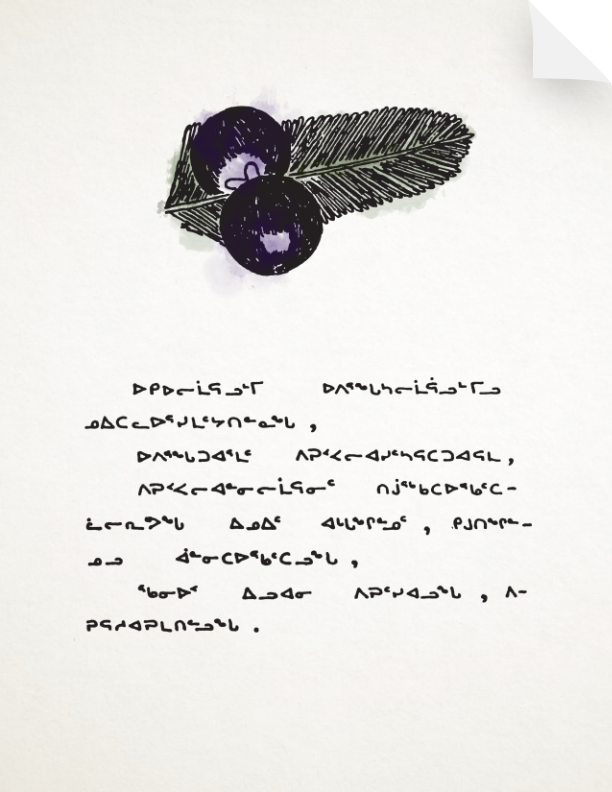
- An Arctic Net poster to bring research on berries into the classroom
- A compilation of texts written by Nunavik students
- When different perspective can mutually support and enhance one another
- 4 model approaches to teaching with JUMP Math
Excerpts that should be improved
- An activity for grade 2 students to learn how to recognize sight words (too much repetitive information)
- In this book, we will learn from Naalak, a young Inuk from Akulivik, about the activities that are part of his daily life during the winter (too long, the excerpt will automatically be chopped)
2c.2.5 Practice
Before writing tags for your first post, complete the following activity.
In each case, select the best tag option.
Conclusion
Your first post is almost completed and just requires a little bit of visual enhancement (module 3). Before moving-on to the next modules, where you will learn about peer review and translation, we strongly recommend that you take some time to practice and consolidate what you have learned so far.
Before you learn about visual enhancement of your post in Module 3, let’s take a moment to understand the concept of CSS Styles.
You don’t have to develop a deep understanding of CSS styles to work on Nunavik-IcE, as it is part of a web development coding language, but it’s important for you to know how it will impact your work.
What are CSS styles?
CSS styles are a little bit like a pair of sunglasses that determines how you will see things on a website like Nunavik-IcE. Right now, the sunglasses are set to show you this text in the Ilisarniq bold font, size 1em, black and this box with a white background and slightly rounded corners. There is a rule for pretty much everything, from the style of text to the size of buttons.
The beauty of CSS styles is that we can change a rule at one place, and all the site will automatically be changed. It would be like giving you a new pair of special sunglasses with different settings.
How do they impact your work?
Backend VS frontend
You might have noticed, the backend and the frontend of Nunavik-IcE don’t always show content the same way. This is because CSS styles that determine spacing, font size, image size and more are only applied to the frontend. When you work on a post, in the backend, click on the Preview button once in a while to see what it will really look like for users once your post is published.
Don’t bend the rules!
CSS rules apply to all content on Nunavik-IcE, except where you decide otherwise by applying your own rule, such as putting this text in blue. However, once special rules are applied, the block will not never respond to CSS styles anymore. That means if we change the CSS styles, we will have to manually edit all special rules you applied throughout the hundreds of posts. This is why we try to keep styles as as they are.
Now that you understand this concept, you can continue to module 3.
In module 2a, b and c, you focused on the functionality of your post. You wrote clear information, you added necessary files and you set the proper metadata. It is now time to focus on visually enhancing your post, to make it more appealing to users. Although we will not give you a graphic designer training, there are four simple things you can do to visually enhance your post.
At the end of module 3, you will be able to:
- set a cover image and select a title colour in the metadata;
- improve your post layout in the blocks editor;
- add images in your post;
- replace links towards some files and online files by a preview image (coming soon).
About Copyrights
Nunavik-IcE is a public website attached to an educational institution. That means everything that is made public on the site must comply to copyrights policies. Looking for materials under Creative Commons (CC) licences is a good way to ensure you are not infringing copyrights. However, CC content still has to be referenced appropriately.
Learn more about Creative Commons Licences >>
Here are a few tools that can help you finding CC content to visually enhance your post.
Google Images
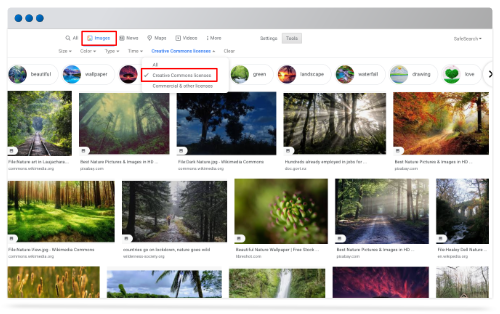
Select Creative Commons in the search tools.
Creative Commons
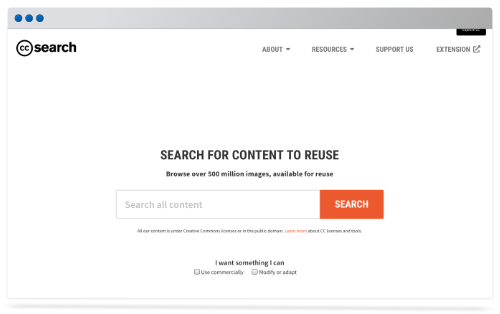
CC licensed materials and guidelines.
Pixabay
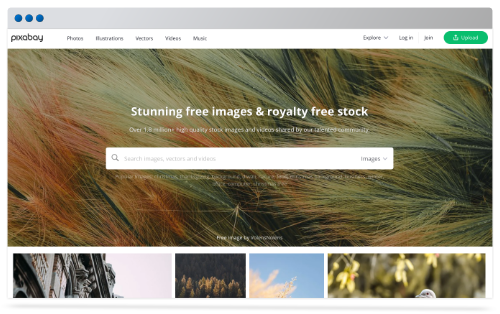
CC licensed pictures.
3.1 Cover image and title colour
When you completed module 2c, on metadata, we suggested to skip the two following categories: cover image and title colour. We are addressing them now because they are more closely related to the appearance of your post than to its identification (which metadata is generally for).
3.1.1 What is a cover image?
The cover image basically acts as a “visual title” for your post. When users navigate on the frontend of Nunavik-IcE, they can see an image on each post. These are cover images. Once users open a post, this cover image becomes the banner of the post (in a blurry format), so that users keep a sense of where they are.
Cover image on the post
Cover image as a banner
3.1.2 Why do we use cover images and title colours?
Cover images
As you learned in the previous module, users don’t read a lot online. In average, just a few words will be hovered before a user decides to stay on the site and consult a post or leave. It works just like when your students choose a book at the library: an attractive cover image is important!
Title colours
Using the cover image as a banner in the post allows users to have a visual cue that they are in fact in the post they selected. Since the title is placed over the banner, we have designed it so that you can set it to white (default) if the banner is dark or to black if the banner is bright (like snow for example).
3.1.3 How to set these metadata?
Cover images are easy to set. Independently of their format, the site will stretch them to fit the zones in which they appear. However, there are a few things to keep in mind.
Image size
Keep the file size of cover images very small. Since each post of the site has a cover image, large and heavy images would considerably slow the site down.
Automatic crop
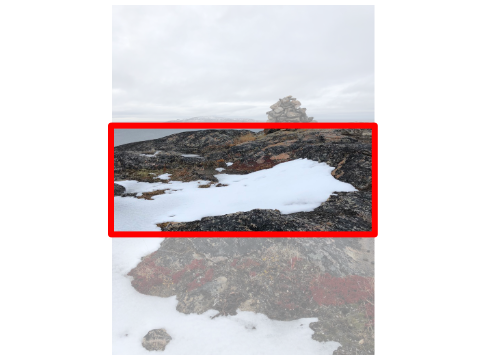
Remember that images will automatically be adjusted to fit where they appear. That means a portrait oriented image, for example, will be heavily cropped
Avoid text
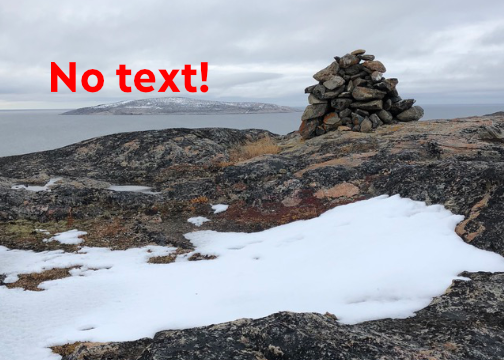
Avoid, as much as possible, cover images that contain text. If they do contain text, it will have to be translated and replaced on the image, which requires graphic work.
Once you have identified the image you want to use as a cover image, you will resize it to an appropriate format for the site.
On a Mac
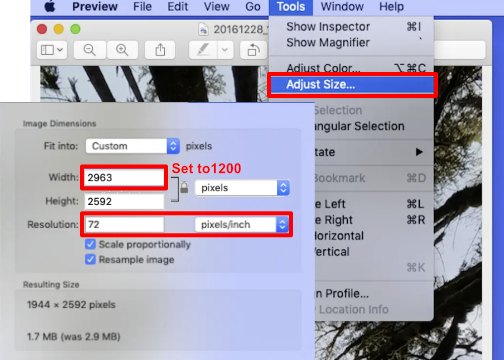
- Open your image in Preview.
- In the top menu, click on Tools and select Adjust size.
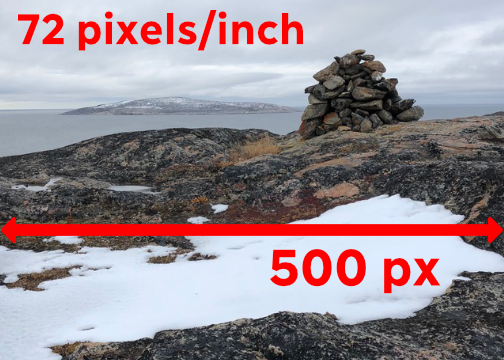
- Set the resolution to 72 pixels/inch.
- If the width is higher than 500 pixels, set it to 500 px.
- Click on OK.
- In the top menu, click on File and select Export.
- Rename the image to respect the structure you learned in module 2b (PostTitle_Whatitisabout_Cover.jpg)
- Select JPG as a format.
- Click on Export.
On a PC
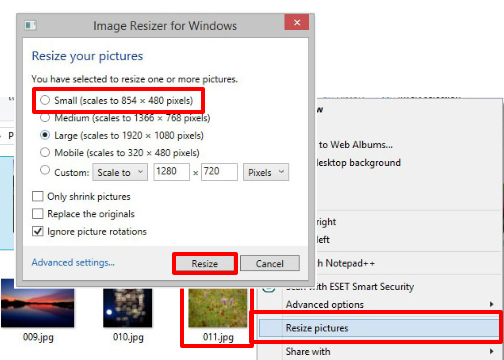
- Right click on your image to open the menu.
- Select Resize Picture.
- Select the Small scale (or the one closest to approximately 500 pixels in width).
- Click on Resize.
- Make sure your image is named according to the structure you learned in module 2b (PostTitle_Whatitisabout_Cover.jpg)
When your cover image is ready:
- Login to the backend.
- Locate the post in which you want to add this cover image.
- Click on the post title to edit it.
- On the right hand side, in the Post menu, find the featured image section.
- Click on Set feature image.
- The media library will open. In the upped left corner, select the Upload Files tab.
- Click on Select Files.
- Select the picture you want to upload from your computer.
- Once the image has been uploaded, click on the blue Set feature image button located in the bottom right corner.
- A preview of your cover image now appears. Scroll down to the title colour section of the Post menu.
- Select between a white or a black title*.
- Save your draft.
*If you don’t know what title colour to choose, you can click on the Preview button in the upper right corner and visualise both options.
3.1.4 Practice
It’s your turn to practice! Using the test post you have been working on throughout module 2, or using a new post, set a cover image and adjust the title colour.
3.2 Post Layout
Throughout module 2, you became familiar with the WordPress blocks editor. You might have even used the layout blocks. Using these blocks is a great and simple way to make the content of your post more dynamic and visually appealing.
3.2.1 What are layout blocks?
Layout blocks allow you to introduce variations in the way your content is introduced in a post. For example, instead of constantly working with only one column of text (like you would in Word), you can introduce content in multiple columns of different width.
These three first blocks allow you to change the layout of your post horizontally, by creating columns. There are also blocks that allow you to work vertically in your post.
3.2.2 Why do we use layout blocks?
Layout blocks are there to visually enhance your post, making the reading experience more enjoyable and dynamic for users. Good uses of layout blocks include:
- Half-half block to introduce two different perspectives or pros and cons side by side so that users can see them simultaneously;
- Half-half block to show a diagram and the explanations that come with it without requiring the user to scroll up and down constantly;
- Third on the right (or left) block to include a list of key elements to keep in mind while reading a paragraph of text;
- Three thirds block to list three different approaches or resources (like in the copyright section of this post);
- Separator block to identify the end of a topic and the beginning of a new one;
- Etc.
3.2.3 How to use layout blocks?
There isn’t a single way to visually enhance your post with layout blocks. You will have to experiment. Before you do, please keep in mind the following considerations, introduced in previous modules:
Backend VS frontend
The backend and the frontend of the site don’t show things the same way. That means what you see in the blocks editor is only an approximation of what users will see once your post is published. Use the Preview button often to see what your layout looks like in the frontend.
Devices
The site does not look the same for users on a computer, an iPad or a mobile. Layout blocks will move around to show your content appropriately. For example, half-half blocks will place the two columns on top of one another on a mobile. It is all about compromise! Luckily, the Preview button now allows you to see what it will look like on different devices.
CSS Rules
Follow the site rules! Each time you highlight a word in a new colour, each time you add a spacer, each time you change the font size of some text, you create content that will never be managed automatically by the site anymore. That means each of these exceptions will have to be found and modified one by one by hand (through 700+ posts) when we update the site CSS.
3.2.4 Practice
A good way to practice working with the layout blocks is to try to recreate existing layouts. Here are a few examples of layout from actual posts on Nunavik-IcE that you could try recreating.
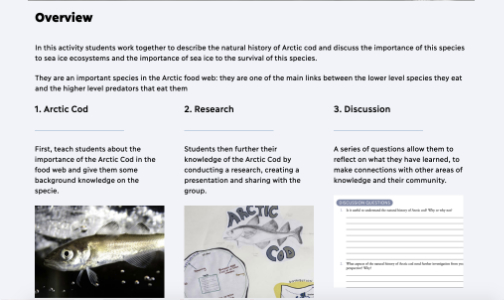
Three columns of content, including text and images inside each.
A third on the right image, with text on the left and under.
Four contents introduced in two sets of half-half columns.
If you need, you can go back to module 2a to review how to use the blocks editor and the tools that allow you to add blocks and move them around. If you are comfortable with the blocks editor and its tools, it’s time to try enhancing a post with the layout blocks.
3.3 Images
Throughout module 2, you became familiar with the WordPress blocks editor. You might have even used the Image block. This is the one and only block you should use to add images to the body of your post.
3.3.1 Which block to use to insert images?
The only block you should use to insert images in your post is the Image block. This block can be placed anywhere in the body of your post, such as inside a layout block.
3.3.2 How big should my images be?
No matter where you place your image block, its content will take all the available width. That means if you place an image block in a half-half block, the image will take half (50%) of the width of the post. If you image block is directly in the body of the post, it will take 100% of the post width. That impacts how big your images should be.
Full
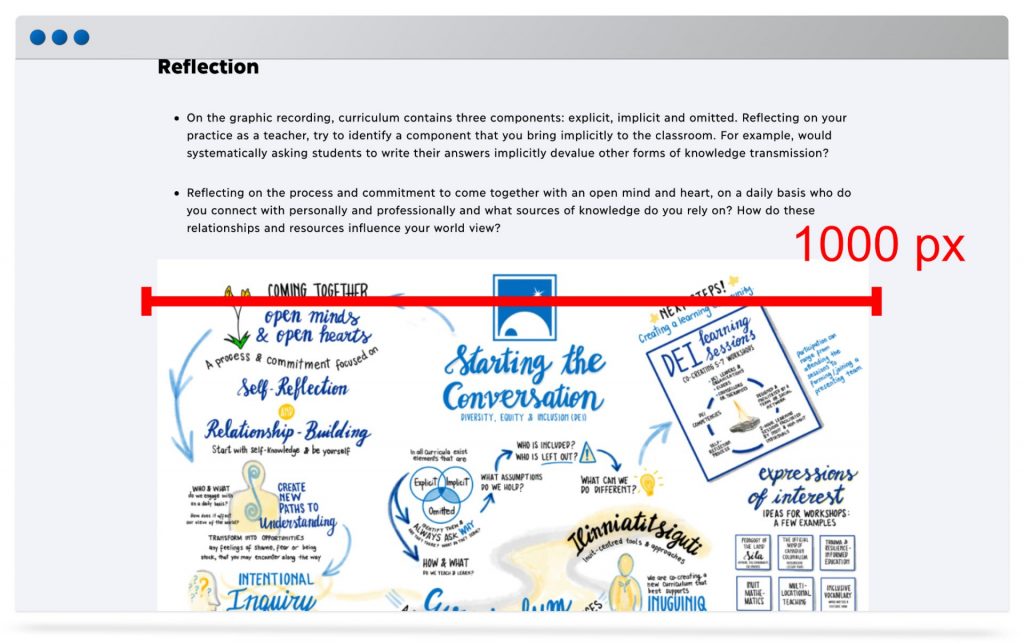
An image taking the full width of your post should be at least 1000 pixels wide.
Half
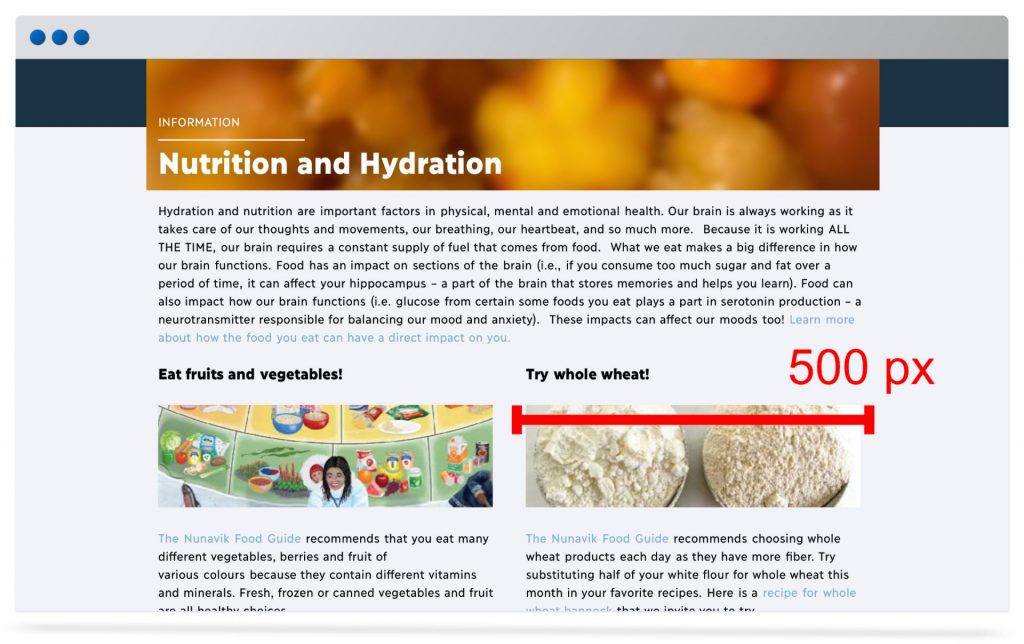
An image in a half-half layout block should be at least 500 pixels wide.
Third
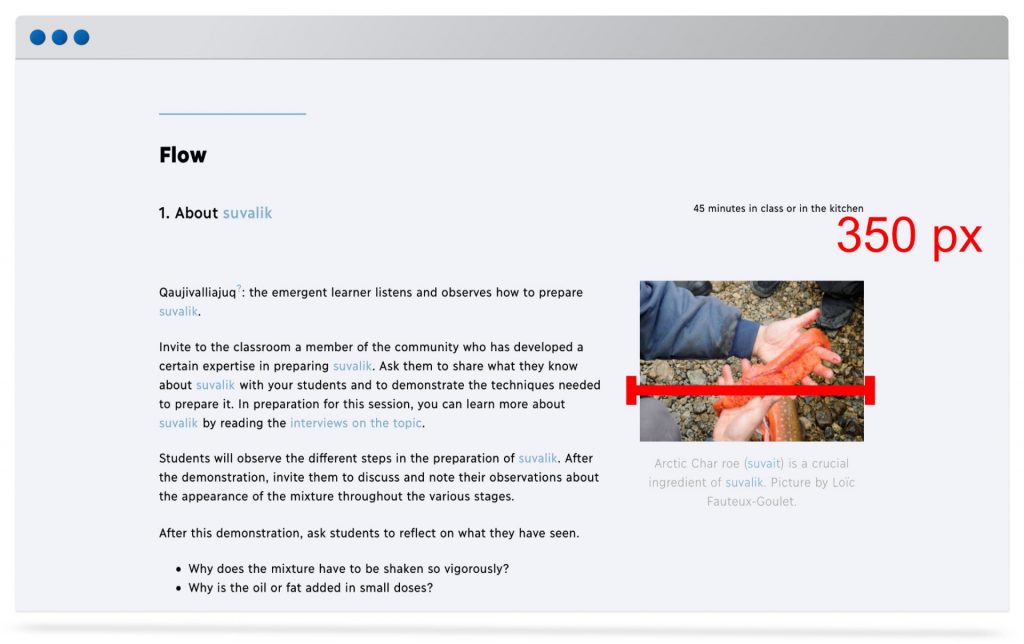
An image taking a third or the width of your post should be at least 350 pixels wide.
Here is how to check and adjust the size of your images before uploading them in an image block.
On a Mac
- Open your image in Preview.
- In the top menu, click on Tools and select Adjust size.
- Set the resolution to 72 pixels/inch.
- Set the width to either 1000, 500 or 350 pixels depending on the location of your image in your post.
- Click on OK.
- In the top menu, click on File and select Export.
- Rename the image to respect the structure you learned in module 2b (PostTitle_Whatitisabout_Image.jpg)
- Select JPG as a format.
- Click on Export.
On a PC
- Right click on your image to open the menu.
- Select Resize Picture.
- Set the width to the closest to 1000, 500 or 350 pixels depending on the location of your image in your post.
- Click on Resize.
- Make sure your image is named according to the structure you learned in module 2b (PostTitle_Whatitisabout_Image.jpg)
3.2.3 How to use image block?
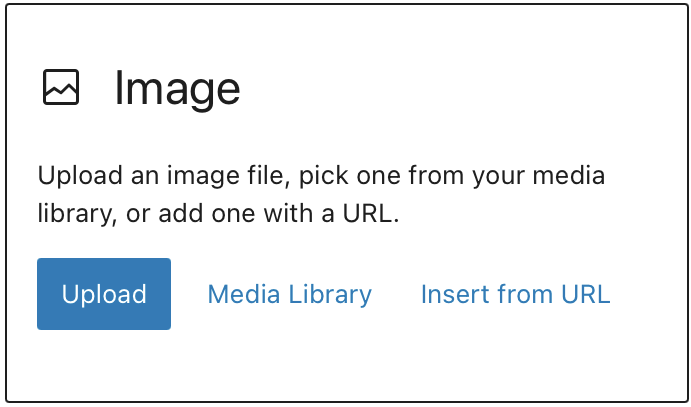
Once you have inserted an image block in your post, like you learned in module 2, you will have two options.
- If the image is on your computer, and you want to add it to your post, select Upload.
- If this image was already used on the site in the past, click on Media Library.
Uploading an image
- In the image block, click on Upload.
- A pop-up window will appear and let you browser your computer. Locate and select the image to upload.
- Click on Open.
Media Library
- In the image block, click on Media Library.
- The media library will open. Locate or search for the image you want.
- Select the image by clicking on it.
- Click on Select.
3.4 Previews
Coming soon
Conclusion
Congratulations! Working with visual is not easy, but you probably improved the visual appearance of your post a lot!
Support
If you feel like you need more help to bring your post to KI standards in term of visual enhancement, you can notify an administrator who will guide you towards a graphic design resource. In order to do so, just send an email to nunavik.ice@kativik.qc.ca, mentioning the title of your post and your needs in terms of visual enhancement.
Once you created a post (module 2) and enhanced it visually (module 3), it must now go through the process of being reviewed by at least one of your colleagues. We call this process peer review.
At the end of module 4, you will be able to:
- send a your draft post to colleagues for them to review it;
- provide these colleagues with a list of key elements to review;
- make any changes suggested by your colleagues.
4.1.1 What is peer review?
Peer review is a method used in scientific and professional journals to ensure quality in published materials. Nunavik-IcE borrows this approach to ensure all posts published on Nunavik-IcE are accurate, precise and relevant.
4.1.2 Why using peer review?
Peer review was chosen as a validation approach for Nunavik-IcE for many reasons:
Expertise
We can’t all be experts in all fields. The peer review process allows you to chose specific colleagues to review posts related to their area of expertise.
Teamwork
Peer review allows your colleagues to know what you are working on. It allows for more collaboration, less redundant work and more promotion of these resources.
Workload
Every day, contributors are working on new posts on Nunavik-IcE. It would be overwhelming for a single person to review all of them. Peer review allows for the distribution of this workload.
4.1.3 How to go through that process?
There are three main steps to follow in order to go through the process of peer review.
- Sharing your post with colleagues
- Asking peers for review
- Editing your post when you receive suggestions
Sharing your post with colleagues
The first step in the peer review process is to send your post to one or more colleague(s). Since the post is not yet ready to be published, you will have to send a private link to your colleague(s) for them to access and review the post draft.
- Login to the backend.
- In the WordPress toolbar, click on Posts.
- Locate the post draft you want to share with colleagues for peer review*.
- Open that post by clicking on the title.
- In the post menu, on the right hand side, locate the status & visibility section.
- Check the third box: Enable public review.
- A URL will appear. Copy that URL and send it to your colleagues, allowing them to see your post.
*This procedure only works with posts that have the draft status. If your post has not yet been saved as a draft, make sure to save it as you learned in module 2.
Normally, at this stage of the Post Publication Process, your post should still be available in only one language. This is because otherwise you would have to share, ask for review and edit three times as much content! However, if for any reason you have more than one language version of your post at this point, you need to repeat steps 2 to 9 for each one.
Asking peers for review
After your colleagues have reviewed a few times, it will become natural for them to pay attention to key elements of your post. However, if it’s their first time, it might be a good idea to suggest what to look for.
This model email includes a list of key elements for your colleagues to review, and helps you sending all the information they need to peer review your post.
Please feel free to copy and paste this model email each time you need to send a post to a colleague for peer review!
Hello
I have created a post on Nunavik-IcE to introduce [name of your resource] to [teachers/parents/students] and my content is now ready to be peer reviewed.
You can access the my post’s draft by clicking on this private link: [paste the URL of your post’s draft]
The private link I sent you will expire in 30 days and is not meant to be shared. As you review my post, please pay attention to the following.
- Is the information in the content of the post and the introduced resources(s) accurate?
- Is the tone and the vocabulary appropriate for the audience of this content?
- Are there any mistakes in the information and the text, including in text on images?
- Is the content of the post and the introduced resources clear to you?
- Does the general presentation of the post and the introduced resources look professional?
Please send me your comments by replying to this email. If you prefer annotating directly on my post, you can print it or print it to PDF by clicking on the 🖨️ in the upper right corner, over the banner image.
Thank you!
Conclusion
You have already completed module 4! Once you receive feedback from your peer(s), you will have to edit your post to implement their suggestions. This is why you have only worked in one languages so far, so that you don’t have to edit three posts in three different languages!
Frequently Asked Questions about Edits
Q: Can I edit someone else’s post?
Yes, you can edit any post on Nunavik-IcE.
Q: Can I edit a post that was already published?
A: Yes, you will simply have to re-submit it for publication by an administrator.
Your post was just peer reviewed and it’s time to implement your colleagues suggestions. Depending on the status of your post, you will need to follow different procedures to edit before publication.
Option A
If you have followed the post publication process step by step, you should have a post in only one language and in the draft status. This is the easiest situation to implement changes.
- Login to the backend.
- Under the post section of the WordPress toolbar, find your post.
- Click on the title to edit it.
- Make any changes in your post.
- Click on Save Draft in the upper right corner.
Option B
If your post is already available in more than one languages, but still in the draft status, you will have to make the changes in each language version before submitting them for publication.
- Login to the backend.
- Under the post section of the WordPress toolbar, find your post.
- Click on the title to edit it.
- Make any changes in your post.
- Click on Save Draft in the upper right corner.
- In the Post menu, scroll to the language section.
- Click on the pencil beside a second language to edit.
- Repeat steps 4 and 5 for each language
Option C
If your post is already published, in one or many languages, you will have to make changes in each language version and then re-submit them for publication.
- Login to the backend.
- Under the post section of the WordPress toolbar, find your post.
- Click on the title to edit it.
- Make any changes in your post.
- Click on Update in the upper right corner.
- A confirmation window will ask if you want to Submit the post for review. Click on Submit for Review.
- In the Post menu, scroll to the language section.
- Click on the pencil beside a second language to edit.
- Repeat steps 4 to 6 for each language.
Demonstration coming soon.
Kativik Ilisarniliriniq is a trilingual organization and has the mandate to promote Inuktitut in Nunavik. Therefore, it is crucial that our public platforms, including Nunavik-IcE, feature all resources in Inuktitut, English and French with equal level of quality.
At the end of module 5, you will be able to:
- send all the required information from your post to the translation department;
- create language versions of your post by implementing the translations received from the translation department;
- create language versions of tags using the tags manager.
5.1 Sending the content of your post to translation
Nunavik-IcE is a trilingual site. That means each post must be made available in Inuktitut, English and French. In module 2, you learned how to create a post in your preferred language. You have also entered the metadata (excerpt, tags, etc.) and maybe created illustrations on which words appear. Once the post has been peer reviewed, as explained in module 4, you can now send all of your content to the translation department.
5.1.1 What to send to translation?
There are three main components of your post to send to translation.
1. Body of the post
This is all the text in your post, starting with the title and finishing at the bottom of the page.
2. Metadata
This includes tags, excerpt, as well as any new theme, collection or topic associated to the post.
3. Images and forms
This includes words on illustrations and graphics, as well as forms for users to interact with.
The following example shows what components of a post have to be sent to the translation department.
Keep in mind every detail that requires translation. For example, when the user clicks on the Submit button of this form, will they get a confirmation message? If so, it also has to be translated! This will save you and the translation department a lot of time.
*Note on tags: In section 2c.2.3 How to write tags?, you learned how to select an existing tag and how to create a new one. Existing ones should already be translated in all three languages, while the ones you create have to be sent to translation. If you are uncertain of which of your tags need translation, watch this video.
5.1.2 Questions & Answers
Why do we translate tags?
Tags are the keywords users type to find the posts they are looking for. In order for users to be able to search in all three languages, tags must be translated. Tags translations are implemented in a different module of the site, which keeps in memory all tags ever used and their translation.
What to do if a resource is not available in all three languages?
Ideally, the resources introduced in each post (such as documents, illustrations, etc.) should also be available in all three languages. However, in some cases, resources like books, videos and websites are not available in all three languages. In these cases, we still create a trilingual post, but mention the resource is only available in x language, like in the examples above.
More questions? Send an email to nunavik.ice@kativik.qc.ca.
5.1.3 How to send my post to translation?
The procedure to send a post to the translation department is to make a Word document with all the text and to send it by email. This procedure is the same, no matter which language your post is in.
Procedure
- Login to the Nunavik-IcE Backend.
- Select posts in the WordPress toolbar, on the left hand side.
- Find the post you want to translate and open it by clicking on the title.
- In parallel, open Word and create a new document.
- Start by the body of your post, selecting each section to copy and paste it in the Word document. To copy and paste faster on a PC, press Ctrl + C on your keyboard to copy and Ctrl + V to paste. On a Mac, the controls are Cmd + C and Cmd + V.
- Make sure all the text of the body is pasted in your Word document, including the title, the text on buttons, the caption under images, etc.
- In the document menu on the right hand side of your post, go to the tags section.
- Tags can’t be copied and pasted, so you will have to manually add them to your Word document.
- Still in the document menu on the right hand side of your post, go to the excerpt section.
- Copy and paste this text to your Word document.
- Look for images in your post that would have text on them. If you find any, add this text to your Word document.
- Look for any forms in your post. If you find any, add this text to your Word document, including the text of the button and the confirmation message.
- Save your Word document.
- Send your Word document by email to translations@kativik.qc.ca, making sure to mention the languages in which you’d like the document to be translated. To make your life easier when you receive the document back, ask to get the translations under each of your original paragraphs.
Example
This example shows the post, on the left, and the Word document sent to translation, on the right.
Remember, this is the last step before publication! If you still have to make changes in your post, they will have to be translated over again!
5.2 Implementing translations
Once you receive your translated document, you will basically do the opposite process to implement the translations. This is what we call creating language versions of your post.
5.2.1 What is a language version?
In order for users to be able to navigate in all three languages and to switch from one another seamlessly, posts on Nunavik-IcE are not only available in three copies; they are three linked versions that we call language versions.
In the post
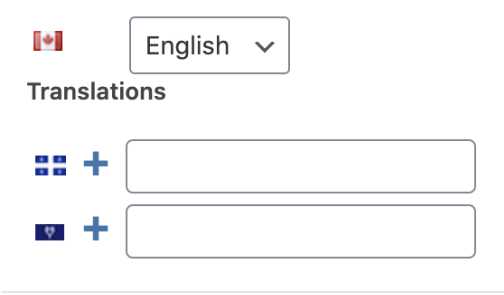
When you created a post in module 2, you set the Language of your post prior to creating content. On this example, the post is only available in English for now.
In the posts list
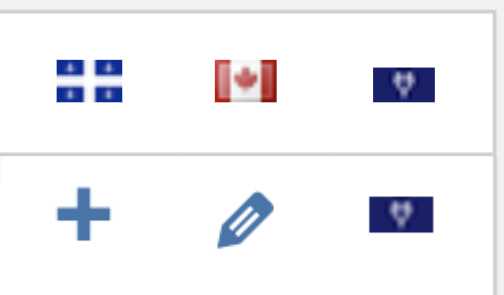
When you look at all the posts in the backend, you can see in which language they are available or not. On this example, the post is in Inuktitut, available in English, but not yet in French.
For the users

On the frontend of the site, users can switch languages. They will not be redirected to the homepage, but rather see another language Version of the post they are reading.
5.2.2 Why creating language versions?
Creating a language version, rather than simply a new post in another language allows users to switch seamlessly from one language to another. It also allows us to make modifications in the metadata of on only one out of three language version (such as adding a theme) and the site will automatically adjust the other ones.
A good way to grasp the concept of language versions is to select a post in the frontend and change language using the language menu in the upper left corner. Give it a try and come back here to continue your training.
5.2.3 How to create a language version?
This procedure is for everything else than tags. Do not simply add the new tags in your post. Instead, please refer to section 3.
Demonstration
- Login to the Nunavik-IcE Backend.
- Select posts in the WordPress toolbar, on the left hand side.
- Find the post for which you want to create a language version. You can already see, on the right hand side, a flag indicating the language in which this post was originally created. The pencil Icon shows that there is already a language version, while the + Icon shows that there is none yet.
- Open the post by clicking on the title.
- In parallel, open the Word document you received from the translation department.
- On the right hand side, in the Post menu, scroll down to the language section.
- Make sure the post is in the language that is selected. If it’s not, you must adjust this setting now, before creating a language version.
- To create a language version, click on the + beside the language you want to work with first. This will automatically create a copy of your post, which can now be translated.
- Before you start replacing the text, make sure you are in the right copy! On the right hand side, in the Post menu, scroll down to the language section. You should see the title of your original post, and that you are now working in a new language.
- Click on Save Draft in the upper right corner of the screen.
- Starting with the title, copy each section of your Word document and paste them to replace the existing text in the post. Throughout this process, the layout of the post might move a little, so you will have to adjust it.
- Don’t forget to paste the translated excerpt in its location, in the Post menu.
- Save your draft frequently.
If there are forms in your post that were created by a colleague, please send your translations to them.
If there are images in your post that contain text and that were created by a colleague, please send your translations to them.
5.3 Implementing translated Tags
Tags are a critical component of the Nunavik-IcE website. In addition to allowing users to find what they are looking for, they allow the site to show the right thing at the right place, to suggest related posts and to group posts by tags. Therefore, it is important to pay close attention to tags. For this reason, there is a tags manager installed on the site.
Before you begin this section, make sure that you have section 2c.2.3 How to write tags? fresh in mind.
5.3.1 What is the tags manager?
The tags manager is a trilingual list of every tag ever used in Nunavik-IcE. You just learned about posts’ language versions… well the tags manager works exactly the same. On the right hand side of each tag, you can see the language symbols. The flag indicates which language a tag is set to. The pencil indicates that a translation of this tag is already implemented and allows you to edit it. The + symbol indicates that there is no translation yet. You can click on it to add that translation.
5.3.2 Why do we translate tags this way?
Tags and their accurate translations in three languages are essential to the good working of Nunavik-IcE. Here’s a metaphor to better understand their role.
Imagine flying to Nunavik. The flight attendant explains, in Inuktitut, that emergency exits are at the back of the airplane. In the French version, the attendant does not mention emergency exits at all. In English, the attendant rather talks about the emergency exits over the wings. In the case of an emergency, everyone would behave differently and the attendants would have to tell everyone again, in a rush, what to do.
This is the same with tags in Nunavik-IcE. Missing tags or inaccurate translations lead to posts behaving very differently across the site and requires lots of intervention afterwards to debug.
5.3.3 How to implement translations in the tags manager?
Translating tags in the tags manager ensures each tag you attributed to your post will automatically be applied to all language versions in the right language. Here is how to implement tags translations.
- Login to the Nunavik-IcE Backend.
- Select posts in the WordPress toolbar, on the left hand side.
- Under the posts section of the WordPress toolbar, select tags.
- In parallel, open the Word document you received from the translation department and find the translated tags.
- In the tags manager, use the search field to find a word for which you want to implement a translation.
- Once you found the tag to translate, make sure it starts with a capital letter. If it does not, click on the tag to edit it.
- Make sure it is set to the right language (identified by a flag on the right hand-side). If it does not, click on the tag to set its Language.
The language symbols, on the right hand side of the tag, indicate the status of different tags language versions.
The flag is the language this tag is set to. If you look at a word in English and you see a Canadian flag, everything is fine. Otherwise, you can edit the tag to set the right language.
The pencil indicates the tag has already been translated to this other language. If you see a pencil under the Nunavik flag, it means an Inuktitut translation is already there.
The + symbol indicates there is no translation yet for this language. If there is a + symbol under the Québec flag, that means a French translation has to be implemented.
- If there is a + symbol on the right hand side of your tag, click on it.
- The tag editor will open on the left hand side of the screen, indicating what language the tag is set to and which translations have been implemented or not.
- Copy the translated tag from your Word document and paste it in the Name field.
- Scroll down and click on Add New Tag.
- If there was more than one + symbol next to your tag, meaning that two translations were missing, repeat steps 8 to 11 for each language version of the tag.
Demonstration
Conclusion
Congratulations! You have completed the last module of the Nunavik-IcE online training. There is only one last thing to do before your post gets released and becomes available to the public on Nunavik-IcE.
Congratulations! Your post is ready to be published. The last remaining step is to submit it for publication by a site administrator.
Procedure
Once your resource has been vetted (module 1), your post is created (module 2), visually enhanced (module 3), peer reviewed (module 4) and translated (module 5), you can finally submit your post for publication. This is how to do.
- Login to the backend.
- Under the post section of the WordPress toolbar, find your post.
- Click on the title of your post to edit it.
- On the upper right corner, where you usually save your draft, click on Publish.
- You will be asked if you want to submit your post for review. Click on that button.
- Repeat steps 2 to 5 for all three language versions of your post.
- Send an email to a website administrator or to nunavik.ice@kativik.qc.ca, including the title of your post, to let them know it is ready to be released.
What’s next?
Congratulations for completing the main Nunavik-IcE online training, following each step of the Post Publication Process. There are many other tools in the Nunavik-IcE WordPress backend that you can learn to use through these short complementary online trainings.
- Under development: Vocabulary module
- Under development: 3D Flipbooks
- Under development: Advanced Metadata