You might know PowerPoint as a presentation tool, but what about a storytelling tool? In this article, we suggest three activities for your students to tell theirs stories creatively using PowerPoint. In addition to gaining familiarity with this software, students experience the process of publishing of their stories in a format that is easy to share with readers and engaging.
Encourage your students to tell their stories in creative formats and share the final product for publication into Nunavik Writes!
Comic Books
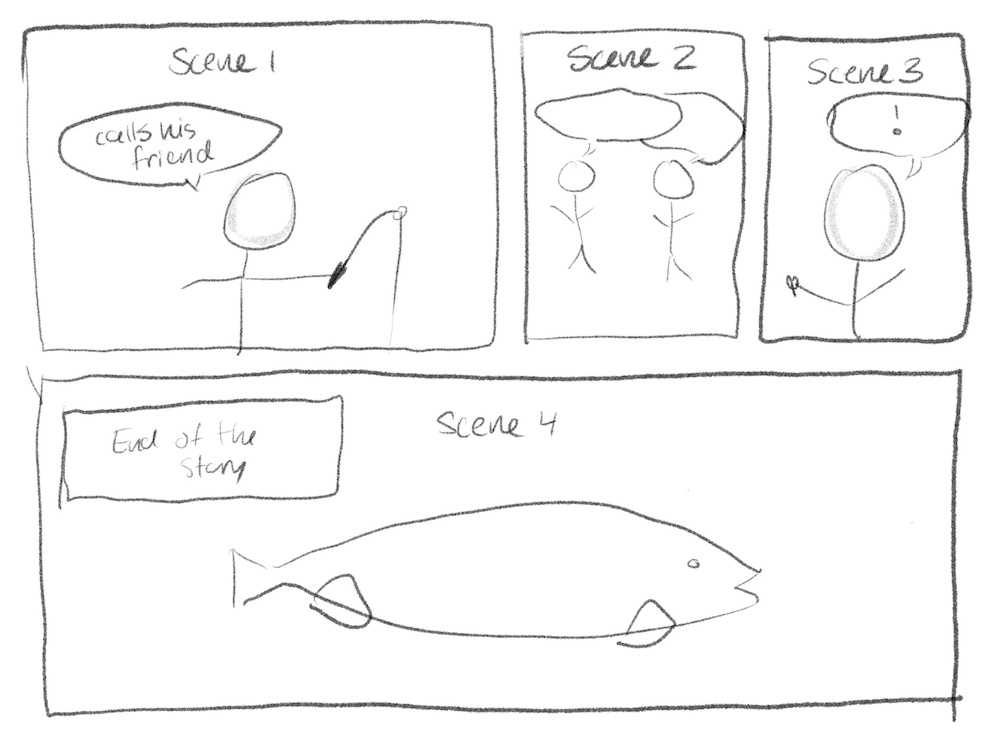
Dialogue heavy stories can easily be turned into comic book strips using PowerPoint. Ask your students to take pictures or use existing ones and add dialogues and narration using shapes and text.
🛠️ Tools used: PowerPoint’s Pictures and Shapes tools.
📚 Curricular links: Storytelling, dialogues, cartoon, media arts, planning and organizing ideas
📈 Level of difficulty: Beginner
Teaching Tips
Ask students to write their stories first, and to separate them into different scenes. You can also ask them to sketch their cartoon first. This will make the creation process on PowerPoint much more efficient! Ask students to write their stories by making a plan or a draft on paper first.
Procedure
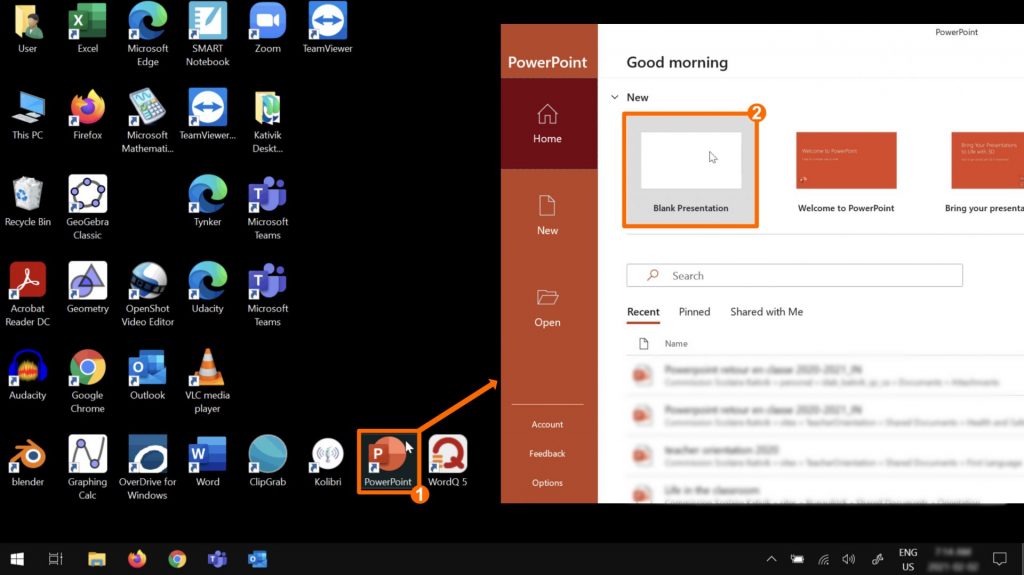
- Double click on the PowerPoint icon on your desktop.
- Double click on Blank Presentation to create a new document.
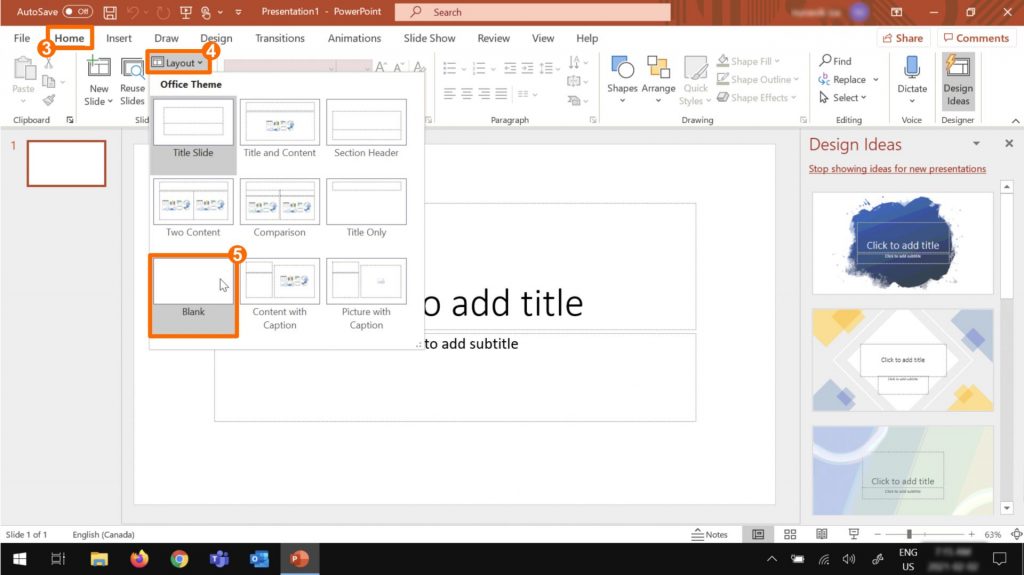
To change the slide layout and select a blank page:
- Select the Home tab.
- Click on Layout.
- Select the Blank layout.
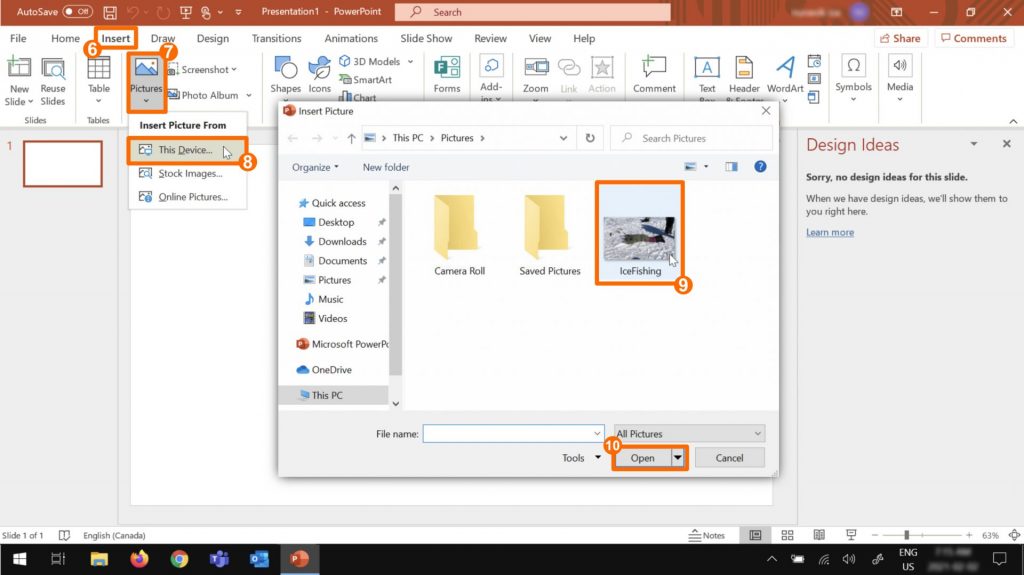
To insert images:
- Select the Insert tab.
- Click on Pictures.
- Under the Insert Pictures From menu, select This Device…
- Locate the picture you want to insert and click on it.
- Click on Open.
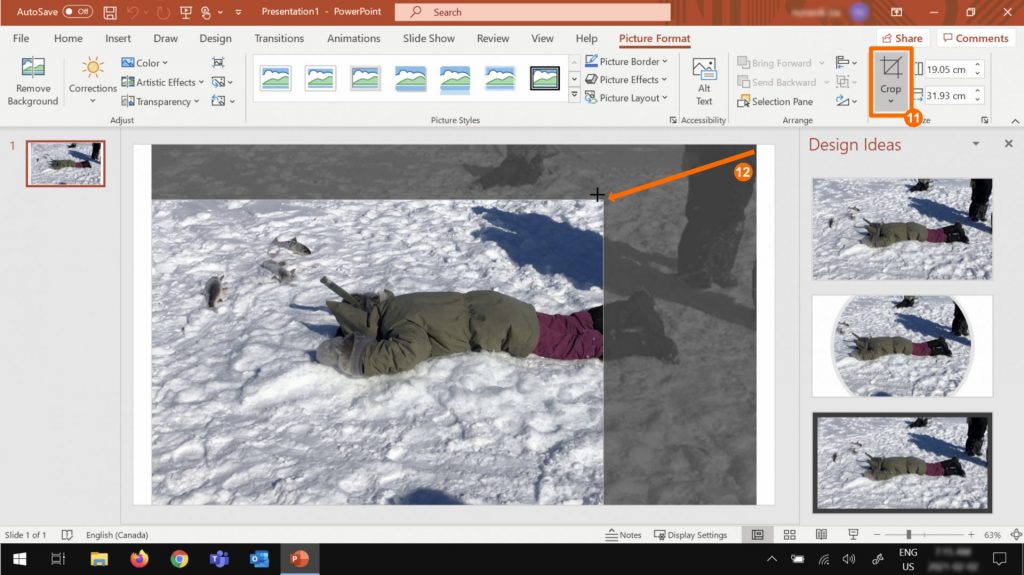
When an image is selected, the Picture Format tab automatically opens.
You can now crop your picture; choosing which portion or it you want to see.
- Under the Picture Format tab, select Crop.
- Click and drag from any corner to crop the image
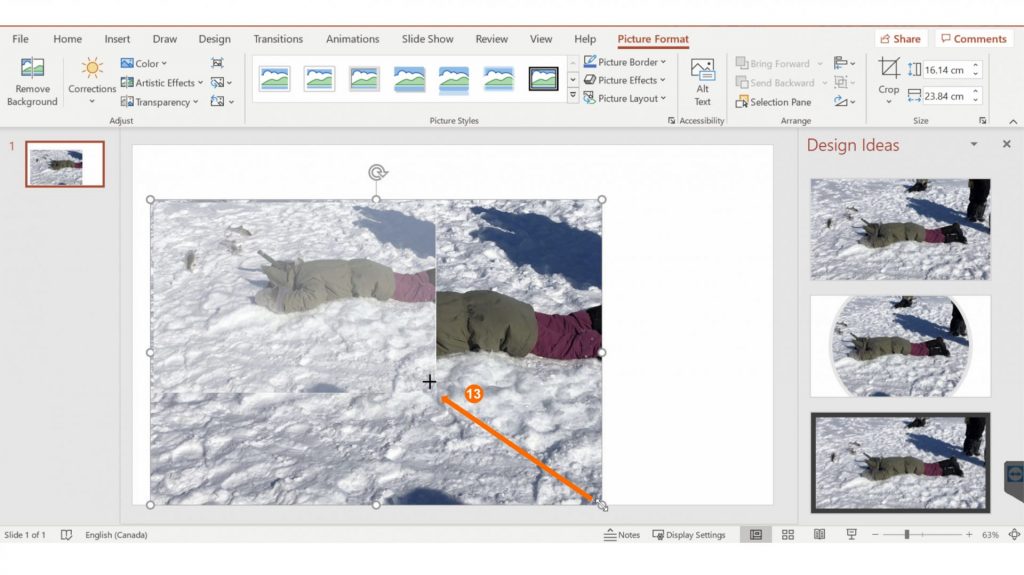
You can now resize and move your image.
- Click and drag from any corner of the image to resize it or click and drag from the center of the image to move it.
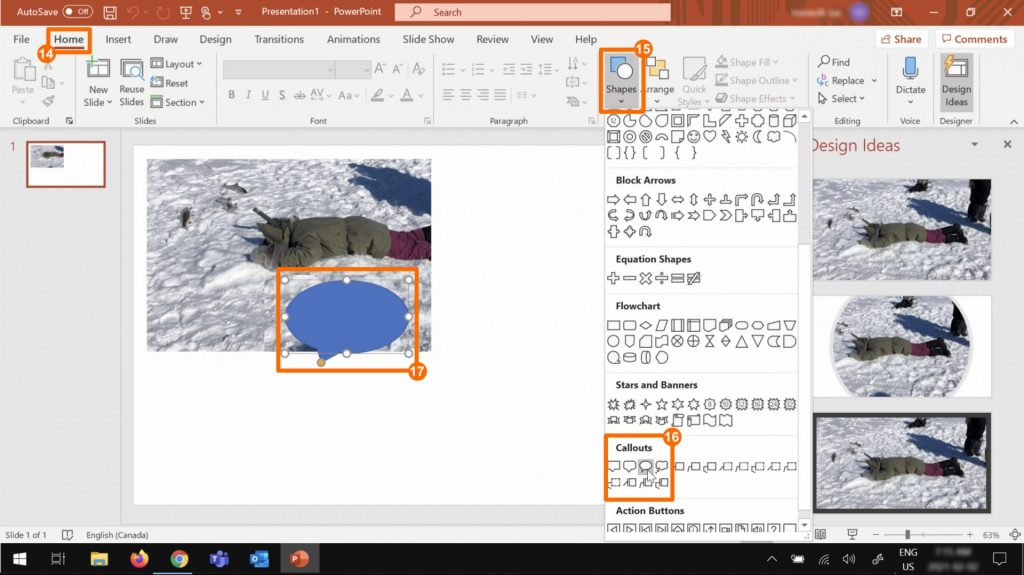
To insert speech bubbles:
- Select the Home tab.
- Click on Shapes.
- Scroll down to the Callouts section and select a shape.
- Click anywhere on the slide to insert that shape.
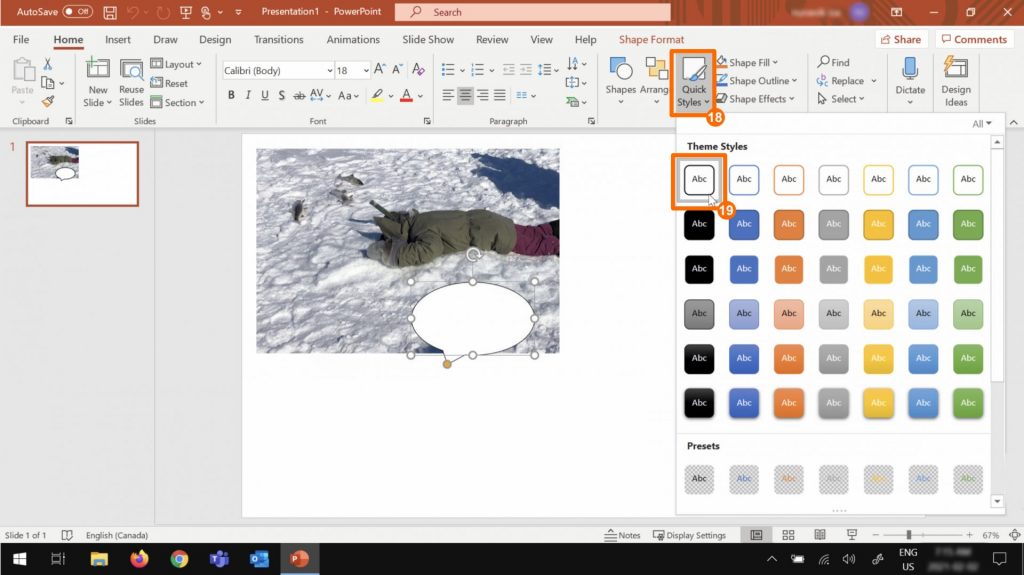
When a shape is selected, the tools to modify it are automatically shown.
- Select Quick Styles.
- Select a style.
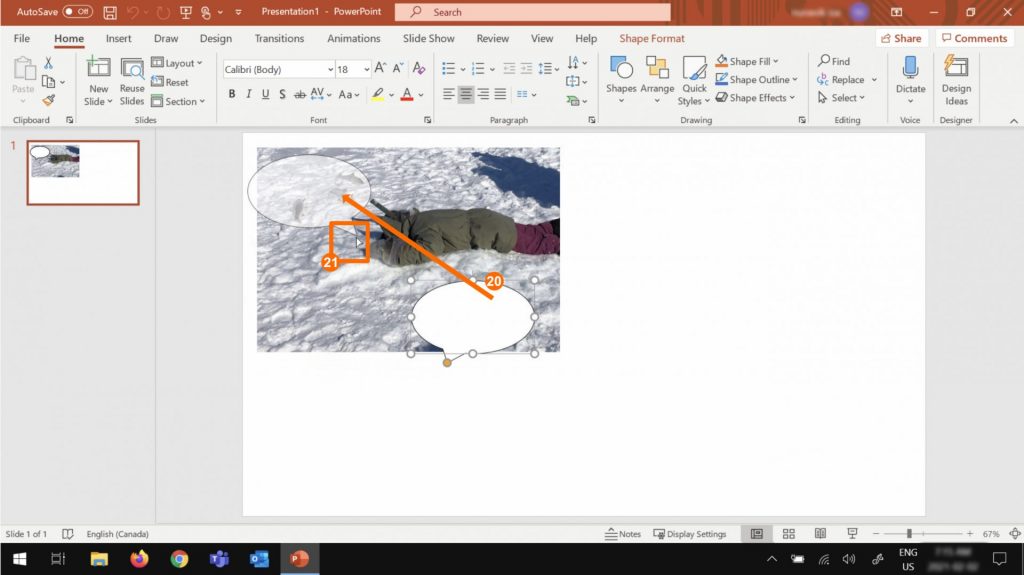
- Click and drag from the center of the shape to move it where you want.
- Click and drag from the yellow dot to transform the speech arrow.
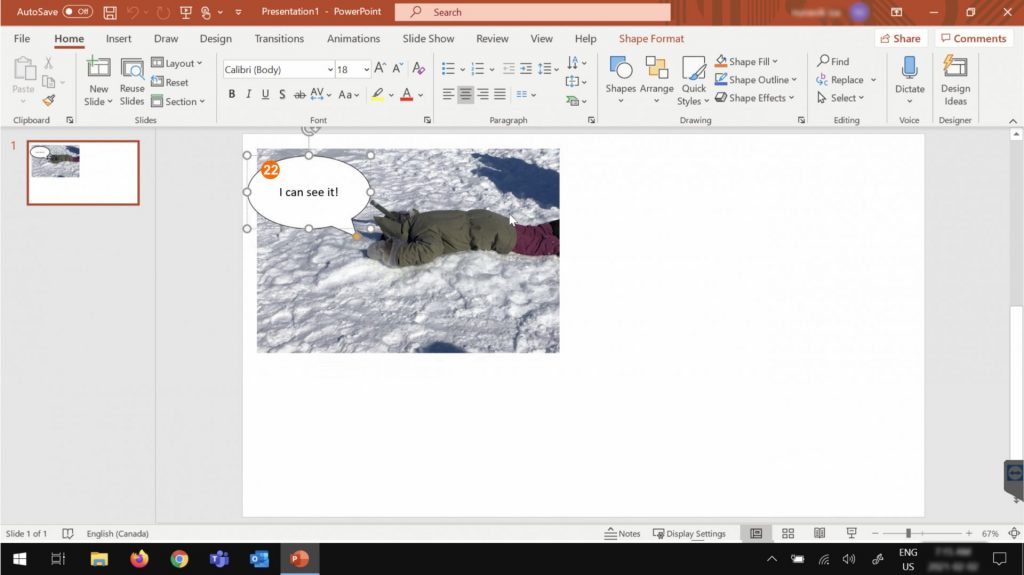
To add text:
- Click on the shape andf start typing.
Repeat steps 6 to 22 to add as many images as you want on each page of your PowerPoint comic book.
Save your Project
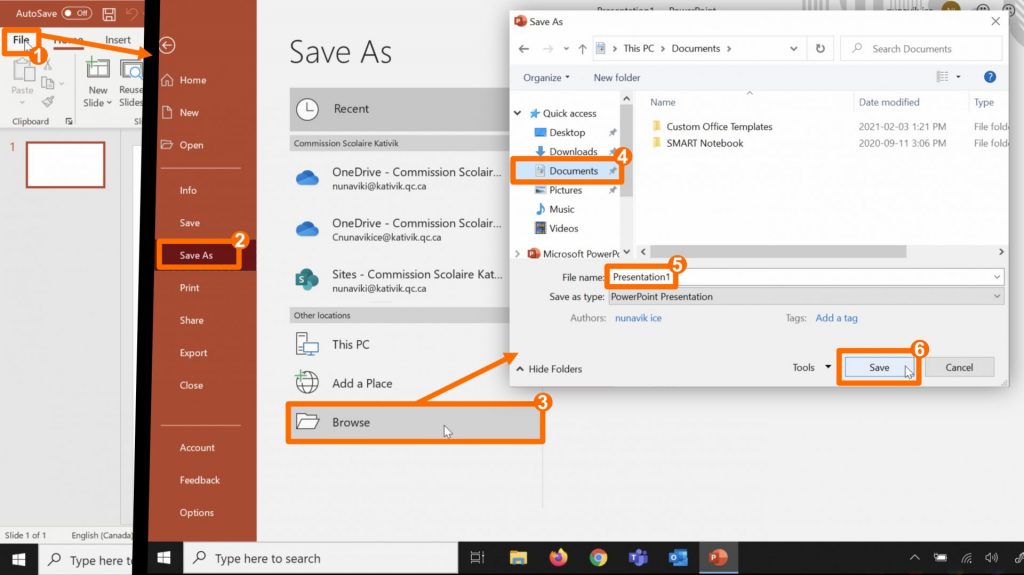
To save your project:
- Click on the File tab.
- Select Save As.
- Click on Browse.
- We suggest saving files under the Documents folder, but you may choose other locations.
- Name your file.
- Click on Save.
‘Choose Your Own Path’ Stories
‘Choose your own path’ stories ask the reader to make choices, which influence the unfolding of events. It is a creative writing style, that can be done collaboratively and that encourages students to consider multiple perspectives. Using the linked pages of PowerPoint, you can make these stories really interactive!
🛠️ Tools used: PowerPoint’s photo editor, text tool and hyperlinks
📚 Curricular links: Narrative structure, Storytelling, Endings, Critical Thinking, planning and organizing ideas
📈 Level of difficulty: Intermediate
Teaching Tips
Suggestions to make this activity collaborative
- Provide all students with the same prompt and ask them to write how the events could unfold. Each student’s text becomes an alternative course of events;
- Pair students in teams of two. In their story, each time a decision is made, each team member is in charge of an alternative course of events;
Make a plan
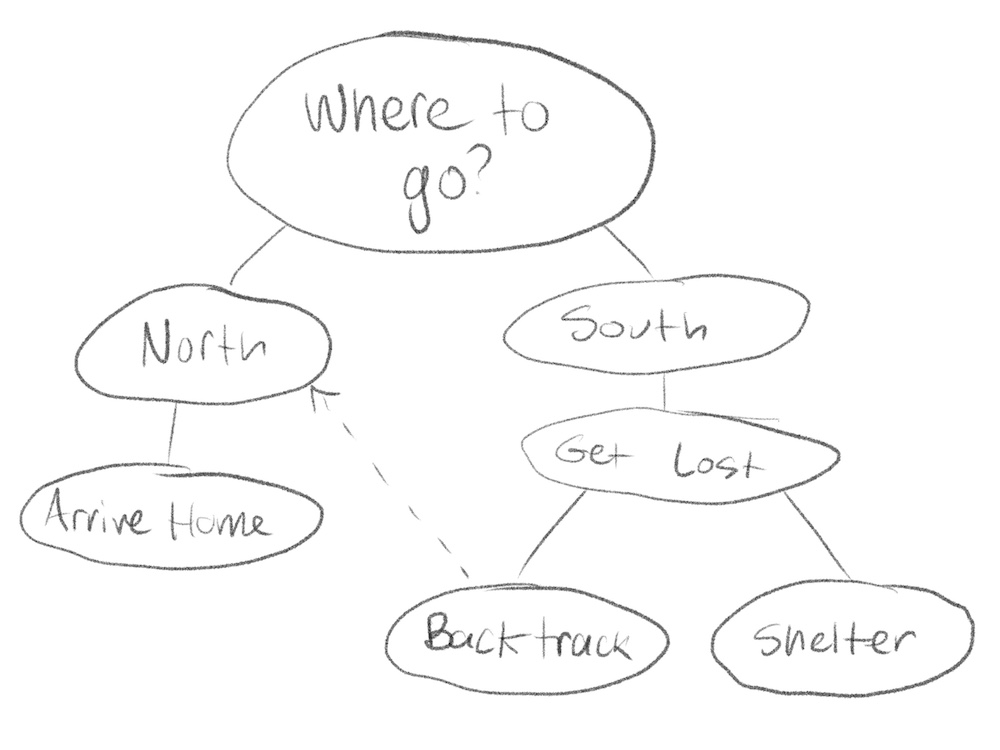
Before creating the story in PowerPoint, we strongly recommend making a tree diagram that represents the different paths the reader can take. Without such a roadmap, it’s easy to get really confused in your own story!
Procedure

- Double click on the PowerPoint icon on your desktop.
- Double click on Blank Presentation to create a new document.
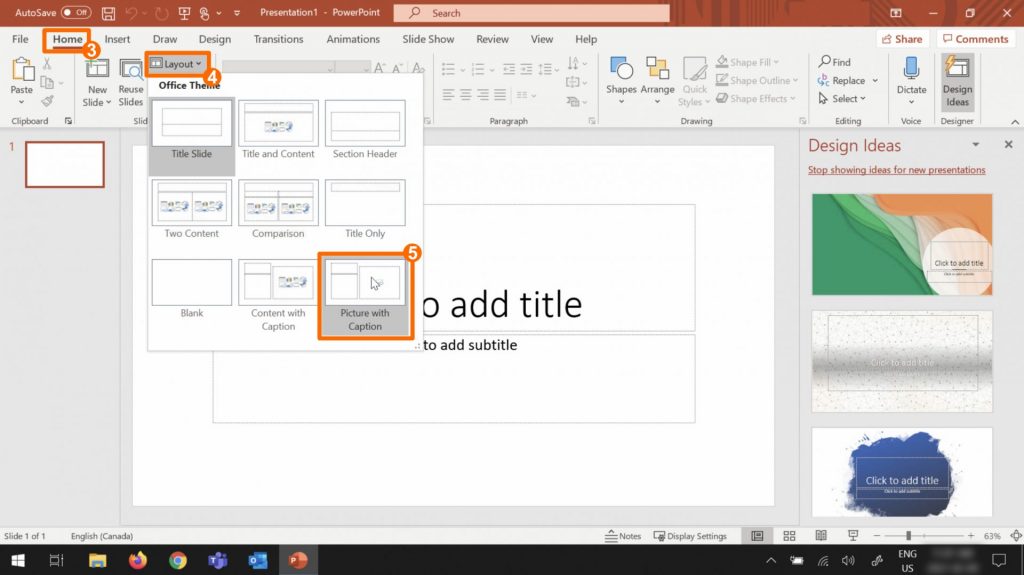
To change the slide layout and select a blank page:
- Select the Home tab.
- Click on Layout.
- Select Picture with Caption or any layout that better fits your needs.
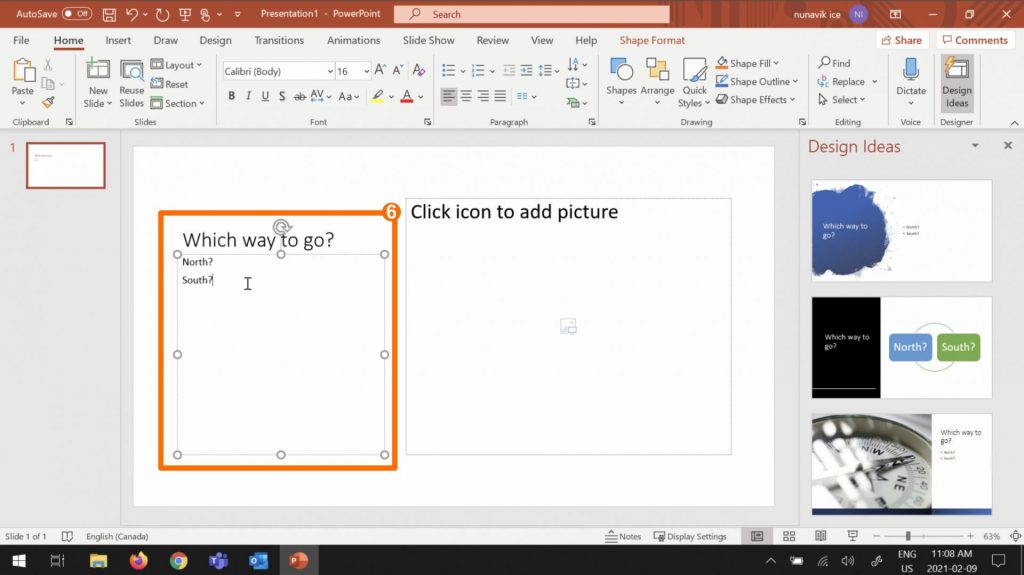
Type the text that goes on this page of the book, including the possible choices for the reader.
- To add text, simply click on a text area and start typing.
If readers are asked to make a choice, make sure that these choices are listed.
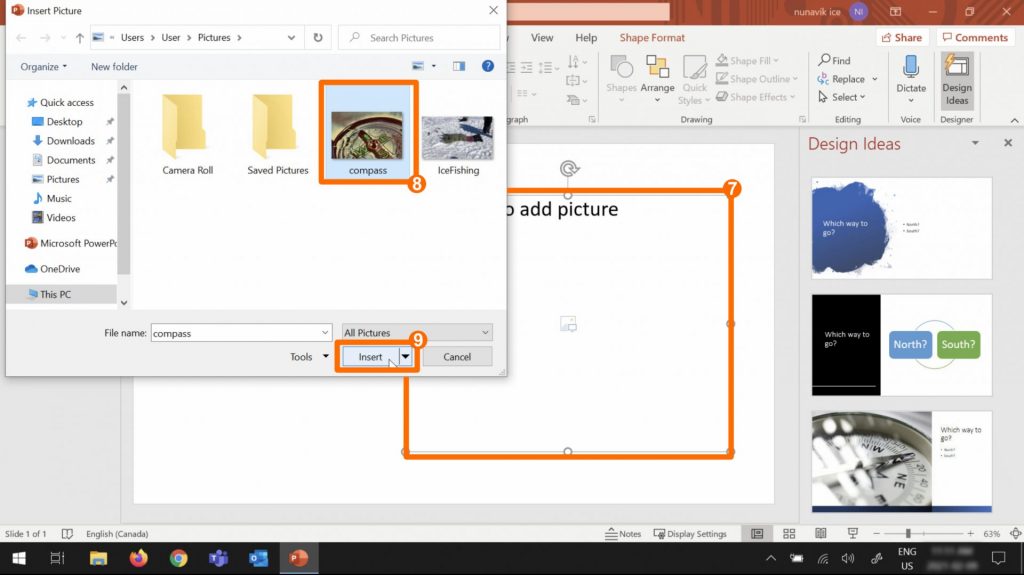
If you want, you can add an image to illustrate this page.
- Click anywhere in the picture zone.
- Locate the image you want to add in the Insert Picture window.
- Click on Insert.
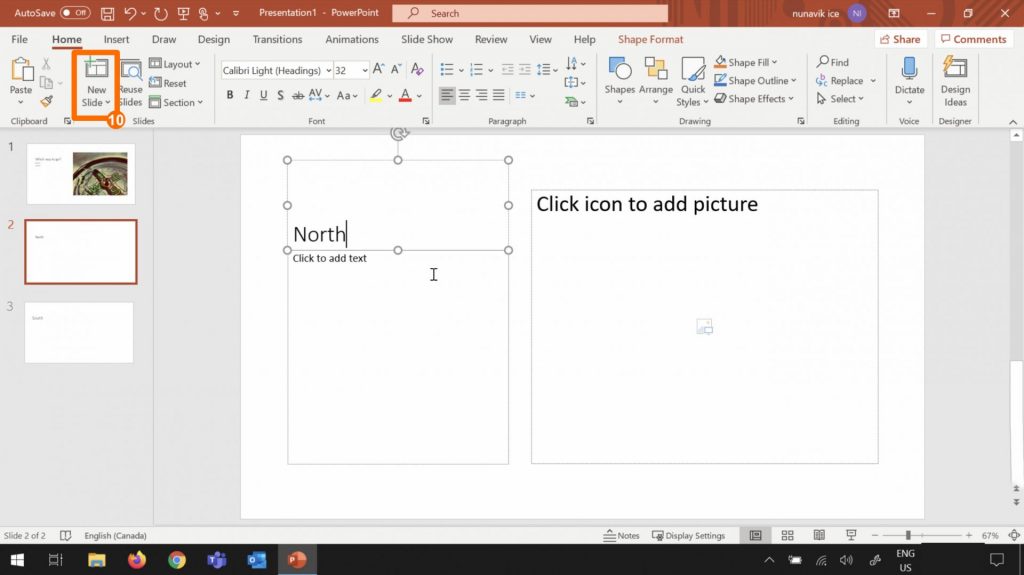
You will now repeat steps 3 to 9, creating a new slide for each page of your book. To create a new slide:
- Under the Home tab, select New Slide.
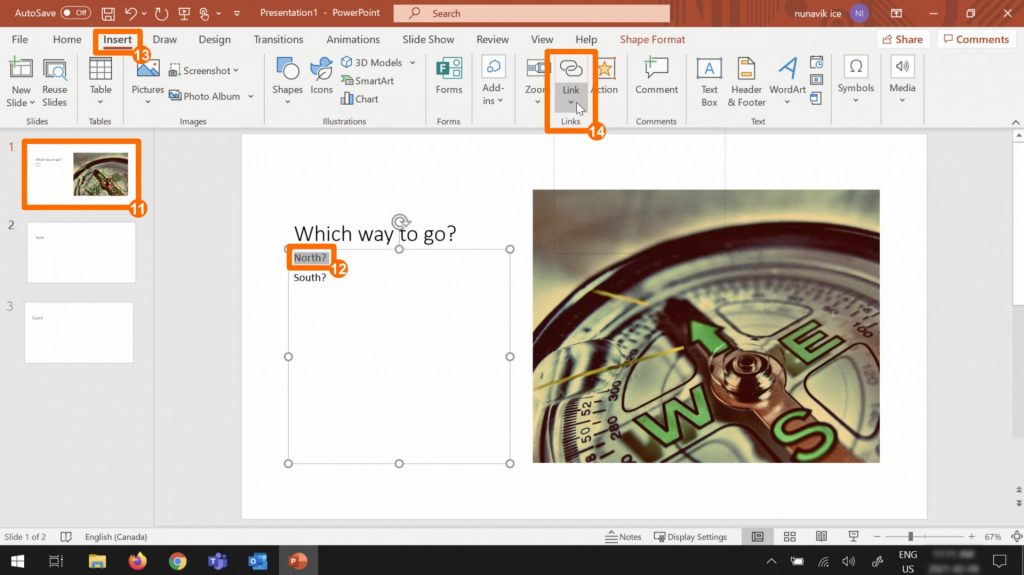
Once all your pages are created, it’s time to create links between them, allowing readers to make choices and follow different paths through the story.
- Select a slide where readers are asked to make a choice.
- Select the text corresponding to one of the choices.
- Click on the a tab.
- Select Link.
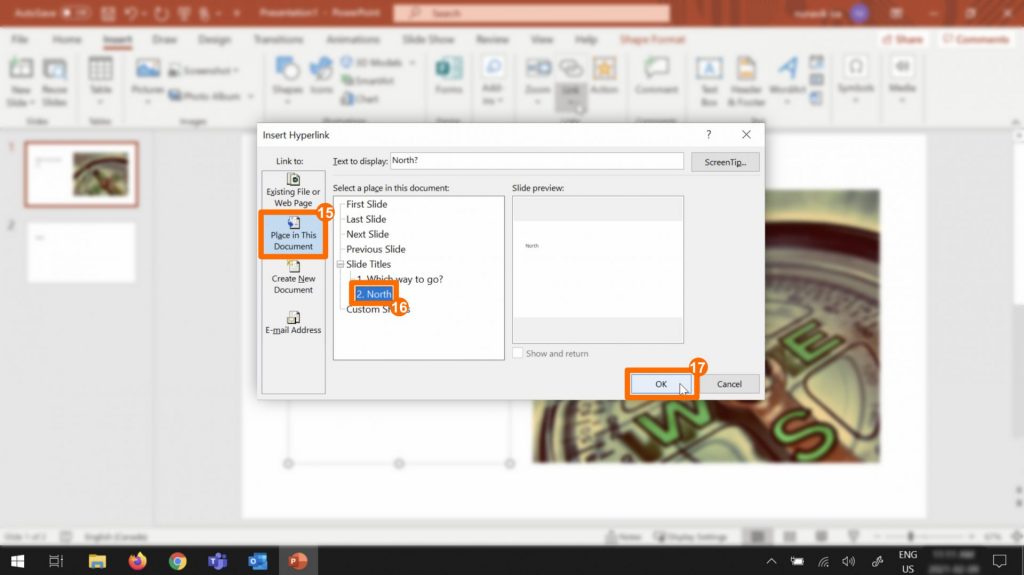
You will now indicate which slide will appear when the reader makes a choice.
- Under the Link to: column, select Place in this Document.
- Select the page corresponding to this option.
- Click on OK.
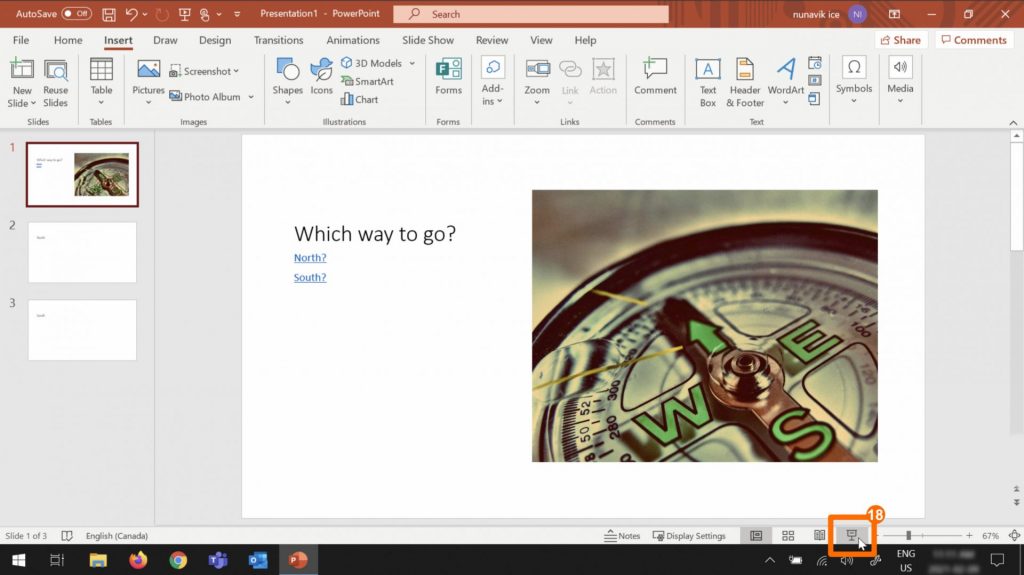
Repeat steps 12 to 17 for each option. Blue and underlined text means it will link to another slide when clicked.
- To test your book, click on the Presentation icon, located in the lower right corner of the screen.
Save your Project

To save your project:
- Click on the File tab.
- Select Save As.
- Click on Browse.
- We suggest saving files under the Documents folder, but you may choose other locations.
- Name your file.
- Click on Save.
Share your Project with Readers as a PDF
Creating a PDF document allows you to share your book with a larger audience, on any computer or mobile device.
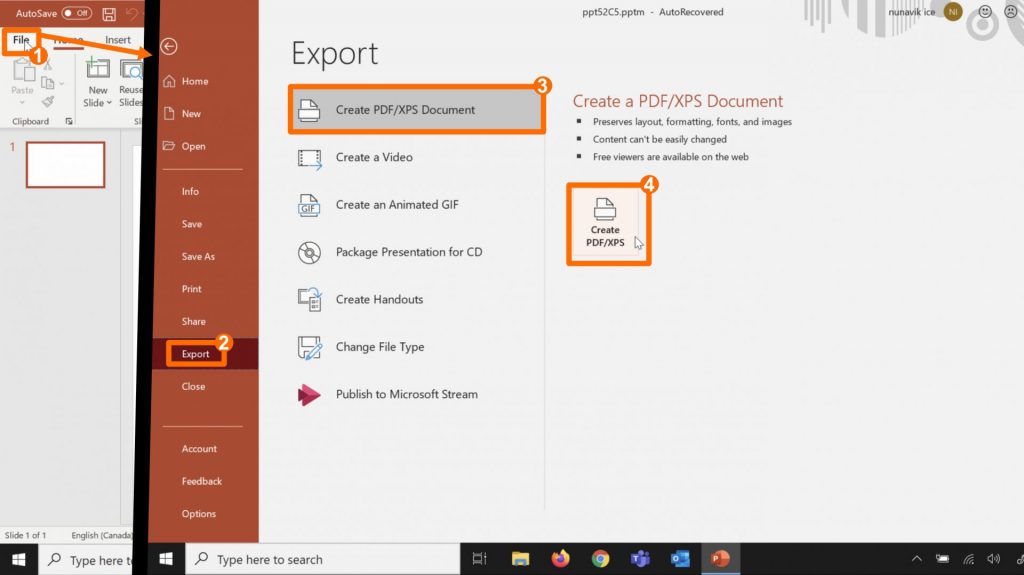
- Click on the File tab.
- Select Export.
- Select Create PDF/XPS Document.
- Click on Create PDF/XPS.
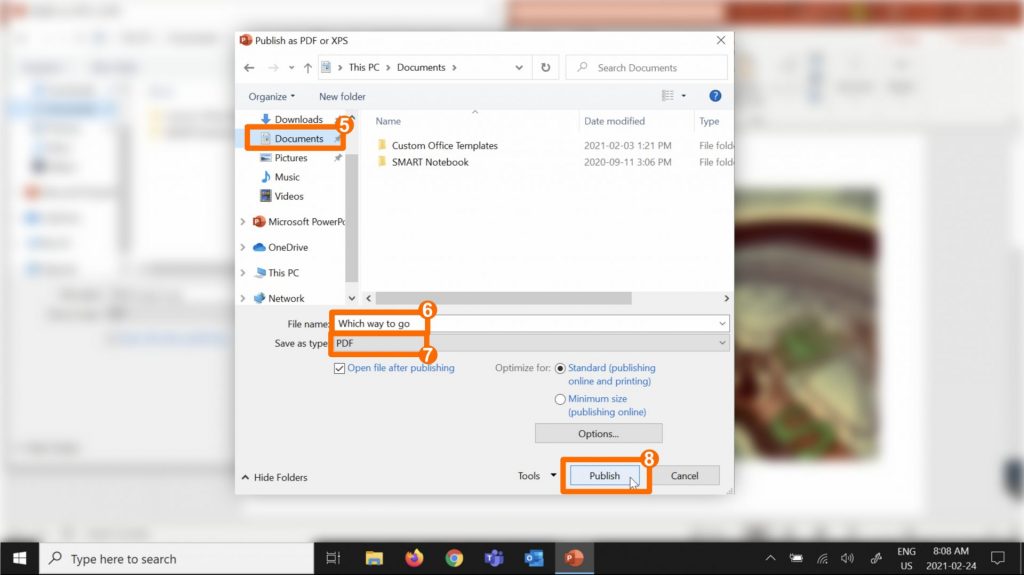
- We suggest saving files under the Documents folder, but you may choose other locations.
- Name your file.
- Make sure the PDF option is selected.
- Click on Publish.
Read Along Book
Read along books combine oral and written storytelling and are ideal for younger students to learn to read. Ask your students to create read-along books and to share them with younger groups to foster school-wide collaboration.
🛠️ Tools used: PowerPoint’s photo editor, text tool and audio recording
📚 Curricular links: Storytelling, illustration, reading, intonation and pronunciation, publishing, sharing with intended audience
📈 Level of difficulty: Advanced
Procedure

- Double click on the PowerPoint icon on your desktop to launch the software.
- Double click on Blank Presentation to create a new document.
Creating the pages of your book
We suggest creating all the page of your ‘read along’ book before recording and animating it.

To change the slide layout and select a blank page:
- Select the Home tab.
- Click on Layout.
- Select Picture with Caption or any layout that better fits your needs.
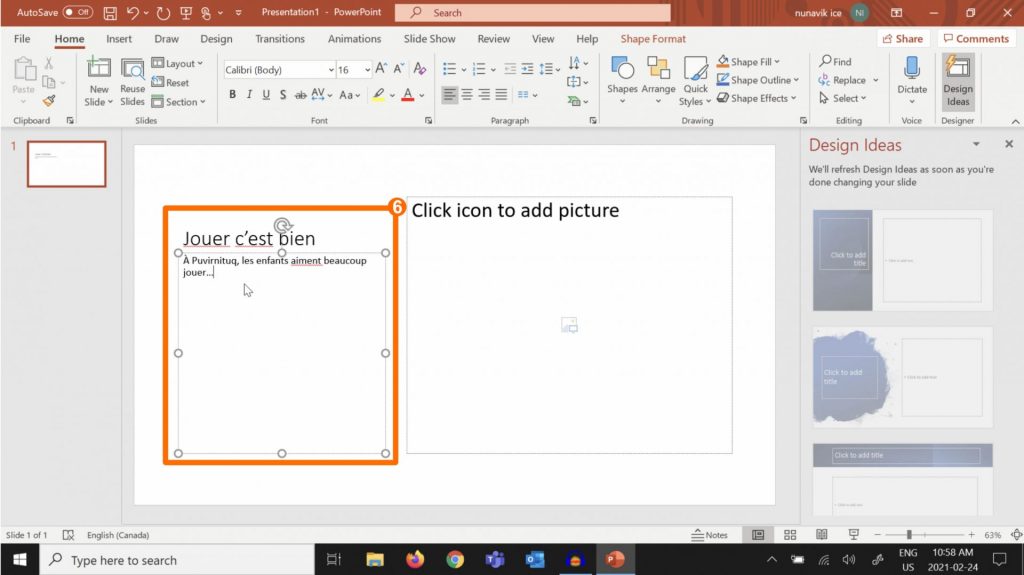
Type the text that goes on this page of the book.
- To add text, simply click on a text area and start typing.
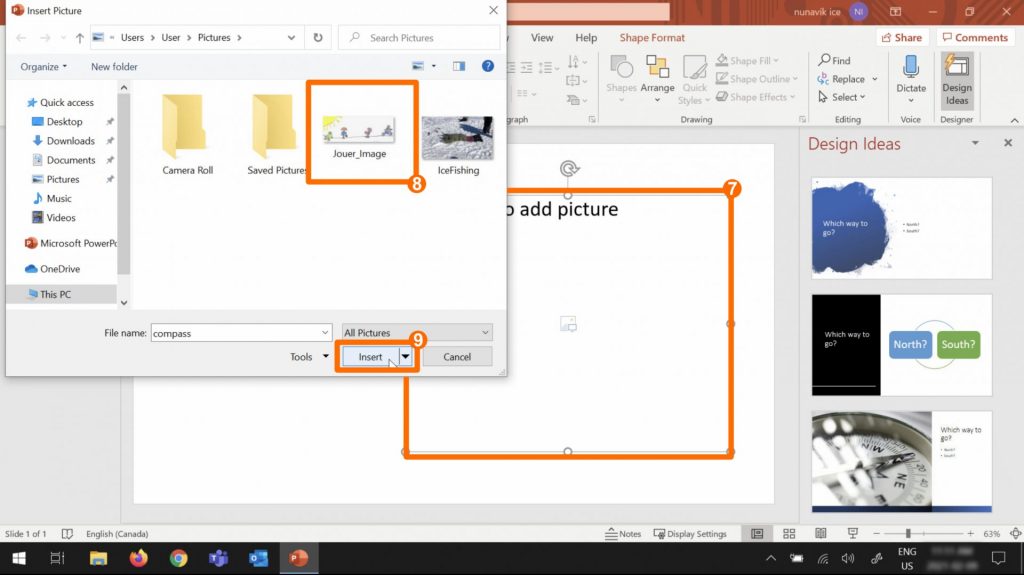
If you want, you can add an image to illustrate this page.
- Click anywhere in the picture zone.
- Locate the image you want to add in the Insert Picture window.
- Click on Insert.

You will now repeat steps 3 to 9, creating a new slide for each page of your book. To create a new slide:
- Under the Home tab, select New Slide.
Recording the audio
Once all the pages of your book have been created, you can start recording the audio.
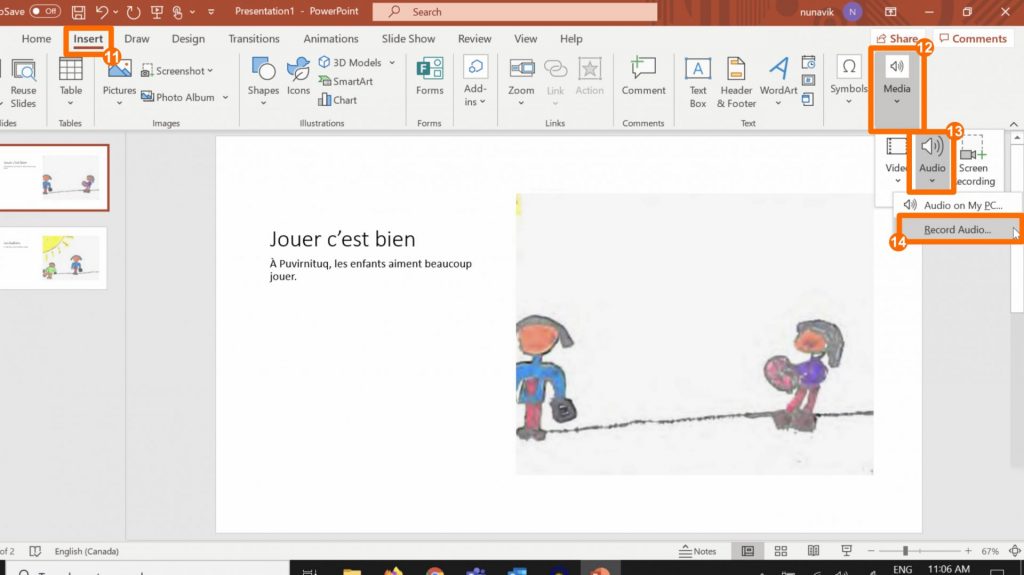
The audio will be recorded for each slide separately. Start by selecting slide 1.
- Select the Insert tab.
- Click on Media.
- Select Audio.
- Select Record Audio…
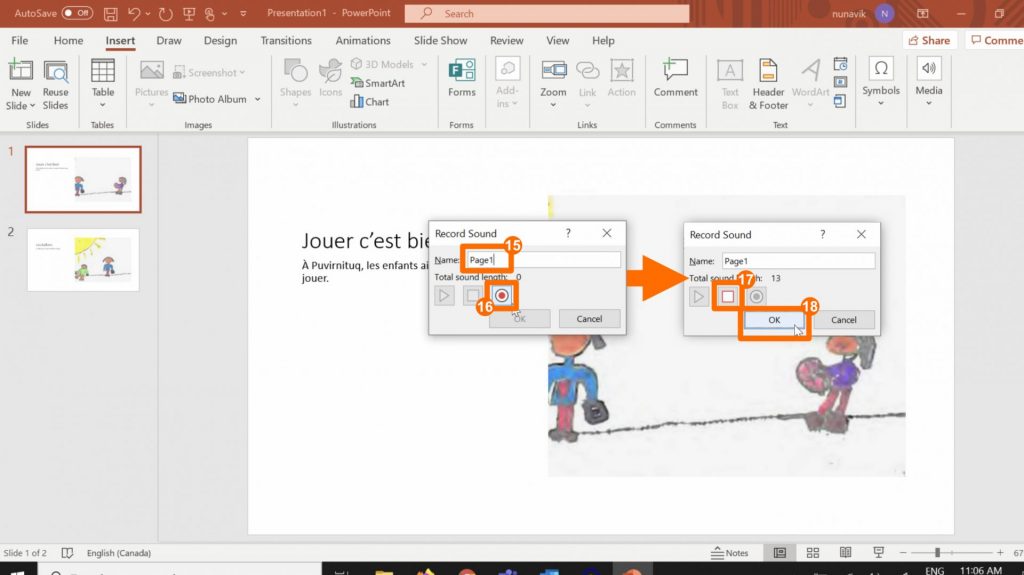
- Name the recording your are about to start.
- Click on the red circle to record.
Read the text on this page aloud while recording.
- Once you are done, click on the square to stop the recording.
- Click on OK.
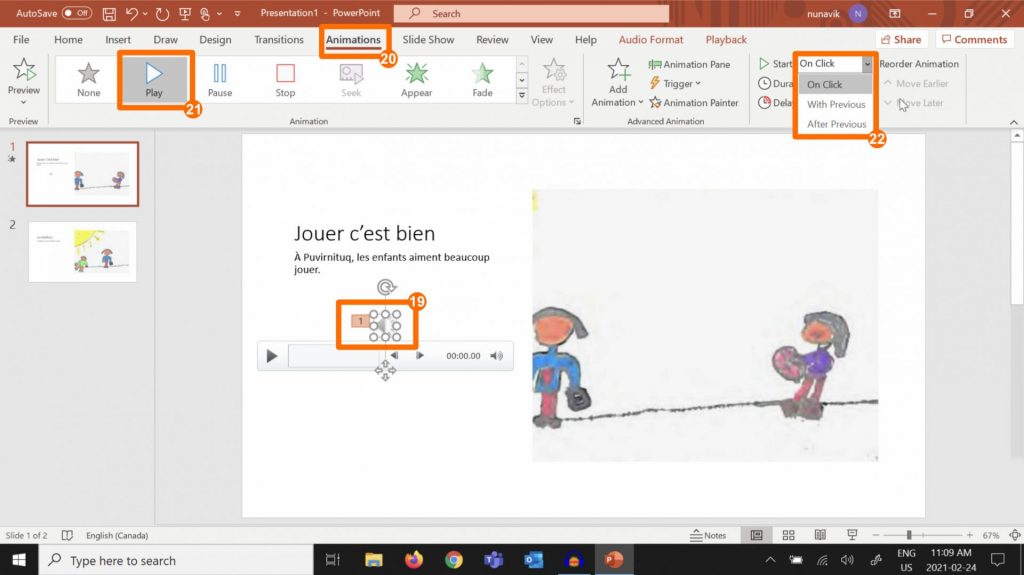
You now have 2 options. The recording can either play automatically, or when the reader clicks on the icon. To select either option:
- Select the recording icon on your slide.
- Select the Animations tab.
- Select the Play action.
- Either select Click or With Previous.
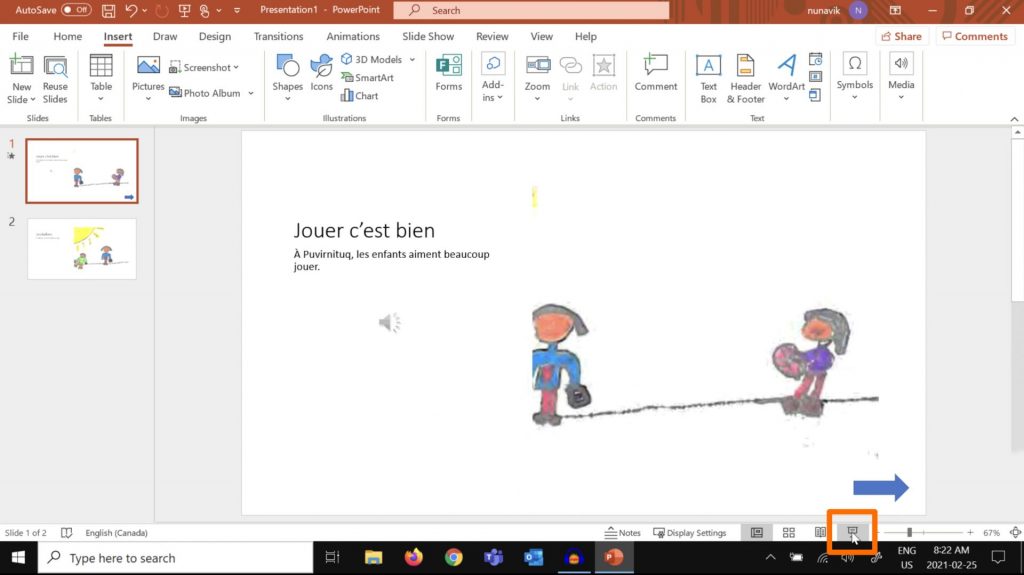
Repeat steps 11 to 22 for each slide. To test your Read Along book, click on the Presentation icon, located in the lower right corner of the screen.
You can now decide how you want your readers to go from one page to another. The first option is to add a Next Page button. The second one is to go to next page automatically after the audio recording has played.
Option 1 Adding a button to change page
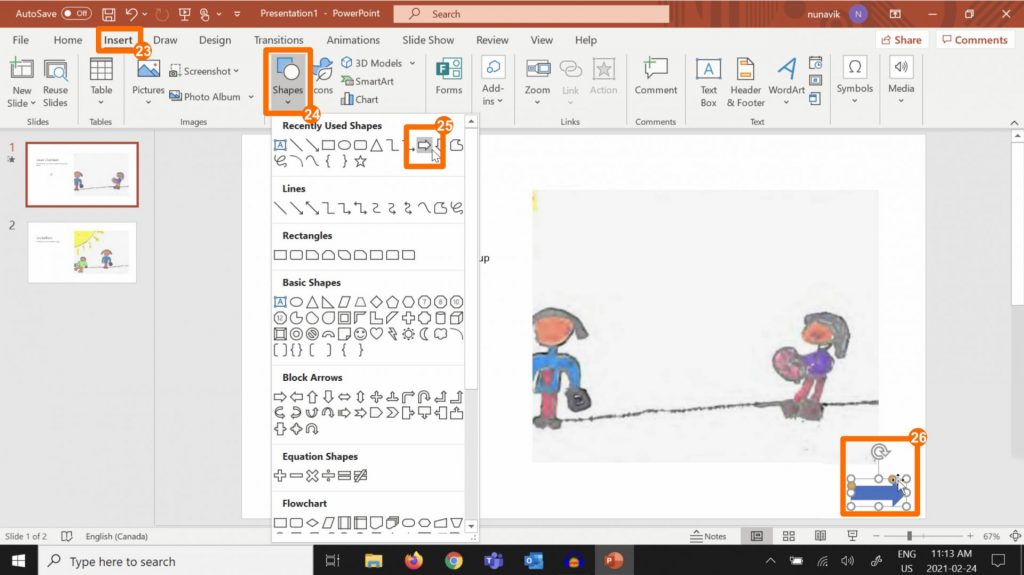
To add a Next Page button:
- Select the Insert tab.
- Click on Shapes.
- Select a shape of your choice, like an arrow.
- Click on the slide to place this shape.
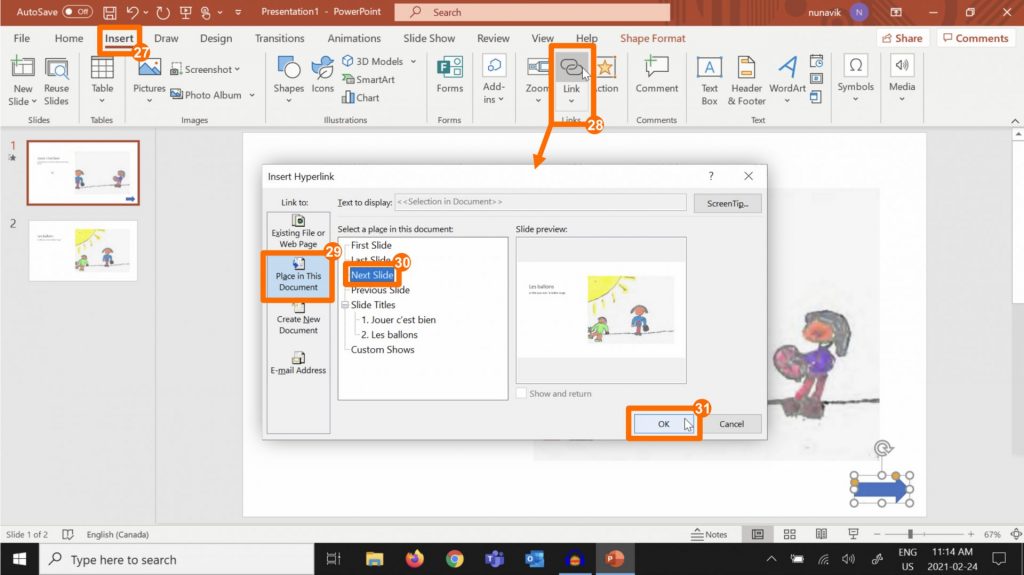
- Make sure the shape is selected, and then click on the Insert tab.
- Select Link.
- Under the Link to: column, select Place in this Document.
- Select Next Slide.
- Click on OK.
Repeat steps 23 to 31 for each slide.
Option 2 Automatically go to the next page
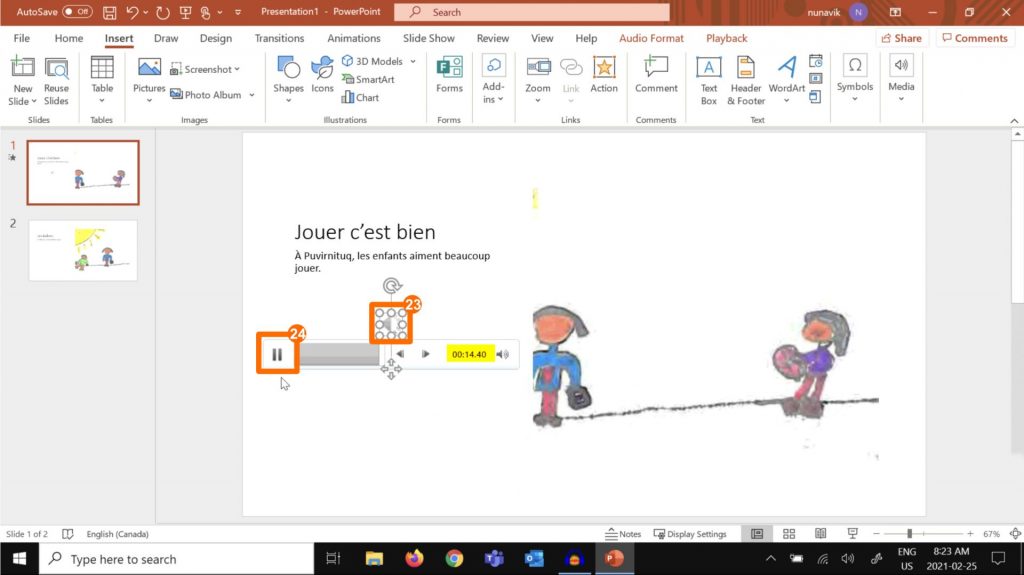
For this option, you will need to know how long your audio recordings are.
- Select an audio recording by clicking on it.
- Click on Play
Note the approximate duration of the audio recording.
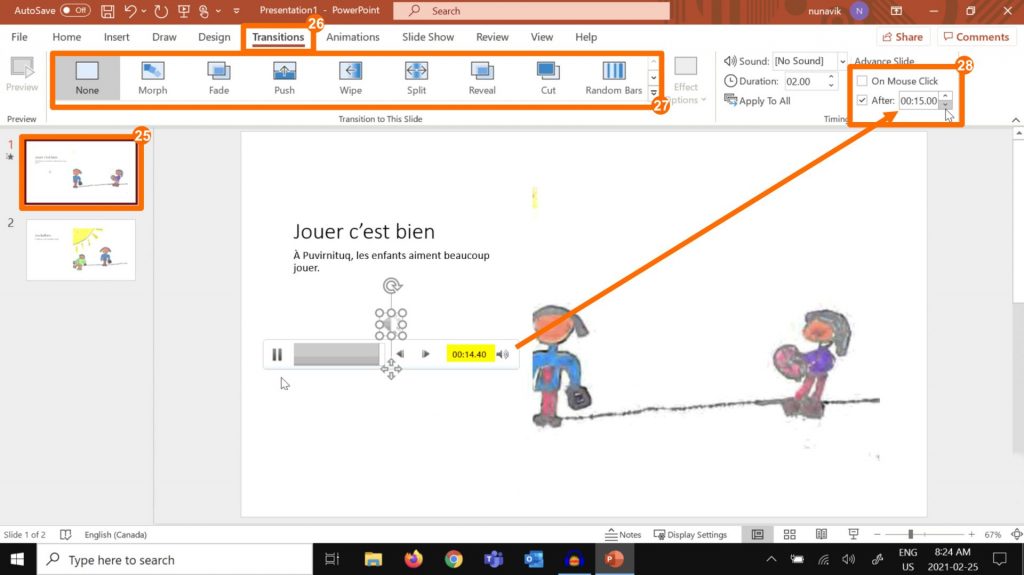
- Select a slide.
- Click on the Transitions tab.
- Select an effect of your choice.
- Under the Advance Slide section, de-select After, select On Mouse Click and enter the rounded up duration of this slide’s audio recording.
Repeat steps 23 to 28 for each slide.
Saving your Project

To save your project:
- Click on the File tab.
- Select Save As.
- Click on Browse.
- We suggest saving files under the Documents folder, but you may choose other locations.
- Name your file.
- Click on Save.
Share your Project with Readers as a PDF
Creating a PDF document allows you to share your book with a larger audience, on any computer or mobile device.
*Choose this option if you created buttons to change the pages of your book.

- Click on the File tab.
- Select Export.
- Select Create PDF/XPS Document.
- Click on Create PDF/XPS.

- We suggest saving files under the Documents folder, but you may choose other locations.
- Name your file.
- Make sure the PDF option is selected.
- Click on Publish.
Share your Project with Readers as a Movie
Creating a Movie document allows you to share your book with a large audience on any computer or mobile. Instead of changing pages and clicking on the recordings, the movie options will do
*Use this option if your audio recordings are set to play automatically (step 22) AND you chose to make pages change automatically in your book (step 28).
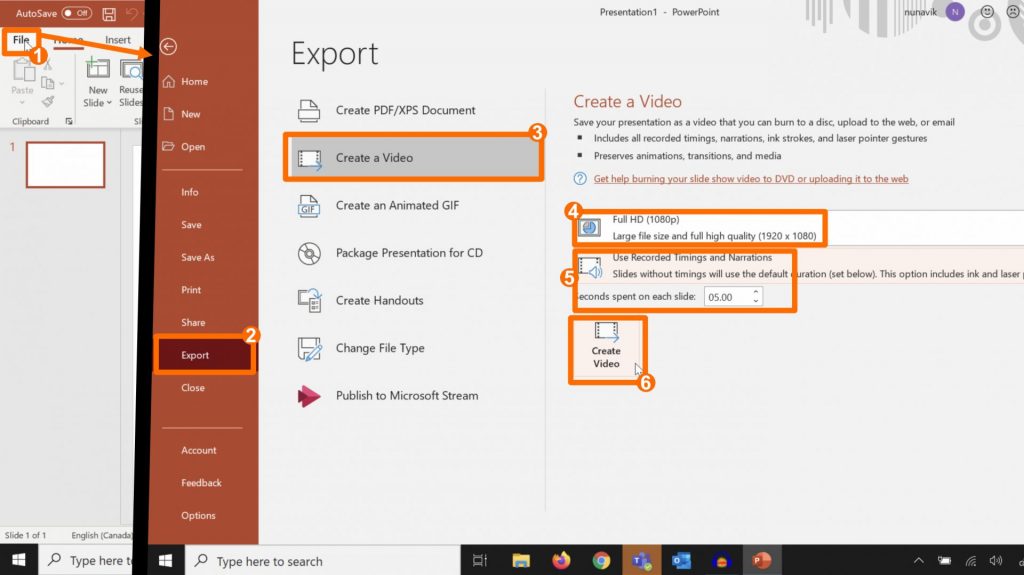
- Click on the File tab.
- Select Export.
- Select Create a Video.
- Select a video quality.
- Make sure to select Use Recorded Timings and Narrations. This way your video will spend the time you specified at step 28 on each page. Ignore the 5 seconds information.
- Click on Create Video.
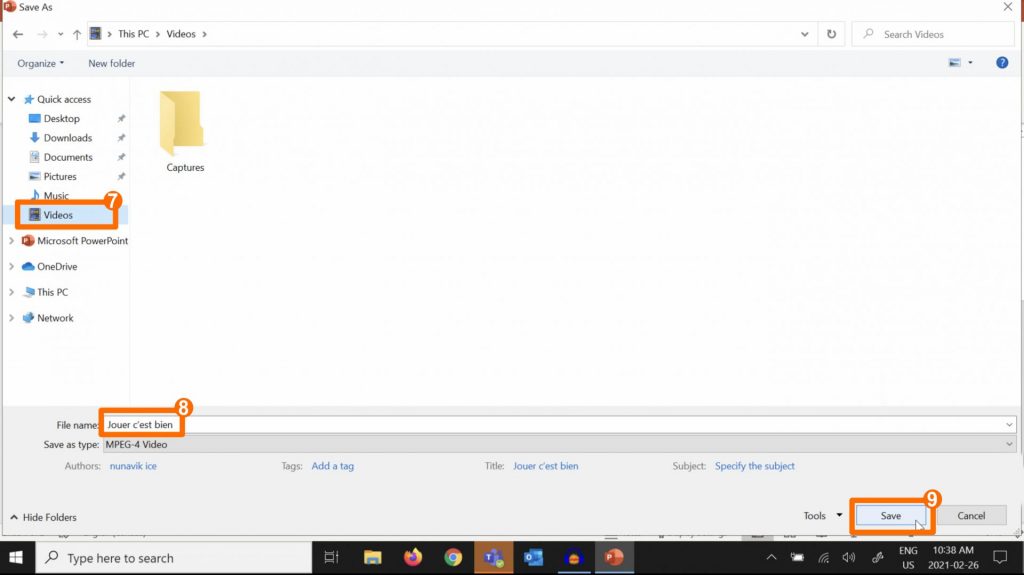
- We suggest saving files under the Videos folder, but you may choose other locations.
- Name your file.
- Click on Publish.
