Guide to your Work Laptop
This section was prepared to guide you step by step as you become familiar with your new KI teacher computer.

Identifying your Computer
KI computers come in two configurations; one for students and one for teachers. Before following the instructions in this document, make sure you have the right computer. For this document, you should have a teacher computer.
Student Computer
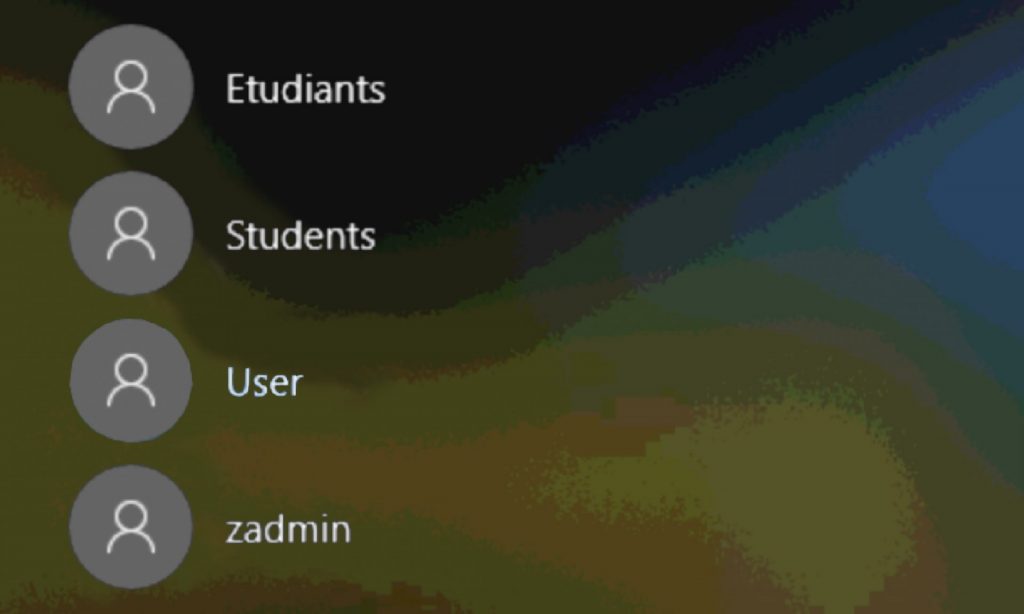
How to recognize a student computer? When you land on the Sign in page, you should see the following sessions.
Currently, students computers are DELL Latitude 3410 or 5310. This information is visible under your computer.
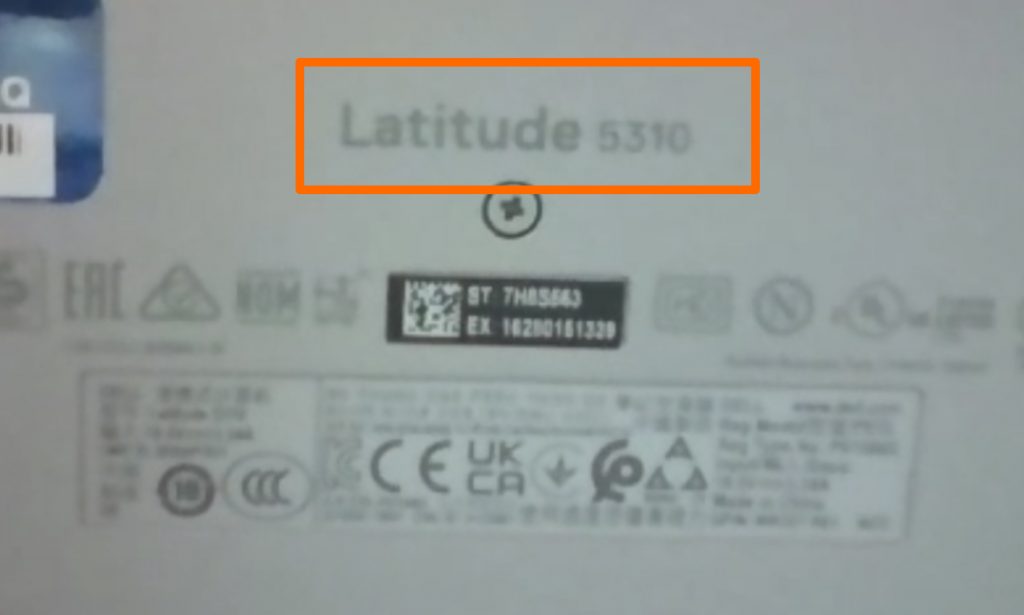
If you have this computer, and you are a student, use the KI student computer post instead.
Teacher Computer
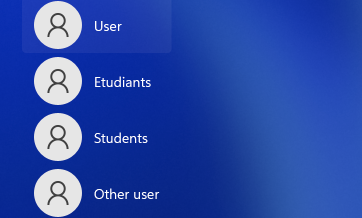
How to recognize a teacher computer? When you land on the Sign in page, you should see the following sessions.
Currently, teachers computers are DELL Latitude 5310 Latitude 2 in 1. This information is visible under your computer.
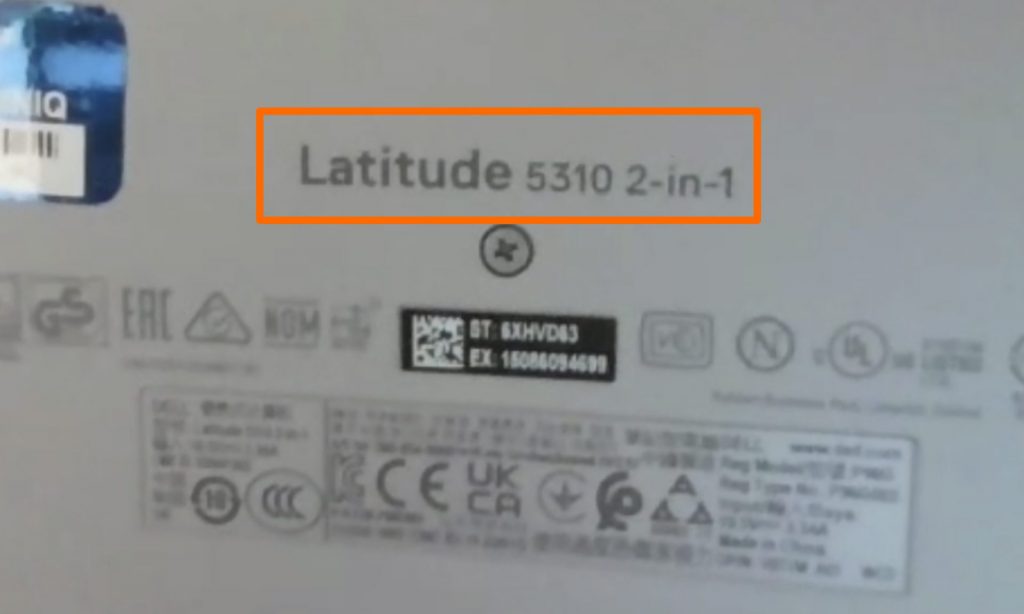
If you have this computer, keep reading this post!
Signing In and Out
When you turn your computer ON, it will land on the sessions sign in page. KI computers come in different configurations. Depending on this configuration, the sessions available will vary. As a teacher, you must use the Other user or Autre usager session. Students must use the Student or Étudiant session.
*A password to sign in with the Other user or Autre usager session will be provided by your principal. NEVER SHARE THIS PASSWORD WITH STUDENTS.
Signing In to the Other user or Autre usager session
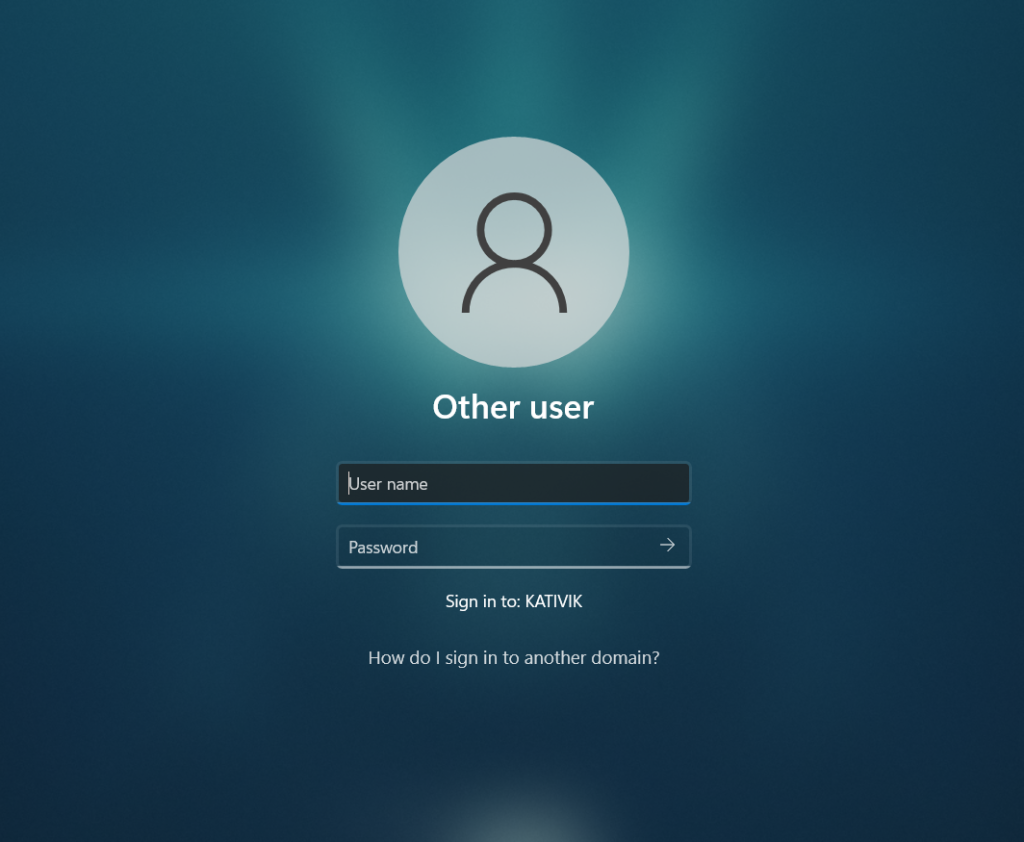
- Select the Other user or Autre usager session, in the lower left corner of the screen.
- Enter your KI credentials.
- Click on the arrow to sign in.
Signing Out
Once you are done working on your computer, sign out of your session to protect your data.
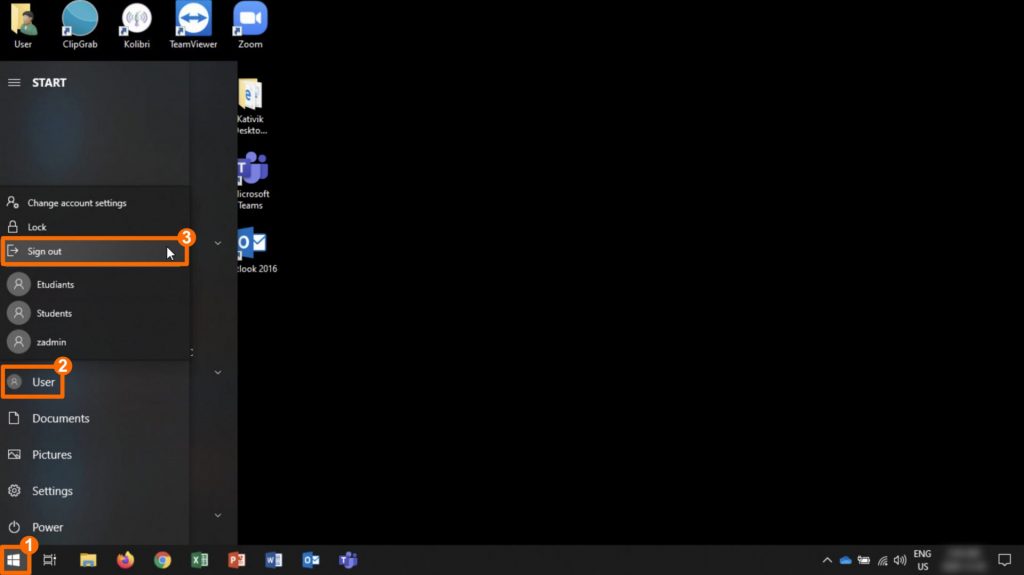
- Click on the Start menu, in the lower left corner of the screen.
- Click on your session icon.
- Click on Sign out.
Accessing your school’s Wi-Fi network
The first time you turn computer ON, you will need to connect to the KI-Employees network with you KI credentials
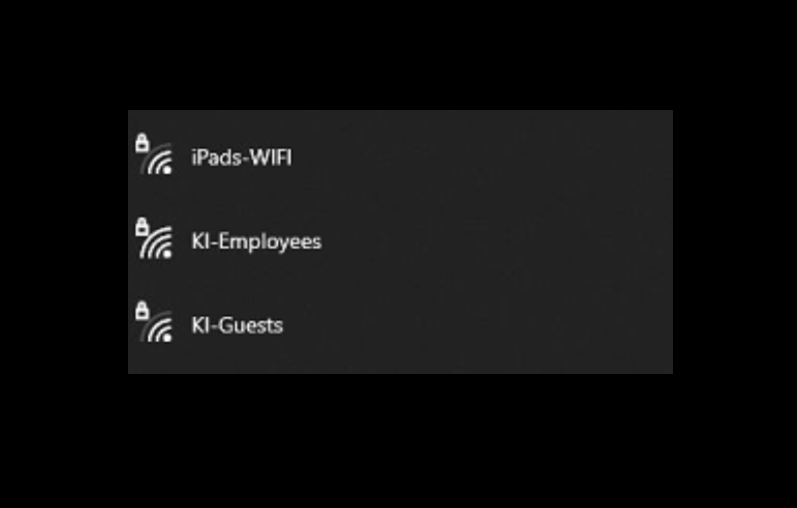
- Click on the Wi-Fi icon, located in the lower right corner of the screen.
- Make sure the selected network is KI-Employees.
- Connect the network using your KI credentials.
*If your KI computer does not connect to the network, create a ticket for the IT department to help you.
Accessing your KI Email
There are two main approaches to access your KI email.
- The first approach is to setup Outlook on your computer. We recommend this approach because it will simplify your access to email, notify you when you receive new messages and allow you to read emails you previously received, even if you are not connected to the Internet.
- The second approach is to use a web browser such as Google Chrome to access your email. With this approach, you will not be notified when you receive new emails and you will not be able to access your inbox when you are not connected to the Internet.
Setting up Outlook on your computer
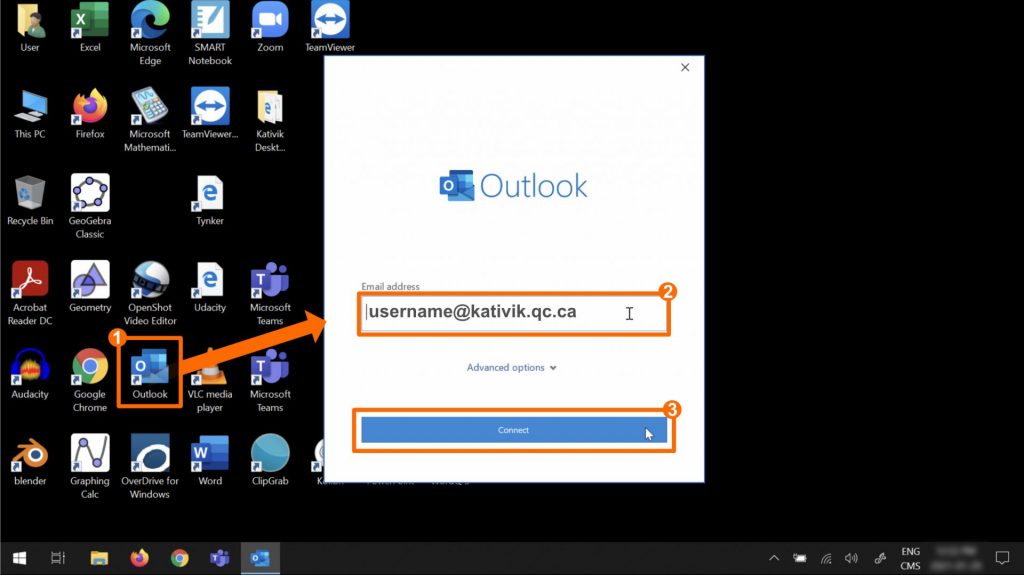
- Double click on the Outlook icon on your desktop.
- To sign in to your KI email account, type in username@kativik.qc.ca.
- Click on Connect.
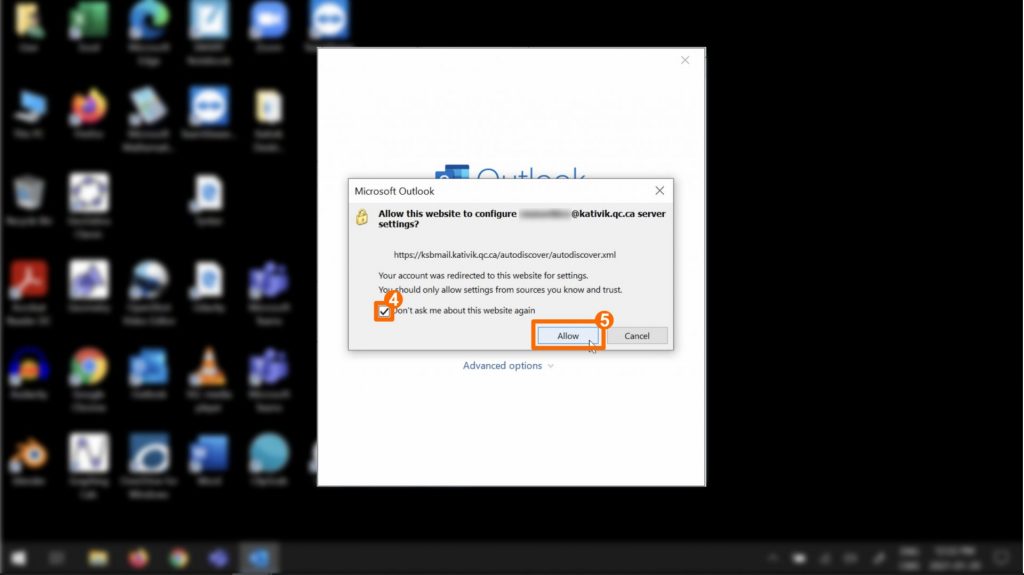
Your computer will probably ask your authorization to connect with the Microsoft website.
- Select Don’t ask me about this website again by ticking the box.
- Click on Allow.
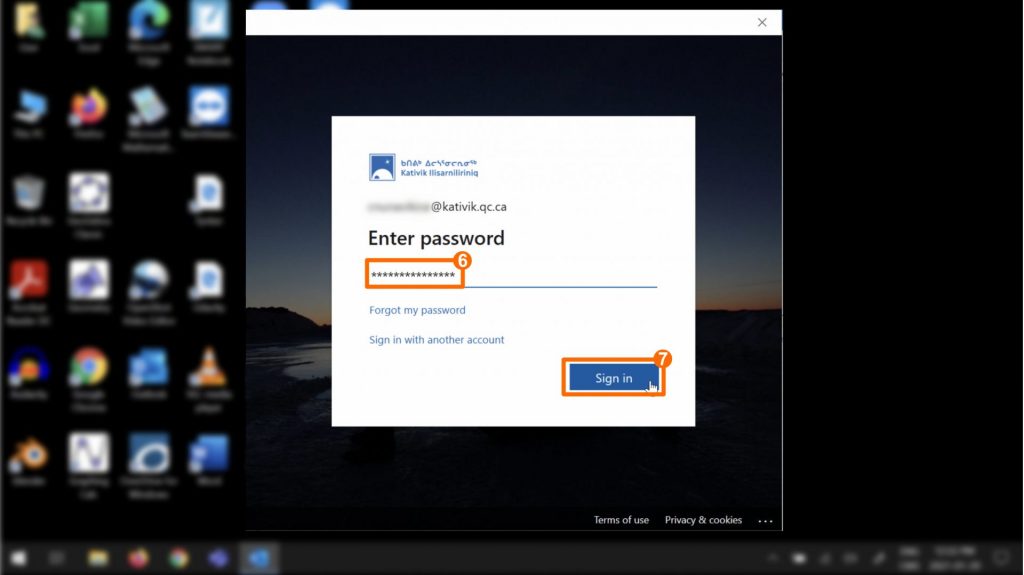
- Type your KI email address password.
- Click on Sign In
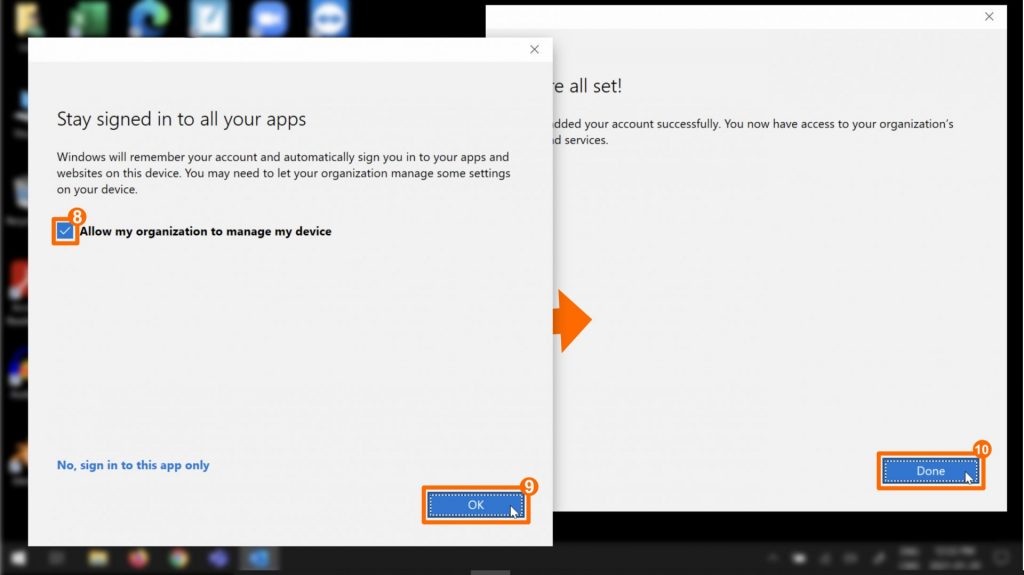
- Select Allow my organization to manage my device by ticking the box. This way, all Microsoft tools will be connected to your KI email account.
- Click on OK.
- A confirmation window will open. Click on Done.
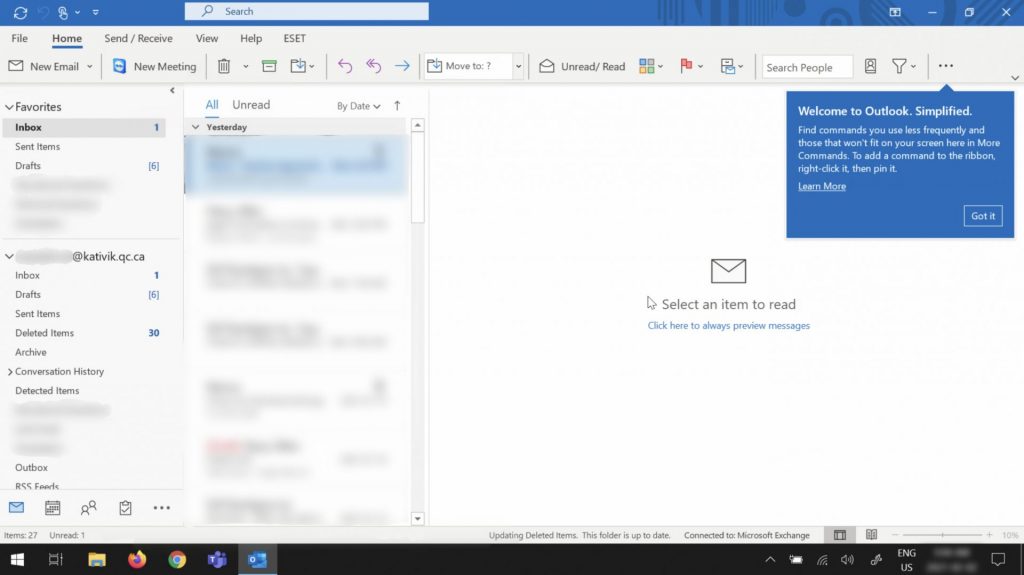
Your email can now be accessed easily through Outlook.
Using a Web browser
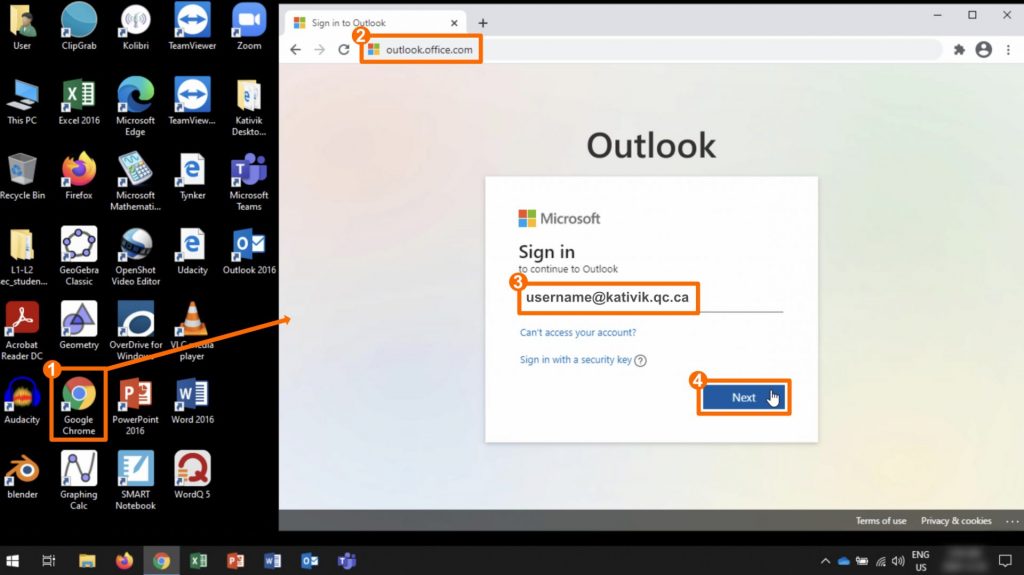
- Double click on the Google Chrome web browser icon on your desktop.
- In the web browser URL space, type the address outlook.office.com and press enter in your keyboard.
- To sign in to your KI email account, type in username@kativik.qc.ca.
- Click on Next.
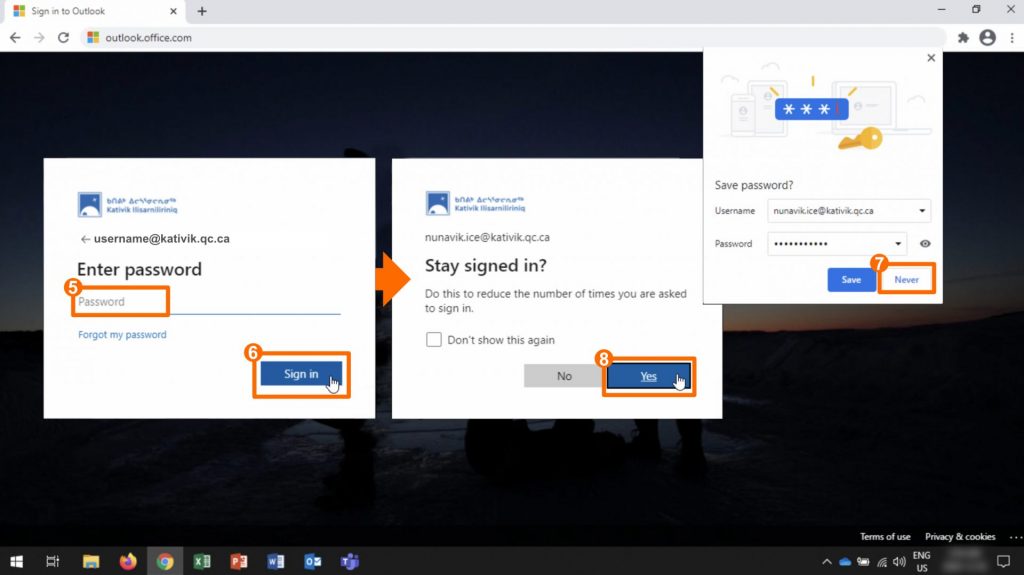
- Type in your password.
- Click on Sign in.
- The Google Chrome web browser will ask if you want your informations, including your password, to be saved. We suggest selecting Never.
- Outlook will ask if you want to stay signed in. You can click on Yes.
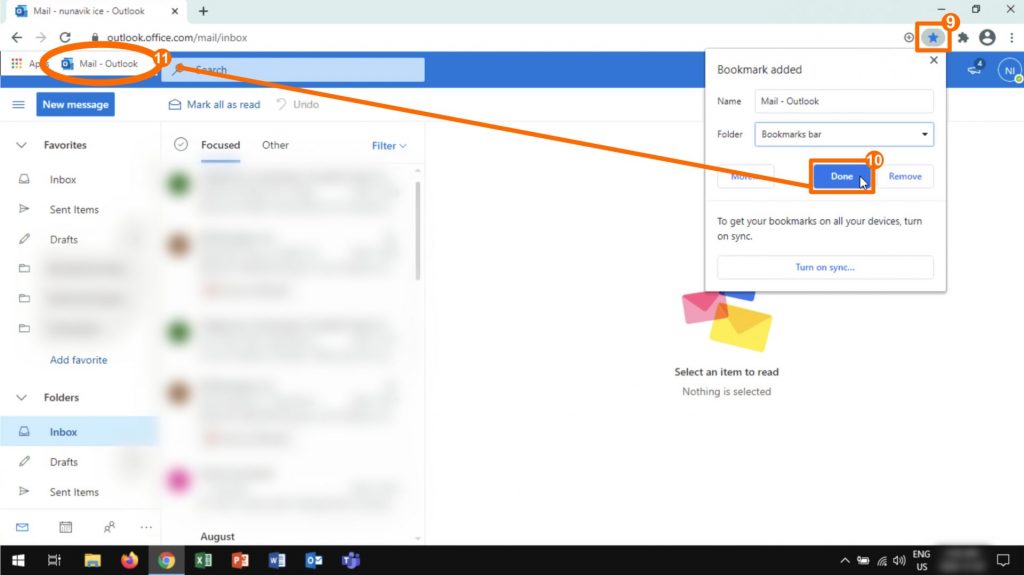
To access your email faster in the future, we suggest adding a bookmark. This is optional.
- On the right of the web browser URL space, click on the star icon to add a bookmark.
- On the bookmark window, click on Done.
- Next time you open Google Chrome, your email will be accessible in only one click!
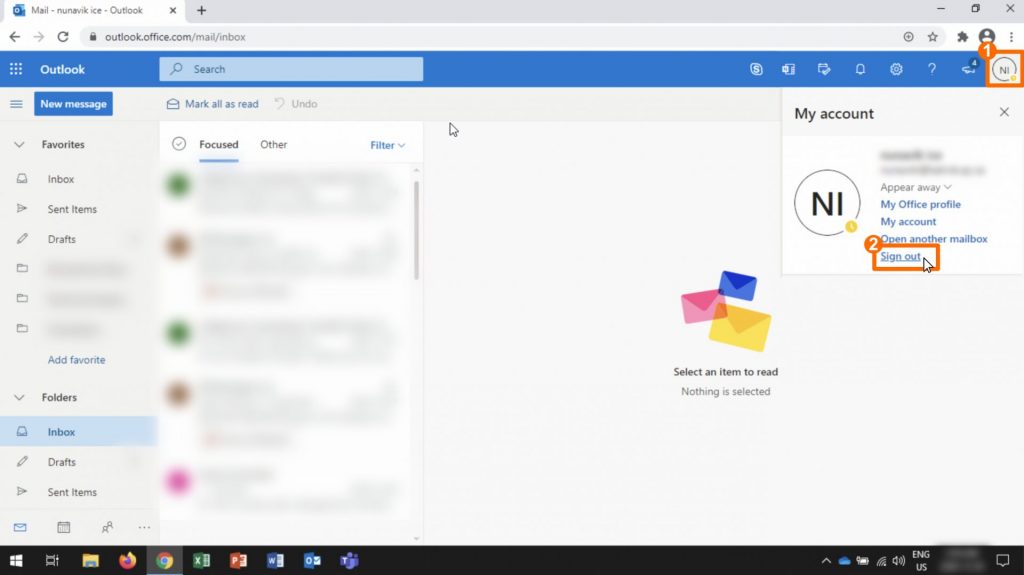
Once you are done, you can sign out to protect your data.
- Click on your initials, located in a circle in the upper right corner of the screen.
- Click on Sign out.
Where to Store your Files?
We suggest two different approaches for you to store your files.
- The first approach is to store the files on your computer, in the Documents folder.
Pros: This solution does not rely on an internet access.
Cons: The files only exist on your computer and could be lost if something was to happen to your computer.
We recommend this approach, and suggest you use a USB drive to store copies of your files.
- The second approach is to store the files online, using the Microsoft OneDrive attached to your KI email address.
Pros: Your files are safely saved online and accessible from any computer using your KI email address and password.
Cons: This solution relies on a stable internet connection.
Accessing the Documents folder, where you should store your files
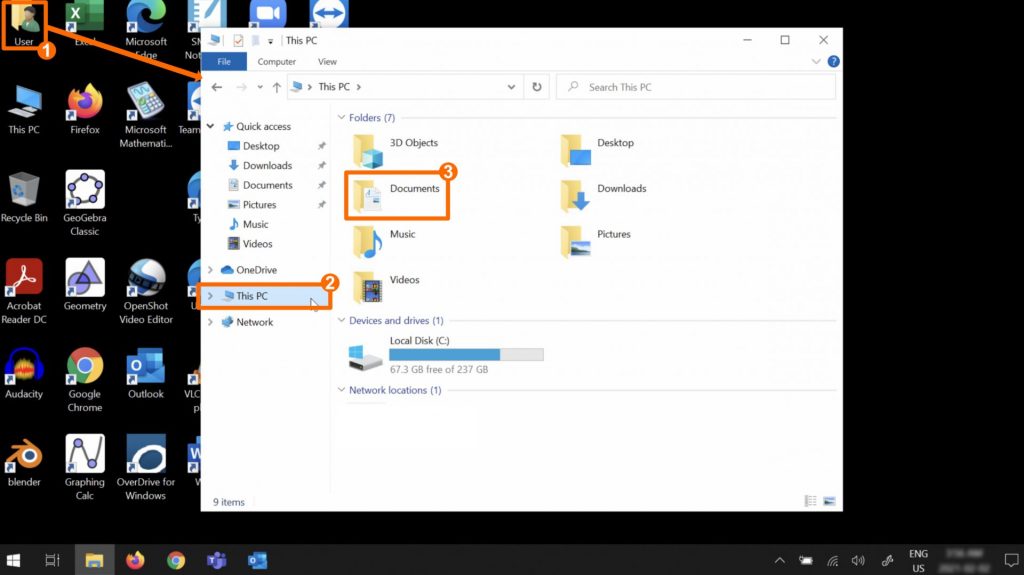
To access the Documents folder:
- Double click on the User icon on your desktop.
- In the left hand side menu, select This PC.
- Click on Documents.
*The files you store in the Documents folder are only accessible through the session you used to sign-in. For example, if you signed in using the Teacher session and create files, the Enseignant sessions will not allow you to see these files.
Saving your files on OneDrive
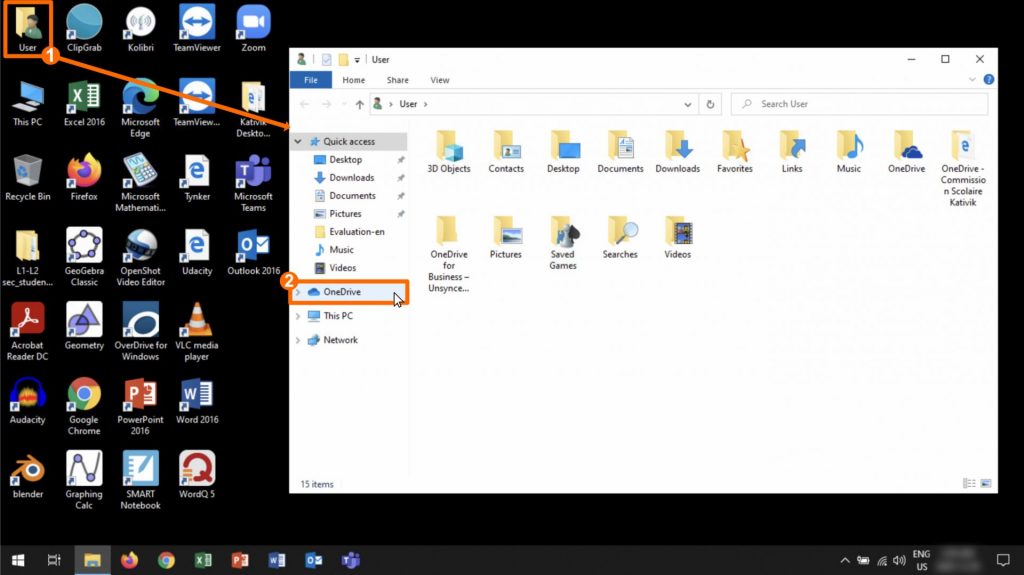
- Double click on the User icon on your desktop.
- On the left hand side of your files browser, select OneDrive.
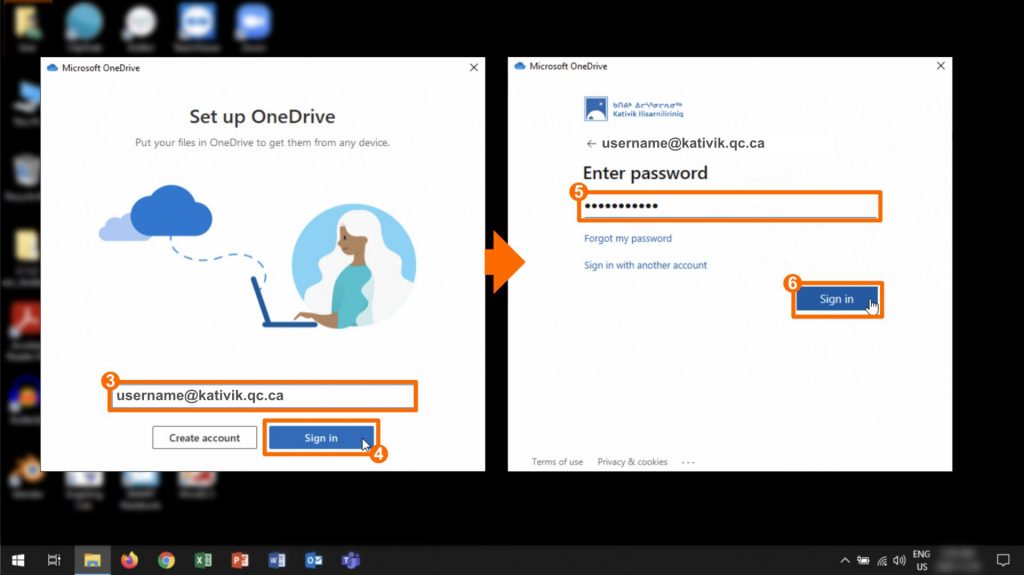
- Type in your username@kativik.qc.ca (the same one you use for your email).
- Click on Sign in.
- Enter your password (the same one you use for your email).
- Click on Sign in.
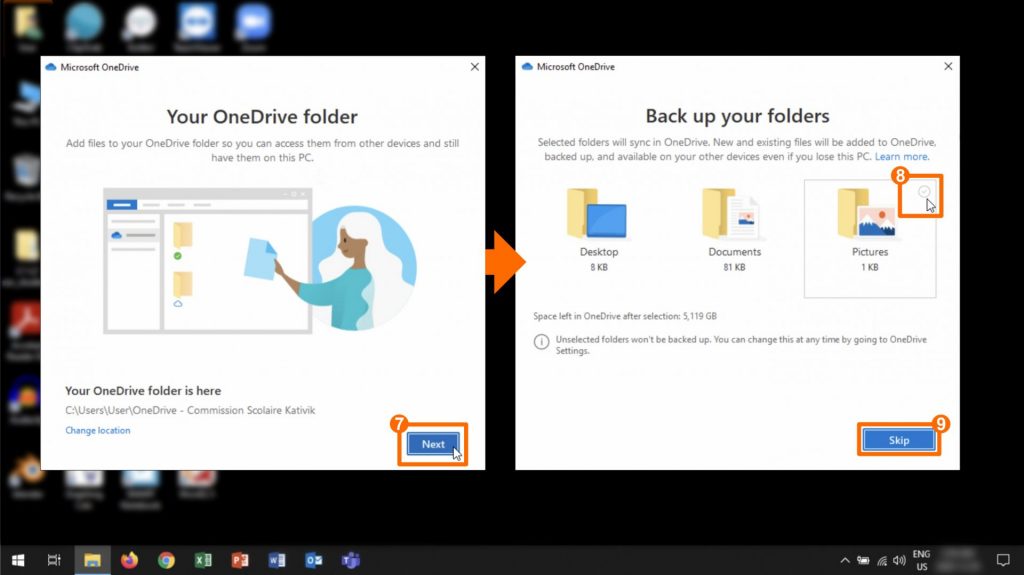
- On the Your OneDrive folder window, click on Next.
- Choose if you want to automatically save the content of your Desktop, Documents and Pictures on OneDrive.
- Depending on your choices, click on Next or Skip.
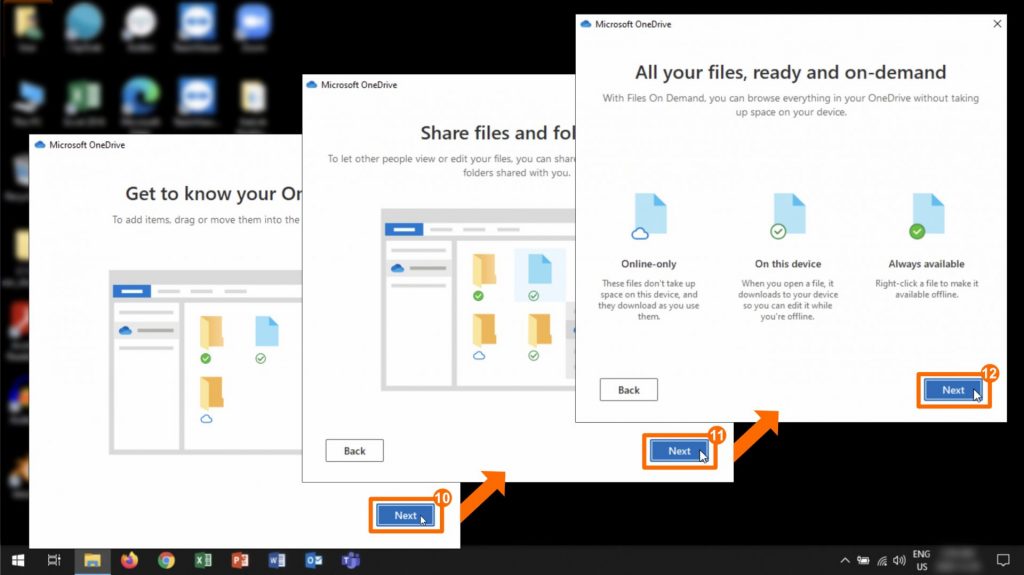
The next widows are only information.
- Click on Next.
- Click on Next.
- Click on Next.
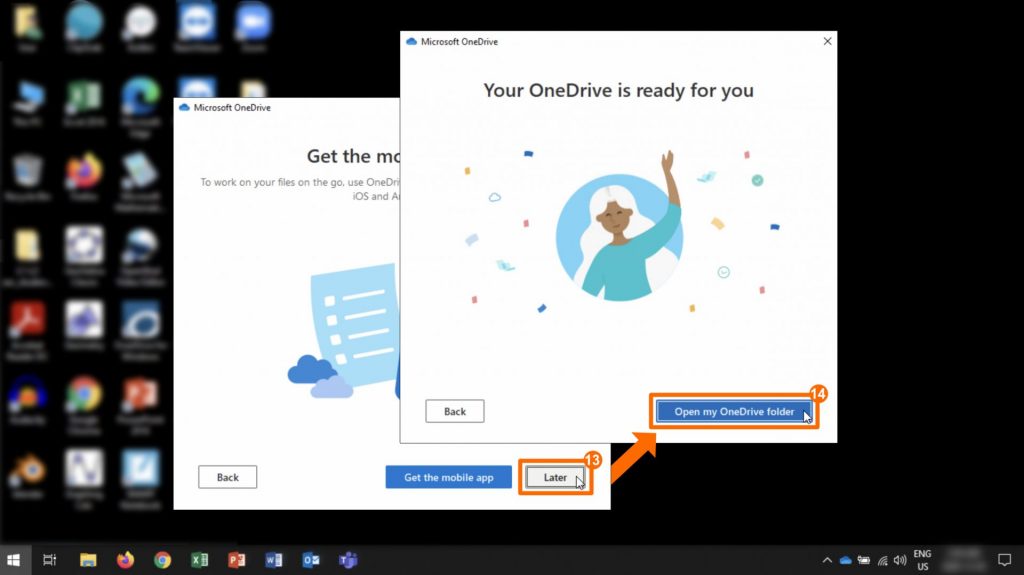
- The next window suggest you get the mobile app. Click on Later.
- To complete your OneDrive setup, click on Open my OneDrive folder.
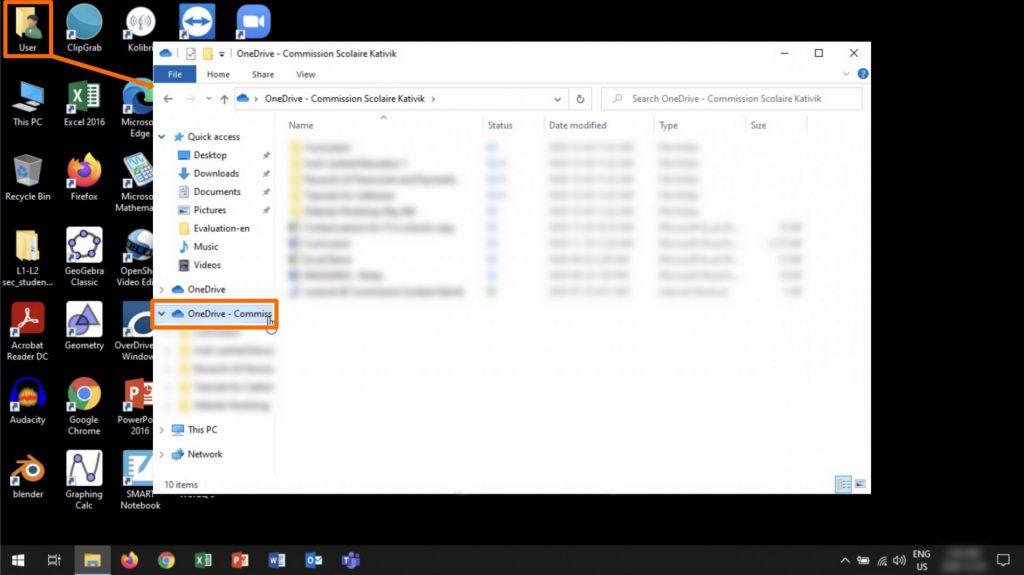
From now on, save and access files within your OneDrive folder.
That folder can be used even offline, and will save your files online when it is connected to the Internet.
Using Microsoft Software
In order to use the Microsoft 365 software installed on your computer, such as Word, PowerPoint and Excel, you will have to login using your KI email address username and password. These steps should only be required the first time you use any Microsoft 365 software.
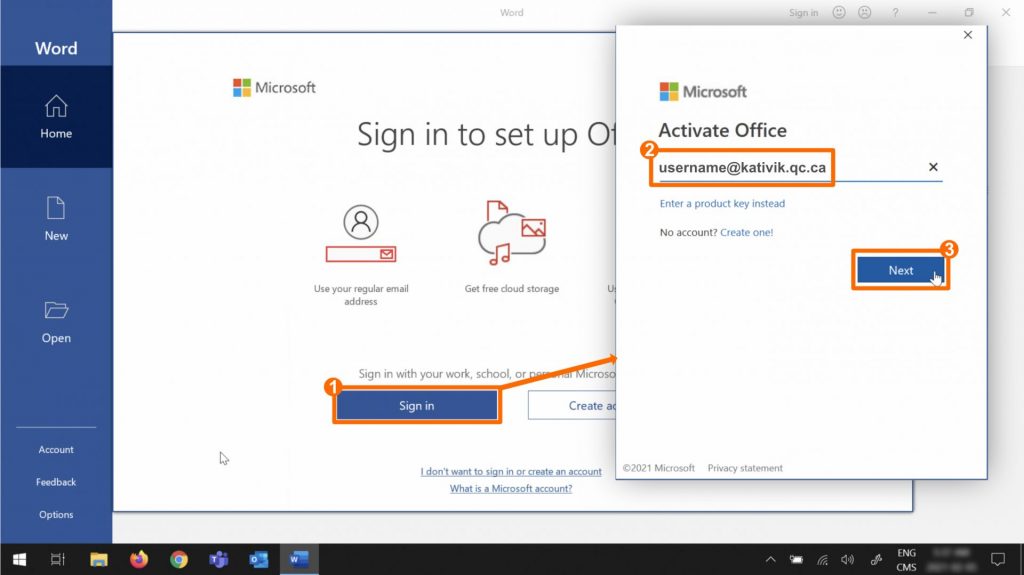
The first time you open a Microsoft 365 software (Word in this example), you will land on the Sign in page).
- Click on Sign in.
- Type you username@ kativik.qc.ca (the same one you use for your KI email).
- Click on Next.
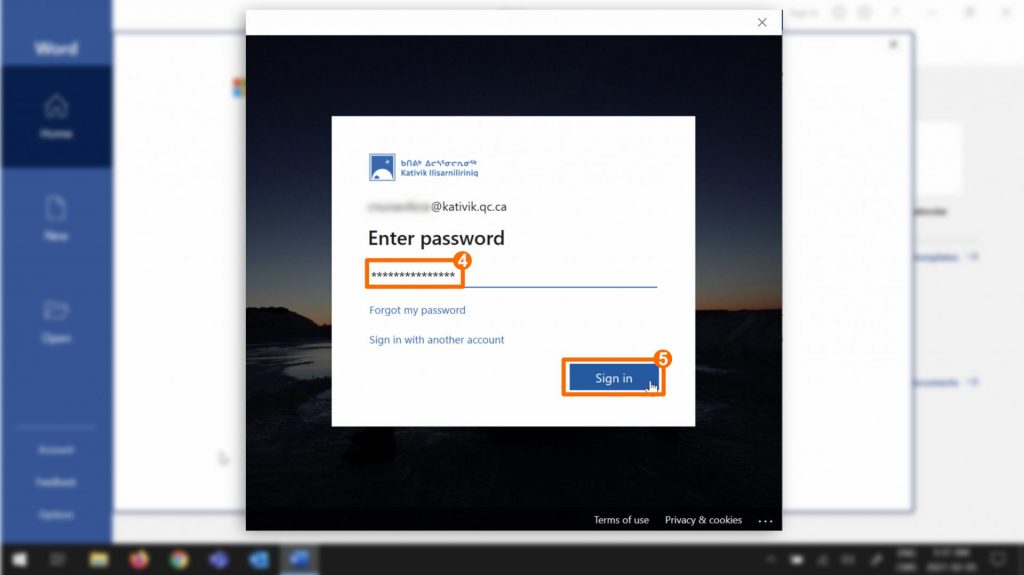
- Enter your password (the same one you use for your KI email).
- Click on Sign in.
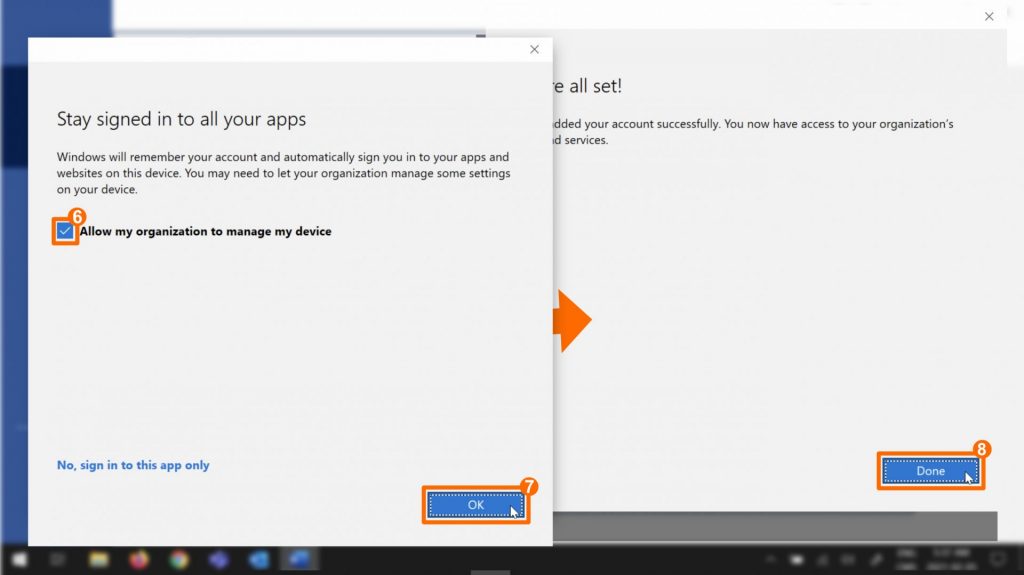
- Select Allow my organization to manage my device by ticking the box. This way, all Microsoft tools will be connected to your KI email account.
- Click on OK.
- A confirmation window will open. Click on Done.
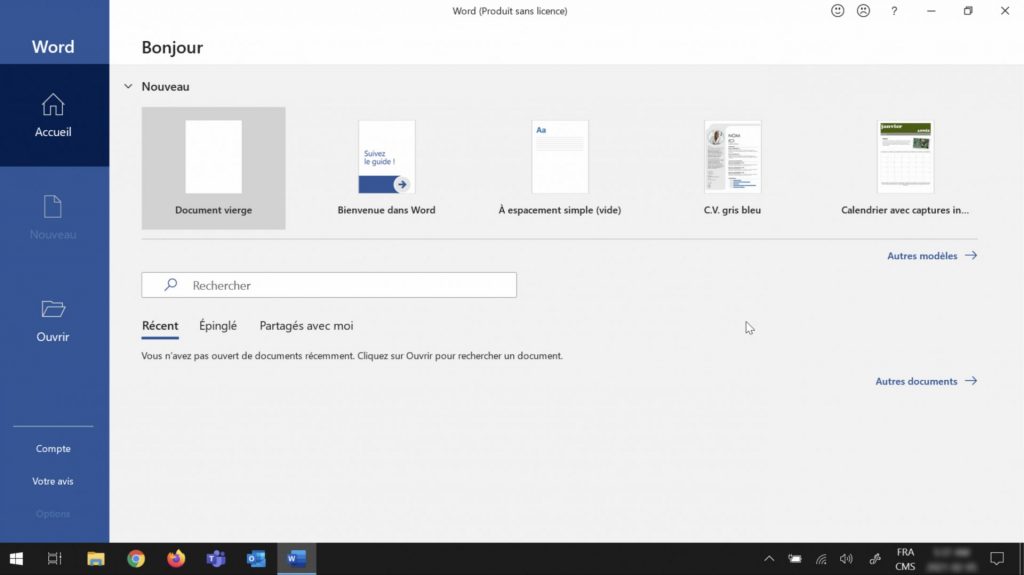
You are now ready to use your Microsoft 365 Software.
Managing Notifications
Notifications are messages shown on screen by different software. Incoming emails or reminders for calendar events will generally appear as notifications. In order not to be disrupted by notifications while you teach, we suggest turning them OFF.
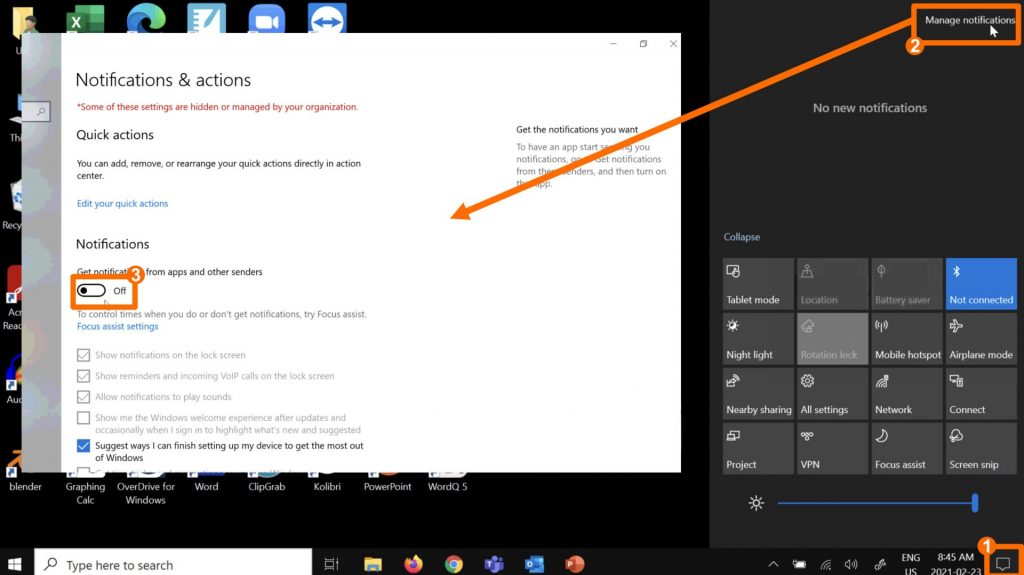
- Click on the Message icon located in the bottom right corner of the screen.
- Click on Manage notifications.
- The notifications settings will open. Turn all notifications ON or OFF using the toggle switch.
Printing
In order to print on your school’s printers using your new KI computer, you will have to install the printer drivers.
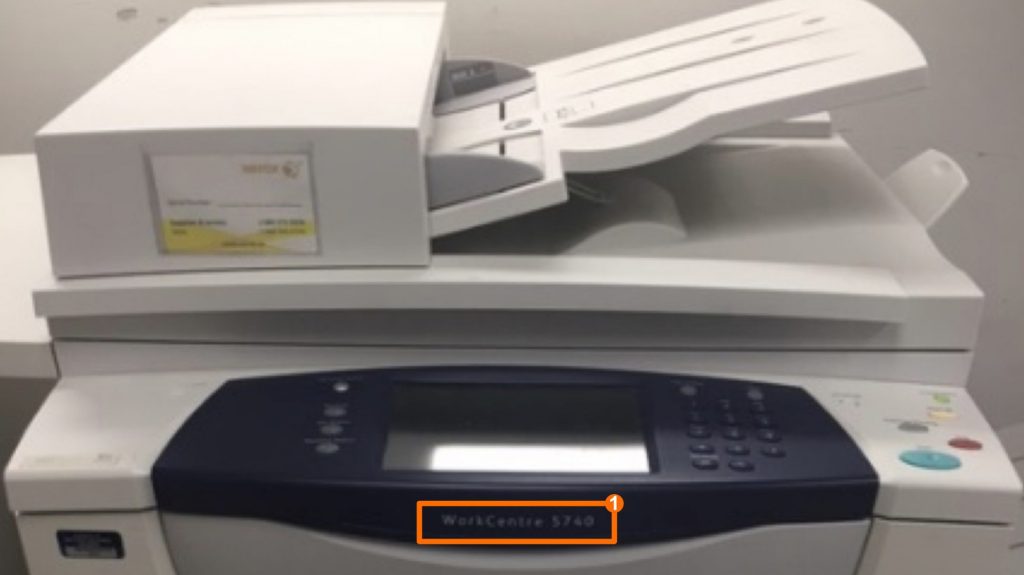
- Identify the make and model of the photocopier/printer you wish to install on your laptop.
- In this example, we are installing the Xerox WorkCentre 5740 photocopier/printer.
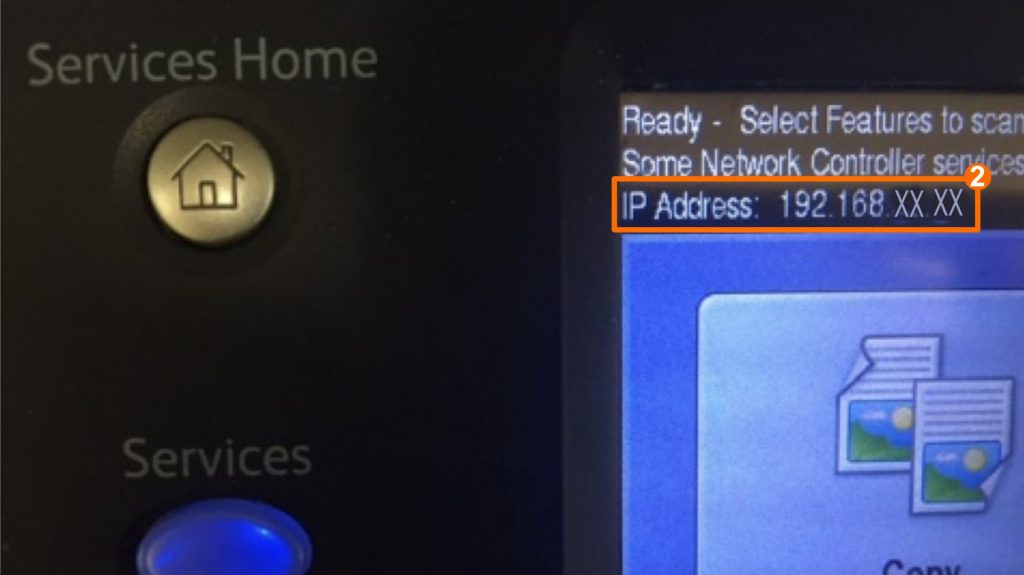
- Identify and note the IP address of the photocopier/printer. Write down the IP address. You will be required to enter it on your laptop during the installation process.
- Often, a label affixed to the photocopier/printer will identify that machine’s IP address. Look for a sequence of numbers such as “192.168.xx.xx”.
- You may also retrieve the IP address by accessing the appropriate menu. In this example, pressing the “Services Home” button displayed the IP address on the screen.
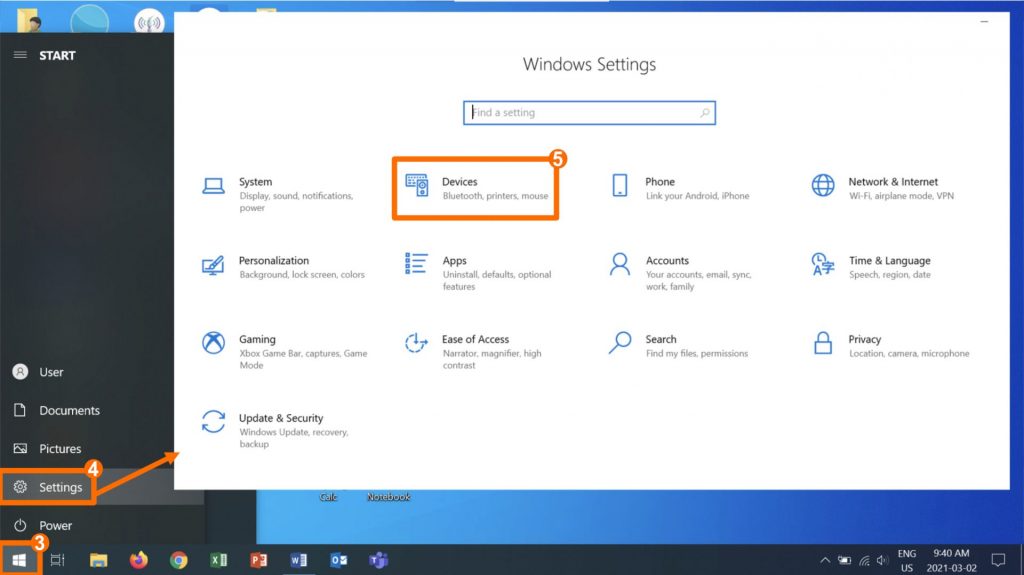
On your computer:
- Click on the Start Menu.
- Launch the Settings utility.
- In the settings window, Click on the Devices icon.
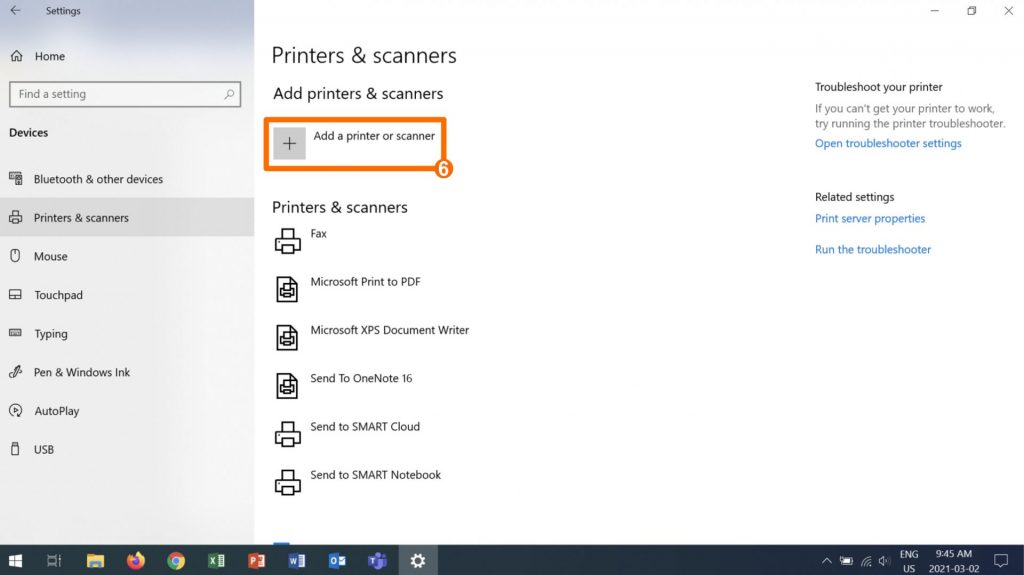
- Click on Add a printer or scanner.
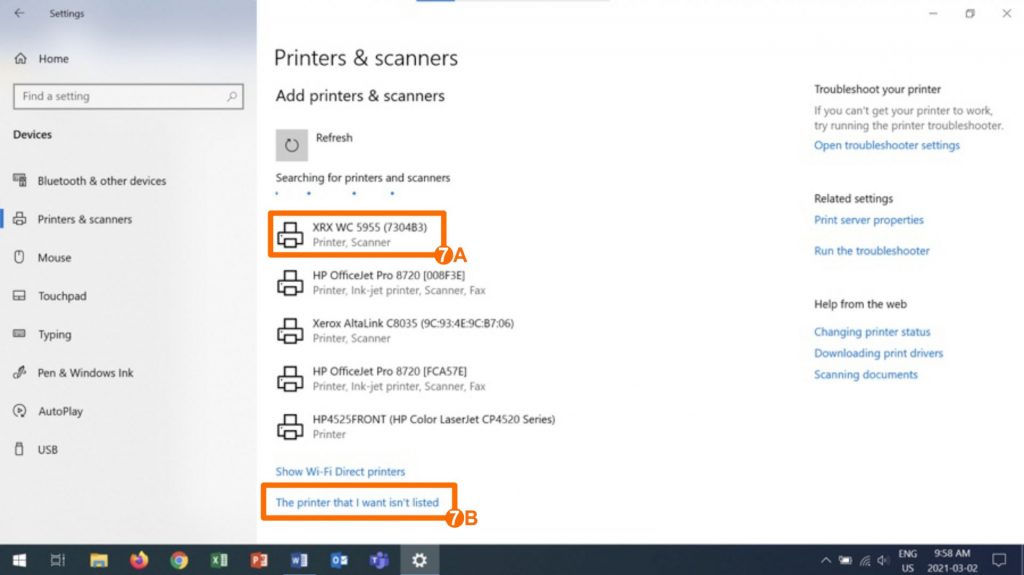
The computer is searching for printers & scanners on the local network. Those that are found are listed just below the Refresh icon.
- A If the printer you want to access is listed, click on that printer’s icon and it will be installed.
B If the printer you want to install is not listed, click on “The printer that I want isn’t listed”
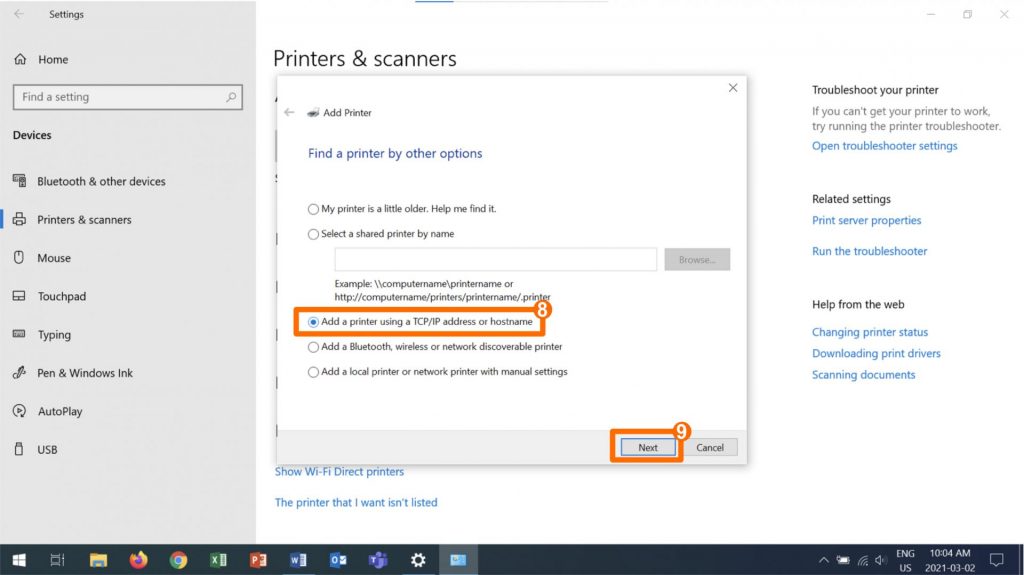
If you selected 7B:
- Select Add a printer using a TCP/IP address or hostname.
- Click on Next.
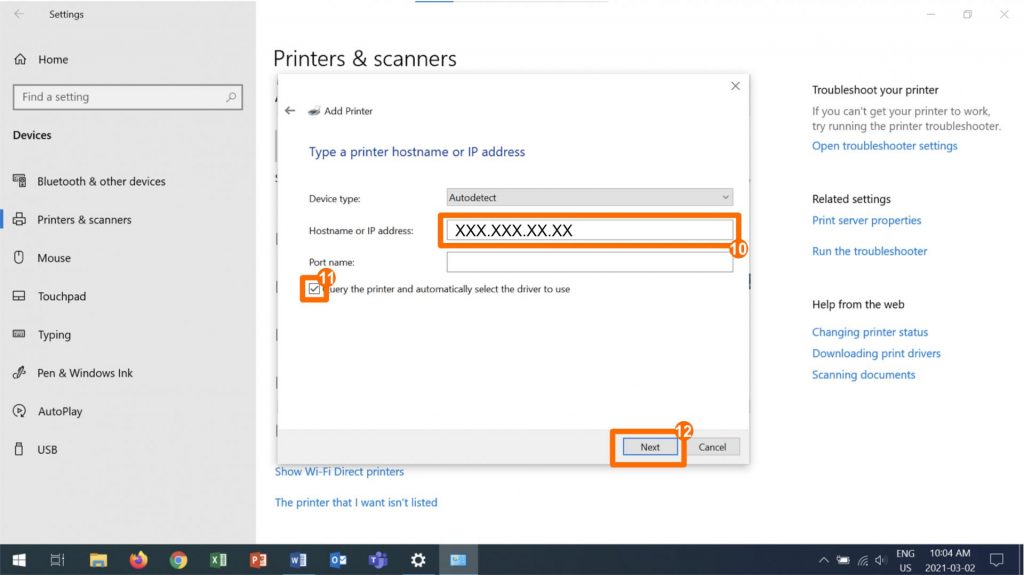
- Enter the IP address you identified earlier in the Hostname or IP address field. Ignore the Port name field
- Make sure the option to Query the printer and automatically select the driver to use is selected.
- Click on Next.
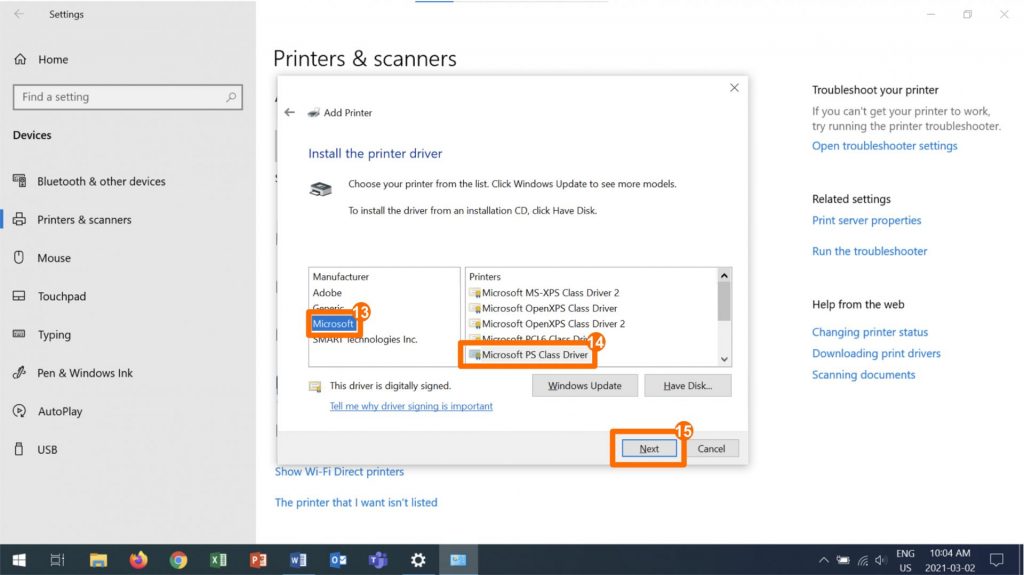
- In the Manufacturer column, select Microsoft.
- In the Printers column, select Microsoft PS Class Driver.
- Click on Next.
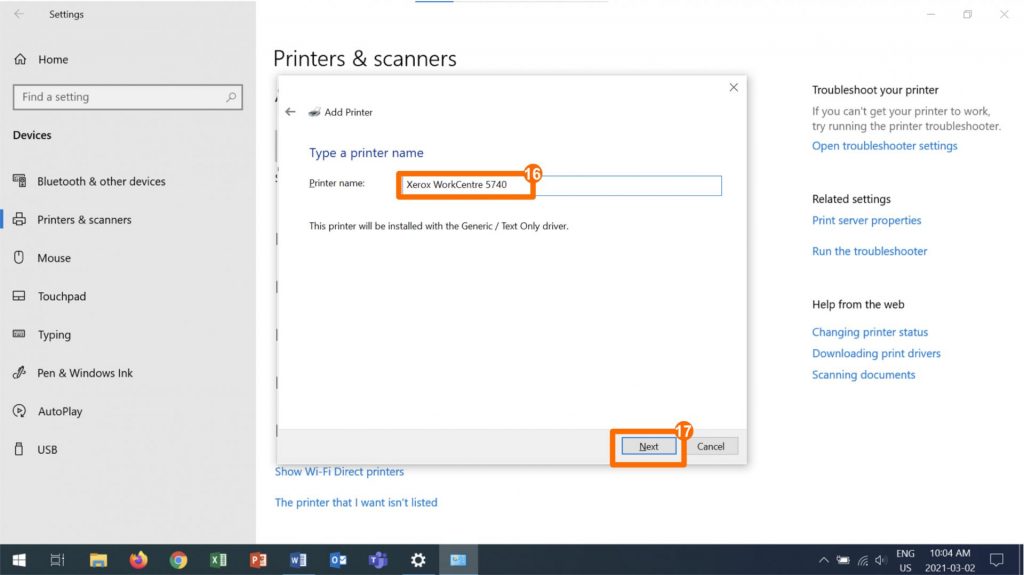
- Choose a name for the printer. The printer name indicated on the image is only an example.
- Click on Next.
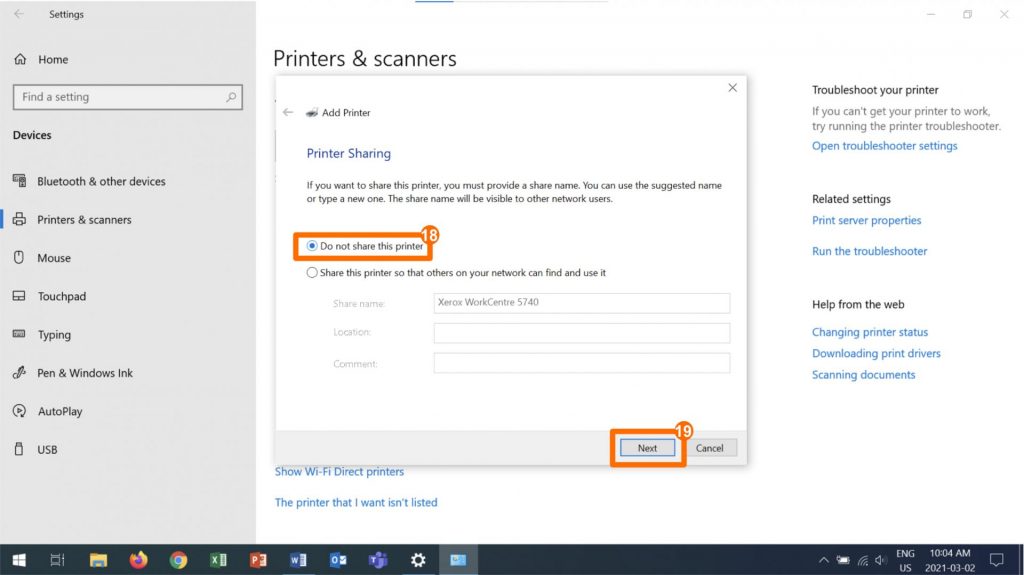
- Select Do not share this printer.
- Click on Next.
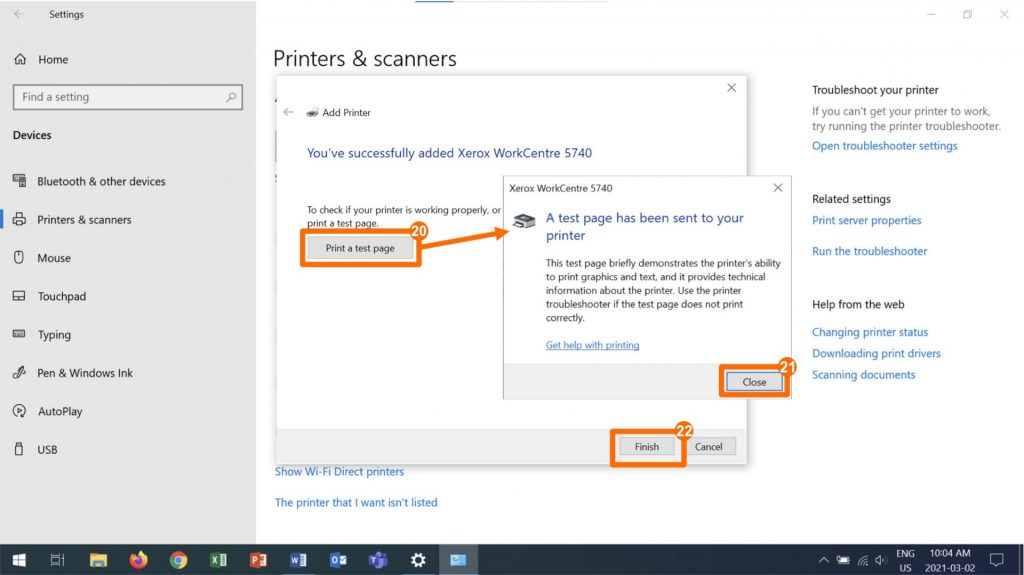
A confirmation window will appear.
- Click on Print a test page.
- Close the confirmation message and go to the printer to make sure your test has in fact printed. It should look like this.
- Click on Finish.
Accessing DB Server
DB Server is a tool used by KI to give teachers access to educational resources even without access to the Internet. Your KI computer can access the DBServer when (and only when) you are in the school and connected to the school Wi-Fi network.
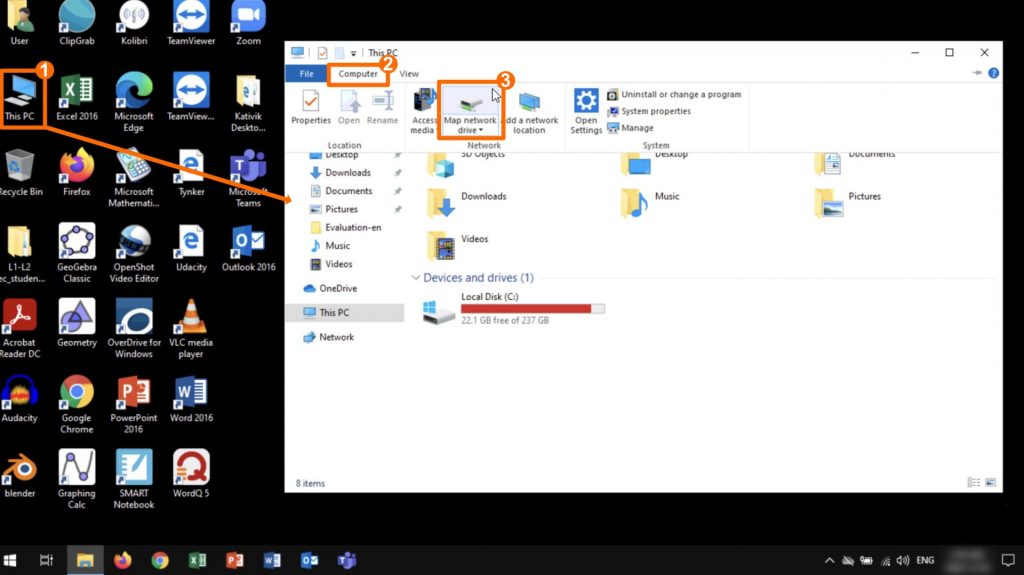
- Double click on the This PC icon on your desktop.
- In this new window, click on the Computer tab.
- Click on Map network drive.
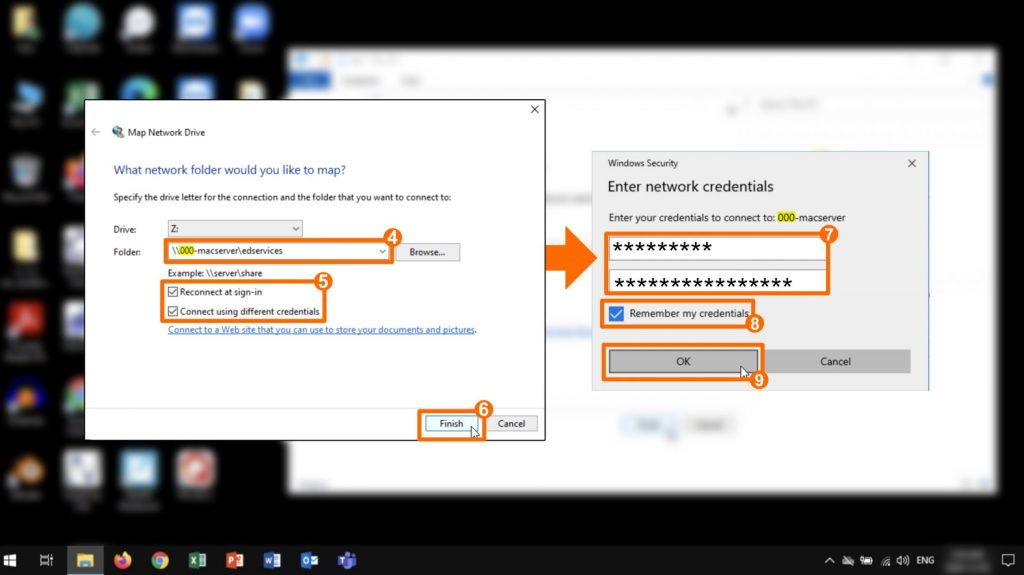
- Type in the DBServer folder address that corresponds to your school (see appendix A).
- Tick both the option boxes (Reconnect at sign-in AND Connect using different credentials).
- Click on Finish.
- Type in the username and password for your school.
- Tick the Remember my credentials box.
- Click on OK.
*Click here to download the procedure, troubleshooting and passwords to access DB Server.
Accessing DASH
To simplify your access to DASH, you will find shortcuts towards each school’s DASH portal on the desktop of your computer. This folder is only available on the User or Usager sessions, designed for teachers.
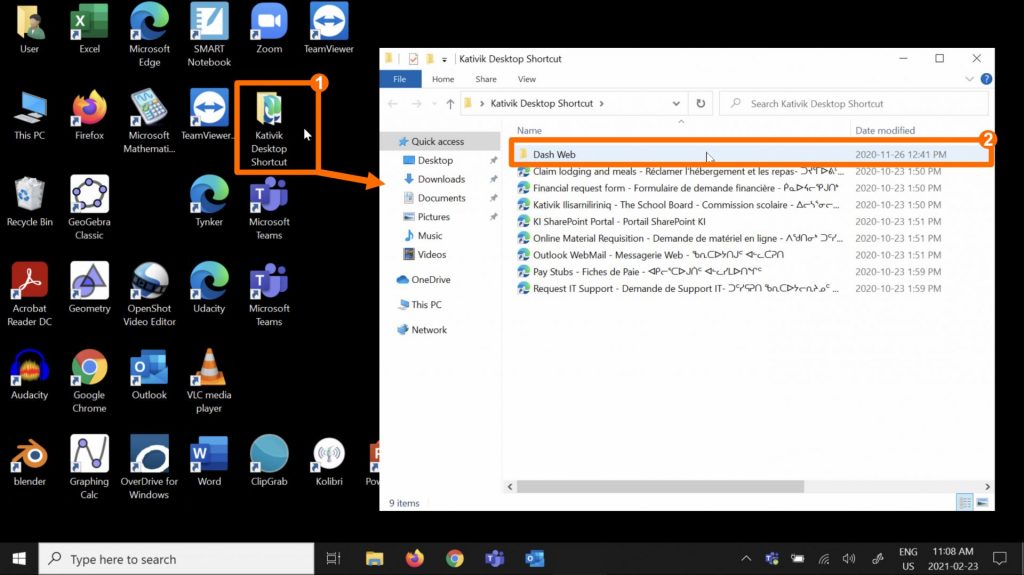
- On the desktop, double click on the Kativik Desktop Shortcuts folder.
- In the window that opens, select Dash Web.
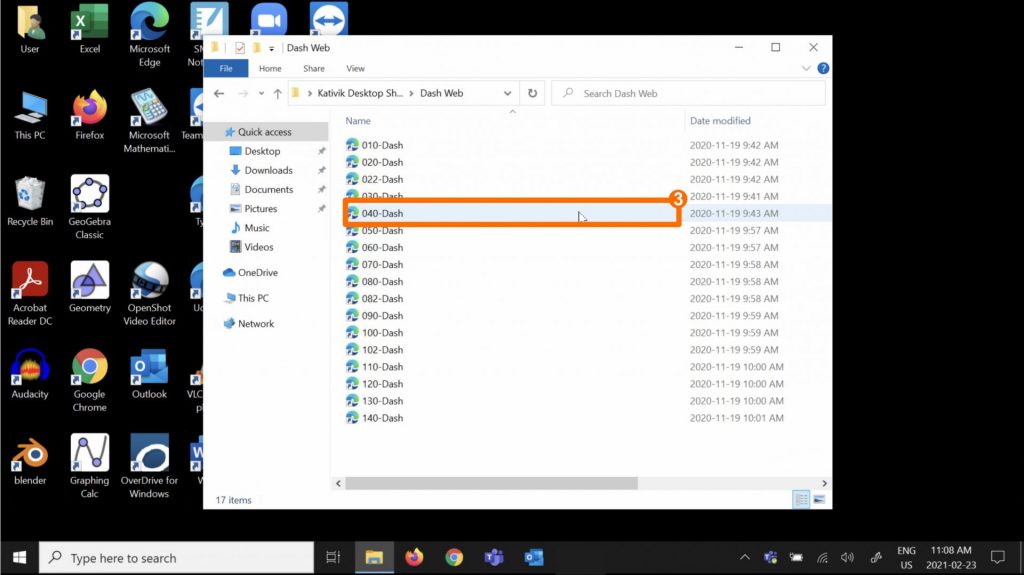
- Identify your school in the list and double click.
DASH will automatically be opened in a Web browser window.
Create a Shortcut on the Desktop
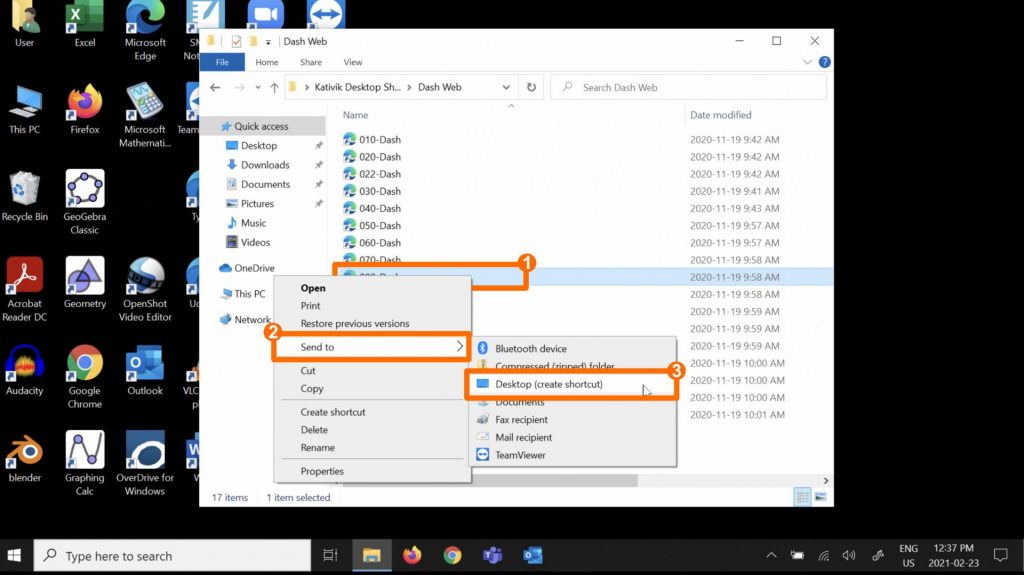
If you want to access DASH even faster, you can create a shortcut directly on the desktop.
- Identify your school in the list and right click to open the options.
- Select Send to.
- Select Desktop (create shortcut).
This shortcut will appear on the desktop.
Using the Stylus
In order to use the Stylus provided with your DELL Latitude 5310 2 in 1, you will have to install batteries in the stylus and pair it with your computer using Bluetooth.
